Scratch-N-Stamp
Search

Checkout

Keep up with Sales, New Products and other events at Scrap `n Stamp. Sign up for our newsletter now!

What's New

Hot Deals


Prima

It’s Blended!

Nancy here with you today to share a quick and easy (and late) Mother’s Day card with you!

Scrap ‘n Stamp Canada is doing another month long word of the day challenge.  For today, the prompt is “Blended” so I did some ink blending on a card I made for a friend to give to her daughter for her first Mother’s Day!

Here’s a look at the graphic for all the days of May, in case you missed it!

I had fun playing with colours on this card… I sure hope that they go together.  I miss having my friend Bonnie over to help me with decisions!

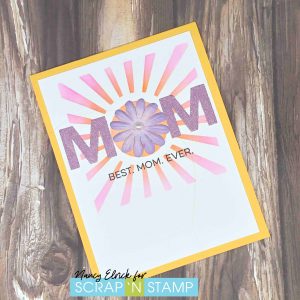
I started with placing my cardstock behind my stencil… my stencil is the one that has the sunburst more in the corner so I played around a bit to get it more centred from left to right.  I love Purple Tape for this!  I then blended on some pink and yellow Gina K inks and it created more of an orange than I had hoped for thanks to getting the pink on more of the stencil than I had planned.  I cut the letters from some purple glitter paper and stamped the sentiment underneath.  And in a strange twist of events (for me) I stuck with the yellow card instead of just doing a layer.

Items Used:

*Carstock:  Neenah Solar White; Lawn Fawn Sunflower; purple glitter from my stash

*Images:  MFT All About Mom

*Ink:  Gina K Wilde Dandelion and Passionate PinkVersafine Clair Nocturne

*Dies:  MFT Mom

*Stencils:  Picket Fence Studios Sunburst

*Tools:  Gemini; Picket Fence Studios Life Changing Blender Brushes

*Embellishments:  Studio Katia Arctic Breeze Pearls; old old old Prima flower

Be sure to create some cards using our prompts and share them on our Facebook Challenge Page!! We will be choosing one person at random at the end of the month to win a small shopping spree at Scrap ‘n Stamp!

It’s Blended! Read More »

Tuesday with Tara {take 238} oh happy day

Happy Tuesday!  I love it when my artwork pops up in my ‘memories’ on facebook.  The project I’m sharing with you today is from several years ago, but since it features a couple different techniques with stencils I thought it would be a fun one to re-visit!  It’s also just a happy little project that I hope brings a smile (and maybe a bit of sunshine) to your day!

enjoy this little throwback…

Today I’ve got a tag to share with you- hope it adds some happy to your day!  Links to products I used are at the bottom of this post 🙂

IMG_9314

IMG_9315

I wiped some white gesso on the tag as a base, stamped the cone flower in black archival ink and colored it with Distress Crayons and a water brush.  I added some washi tape and texture paste over that, adding some scratchy details with texture brushes.  The blossoms were stenciled with a combination of two fabulous Distress Ink colors (the same colors were used to dye my crinkle ribbon!).

IMG_9316

I stenciled these moths/bees with texture paste then inked over them with Vintage Photo Distress Ink once they were dry.

IMG_9317

Here’s a look at the tag without the ribbon topper:

IMG_9318

Supplies used:

Inky hugs,

Tara

Tuesday with Tara {take 238} oh happy day Read More »

Tuesday with Tara {take 223}

Happy Tuesday!

Today I thought I’d share some Halloween tags with you! I made these a couple of years ago for a blog hop we had featuring Tim Holtz’s “Ancestors” Paper Dolls (which are on sale right now) and all my tags show how fantastic Distress Oxide Inks are simply stamped or stenciled on BLACK paper. Hope you like them!

Freaky Friday Tags

(see the full original post from Oct 13, 2017)

I’ve been enjoying getting creative with the Paper Dolls by Tim Holtz, and these new additions add a creepy touch to the mix. There are a few seasonal images included, with costumes and pumpkins, as well as some regular type portraits with creepy expressions!  It’s a nice mix if you want a variety of paper dolls to work with!  I chose to use some of the ‘regular’  images and make a creepy/romantic tag, pairing a couple of single dolls together.

My plan was to create a set of tags that could be attached to treat bags for Halloween- if it happens, this one will go on the one I give my husband!

The technique

I started with black #8 tags and Distress Oxide Ink, stamping a background pattern (numbers by Dyan Reavely) directly on the tag. Then I continued, applying the same ink through a stencil (birds by Dina Wakley) over it to create my background design. I am not a big Halloween crafter, so chose some ‘neutral’ designs that I thought would work with the overall feel I was going for.  It’s good to have basics in your stash!  I selected my paper dolls and chose to add a few spots of color to them with Distress Markers.  I didn’t have a perfect match, but wanted a monochromatic look for this tag so went with a similar shade of purple.  The ink puddled a little bit in some places, so I dabbed with a cloth until I got the desired look.

I wrapped some sheer black ribbon with twine to add texture. Then I finished it off with a metal embellishment (this fancy lock is by Prima) and some occasions chit chat stickers.

The tags

I created a couple more tags as well, which you can see all together here.   Here’s a shot of the backgrounds I started with… 

… and the set of finished tags:

There is still some time for Halloween crafting, especially if you keep it simple & spooky 🙂

Inky hugs,

Tara

Tuesday with Tara {take 223} Read More »

Free Shipping Anywhere In Canada