Scratch-N-Stamp
Search

Checkout

Keep up with Sales, New Products and other events at Scrap `n Stamp. Sign up for our newsletter now!

What's New

Hot Deals


Stampendous

Apple of my Iris

Happy Funday Sunday!

Crafting is the apple of my iris….and the theme for today’s Blog Post!  I decided to combine the Facebook Challenge word of the day “apple” and the older technique of “iris paper folding” to tackle a common crafters problem…. what to do what all your patterned paper!

I have been doing some craft room cleaning and reorganizing and during this process I have come across a lot of patterned paper that I have purchased over the years with good intentions to use and…..well, I still have it!   So, I decided I was going to finally use these papers and the iris paper folding technique is a fun and easy way to do this!

The first thing you want to do is to search on the good ‘ol inter web for an iris folding pattern that you like.  You can choose from a square, triangle and there are even apple specific templates.  I decided to use a square template as I like its versatility with different patterns and that I could use four different colours.  I printed the template out and laminated it so that I could reuse it.  This will be our guide on where and how to line up each strip of paper.  The next thing to do is pick out a die cut pattern.

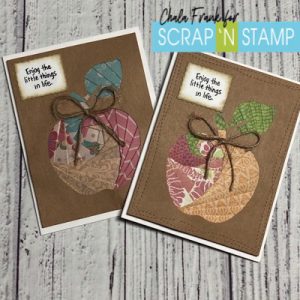
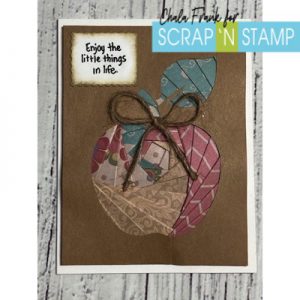
I was enamoured with the new Lawn Fawn Stitched Apple Frames and thought they would work so well with this technique to create a fun fall card.  In fact, any shaped die would work well with this technique!  Unfortunately, I wasn’t able to get this die in time for this post, so I pulled out my Silhouette machine and found a digital cut file that would work and cut the apple out from some kraft cardstock measuring 5 1/2 ” 4 1/4″ (standard A2 size panel).  we will be using the negative cut out portion and I will save the die cut apple pieces to use on another project.

I then pulled together some of the patterned papers that I thought would work well with together and that would look good under the apple.  I cut these papers into strips measuring 1″ wide.  The length of the strips of paper depends on how large your image will be.  I then score and fold each strip of paper in half at the 1/2″ mark.

Now the fun begins!  You will want to turn your negative die cut panel piece so that the “good side” is face down on top of the template.  If you are using the square template, you can move it around to get the best position for the iris.  Once I found the position I liked, I taped the panel down onto the template with some Thermo -Web Purple Tape.

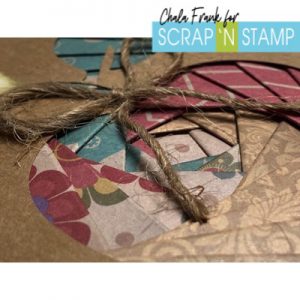
The template I am using already is numbered and colour coded.  I will assign a colour to each patterned paper. Now I just start adhering the paper pieces following the number and colour order.  For this particular die I won’t be started at the number 1, I will have to look for the lowest number and then follow numerical order from there.  You will want to adhere the strips of paper so that the folded edge aligns with the template line (towards the iris).  I trim the strips to the length needed and adhere them down to the edges of the panel.  I am using a double sided adhesive tape runner to do this, however, you can use clear tape as well if you like.

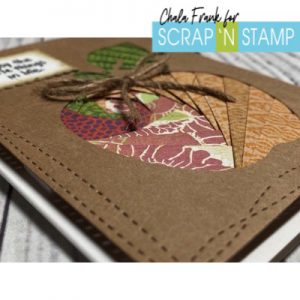
Once you have worked your way around and have adhered all your strips you will be left with a square (or triangle if you are using that template).  For this, you can leave it open or you can adhere any colour of paper to cover the opening.  I chose to use one of the pattern pieces I have already used, but you could also use foil or glitter.

I then trimmed down any pieces that over hang the panel.  There is a bit of bulk to this panel so I thought it was best to adhere the panel to the card base was with some double sided foam tape.

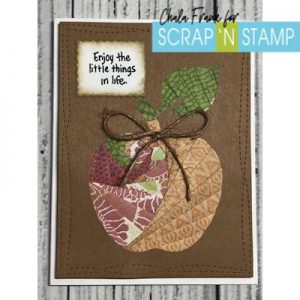
I die cut a scalloped rectangle and used a sentiment from Stampendous Life Words stamp set and VersaFine Clair Nocturne Ink.  I also did a little inking on the edge in Frayed Burlap Distress Ink and a finger dauber.  The last thing I added was a twine bow and I adhered that with some Glossy Accents.


For my second card I just switched the pattern papers and die cut the panel with the My Favorite Things Wonky Stitched die.

I really like how both cards turned out and I am looking forward to using up more of my papers on future card projects.

I hope you have an amazing week full of creative energy!

~Chala


Apple of my Iris Read More »

Fun With Distress Oxides

Hi Everyone. It’s March 1st and it’s still so cold out. I’m really

hoping it warms up soon. I spent last night in my craft room

where it’s warm playing with my distress oxide inks. I set the

camera up to record all the fun but apparently I forgot to hit

the record button – oops. But I do have lots of pics for you.


I pulled out my distress oxide inks and couldn’t decide which ones to

use, so… I used them all 🙂 I cut a piece of watercolor cardstock to

5 1/8 x 3 1/4″ and set about making the background. The amazing

thing about oxide inks is the colors layer on top of each other.

Normally when you layer as much ink as I did it would end up

looking like mud but with the chemical combination in oxide inks

makes it so they layer. It’s all very sciency and super cool!

To make the background, start by smooshing one color of ink onto a

craft mat. Give it a few spritz of water and start pouncing the water

color paper into the ink. Use a heat gun to dry the ink and then

repeat the steps with a new color of ink. Be sure to dry each color

before adding the next one – this is key to building the layers.

Here’s a close up – check out all those colors sitting on top of each

other – so cool!

I’m really sorry I didn’t get a video for you and hope that the

instructions make sense. If you have any questions, please leave them

for me below and I will do my best to help.

Now for the little guy blowing bubbles – isn’t he adorable. The

stamp set is called Bubble Boy from Penny Black and reminds me

of when my kids were little and spent hours blowing bubbles. I don’t

have the actual stamp but I do have the digital image so I printed

it off, colored him in with Prismacolor pencils and then fussy cut

him and the bubbles out. I added a strip of grey cardstock at the

bottom and then adhered bubble boy with some craft foam for

dimension. The sentiment is from Happy Messages by Stampendous.

I performed a little stamp surgery and cut the words apart so I

could easily stamp them in a straight line.  To finish it off I added

the thin strip of black cardstock.


I hope you enjoyed this card and are inspired to create. If you have

any questions, please don’t hesitate to ask.

Be sure to check out the Scrap’n Stamp Challenge Page.

Happy Stampin’

and thanks so much for visiting!

Susan


Shopping list:


Fun With Distress Oxides Read More »

Poinsettia Watercolour and Gold

Kia here with you today to share a Christmas card I did. I received this stamp as a gift last year, and had not used it until today. I also wanted to make something a bit different, so I decided to use black card stock.

I first die cut a panel, also in the black card stock, using my Memory Box die. The die has a frame, but I opted not to use if for this card. I then prepared the panel suface with my powder tool and stamped with versamark embossing ink and heat embossed with gold embossing powder.

I stamped a second time with the versamark and gold embossing powder on watercolour paper, using Fabriano Hot Press for this project. I wanted my Poinsettia to pop off the black, so I opted to watercolour with Ken Oliver Color Burst powders, using Lemon Yellow, Fuchsia and Alizarin Crimson from the Brights Collection Set. I did several layers of colour, until I was happy with the saturation and look, then set the flower aside to dry. I then splattered gold paint on my black panel, and set that aside to dry. I am one of those people that believes that using a heat gun on watercolour lightens the colours, so when painting something such as a flower, I always let it dry naturally.

Continuing on with the Poinsettia I fussy cut the flower and ran my gold feather pen around the cut edges. I attached the card panel to my card base, then styled the poinsettia and attached using foam squares.

 To finish up I added Nuvo Jewel drops to the berries.

I hope you have enjoyed this card today and wish to thank you for visiting today.


Poinsettia Watercolour and Gold Read More »

Categories: Cards, Color Burst, Stamps
Free Shipping Anywhere In Canada