Scratch-N-Stamp
Search

Checkout

Keep up with Sales, New Products and other events at Scrap `n Stamp. Sign up for our newsletter now!

What's New

Hot Deals


Valentines

Tuesday with Tara {take 136}

Happy Tuesday and happy day-before-Valentine’s-Day!  Today’s card celebrates a love that’s kinda CRAY CRAY, if ya know what I mean… this card took on a life of it’s own as I worked on it, ending up very different than I visualized at the beginning.  But hey, sometimes love is like that too.  It doesn’t mean it isn’t a good thing 🙂

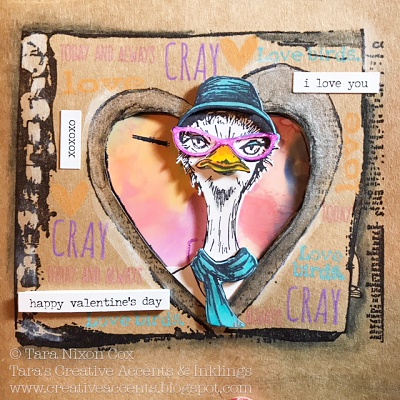
When I got my hands on Tim’s hipster animal stamps I got the idea that they would fit really well peeking through the heart frame in this large Dina Wakley stamp (which is on sale right now!)… so I’ve been waiting to figure out a way to put them together.  Today’s card is what I came up with.  I’ve got a few more ideas (and had several others that didn’t pan out), but I decided to keep this one fairly simple and let the colors and the hip chick speak volumes 🙂

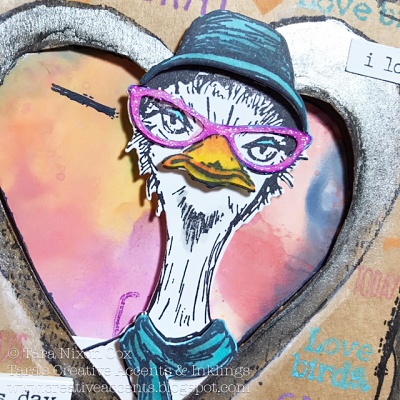
This ostrich image just makes me smile, even though she kinda looks like a grumpy librarian!  I stamped her twice in black on white card stock, cutting the base from one image and the hat, scarf & beak from the other.  I stamped her again in Purple Distress Oxide so I could have colorful glasses to cut out, adding some Nuvo Glitter Drops to it once they were glued to her face.  Colorful glasses are my new favorite thing to do with these stamps & dies!  There is no way I would fussy cut those glasses, but they are amazing die cut! The other elements were all colored with Copic Markers and mounted with foam adhesive.  I kept her white for extra contrast.

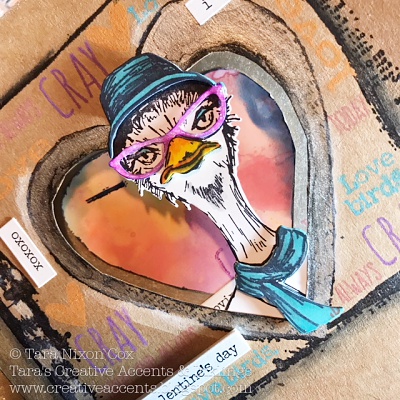
Since I was working with a kraft card, I experimented with a variety of things and finally decided to stamp assorted words/sentiments in Distress Oxide in the open space of the square portion of the frame.  The heart frame was painted with Silver/Sterling paint.  I added some shading with stablio pencils in black & white and a few chit-chat stickers to give extra texture & pop.  As you can see, I cut the heart frame so it was open to the inside of the card and added a piece of colorful paper to show through the window.

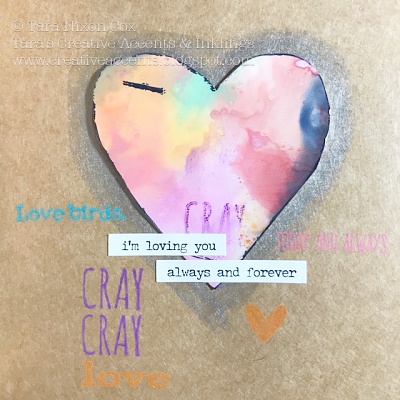
This heart was my first attempt at the Distress Oxide technique Tim shared at Creativation, using them on Glossy/Alcohol Ink card stock and finishing up with Distress Glaze.  I’ll be trying it again and will share the link when I have more success!  I added a bit more watered down silver paint around the heart and finished with more stickers & repeats of the stamped words from the front of my card.

I had fun with this one- like I said, it’s not what I expected when I started creating… but I had fun doing it and I hope it encourages you to look at your stamps and see what sort of combinations you can end up with!

Happy Valentine’s Day!  I hope there’s a little bit of CRAY CRAY in it (the good kind, of course!) and a whole lot of chocolate…

Inky hugs,

Tara


Materials Used:

Dina Wakley cling stamp “Handwritten Heart Collage

Dina Wakley sterling paint

Tim Holtz Hipster stamp & Ostrich dies

Distress Oxide Inks

Assorted words & sentiment stamps

Chit Chat stickers

Glossy/ Alcohol Ink Cardstock

Black Archival Ink

Nuvo Glitter Drops White Blizzard

Tuesday with Tara {take 136} Read More »

Tuesday with Tara {take 84}

Happy Tuesday!

Since I’ve been working on some ATC’s lately, I thought it would be fun to make some Valentines minis!

IMG_9211

I started with a base of watercolor cardstock that had already been inked up with Color Burst and trimmed them down to size (these are slightly wider than a standard ATC).  I used a lot of little bits that were left from previous projects, like die cut words & hearts and book paper.  Sequins & text stickers are tiny details that add to these minis!

IMG_9212  

The button “flair” on this one was something I designed as part of our wedding favors, I love finding ways to work them into my art!

IMG_9213

As this mini featured a larger heart, I chose a simple black Prima flower and a big gold blingy center for it.

I had fun with these cuties, and they would be a great way to make up a bunch of coordinated, but not exactly the same, Valentines for a group of friends!  How fun it would be to give some out at a galentines party if you are single… or they could easily be mounted on a card base so you have room to include a sentiment inside!

inky hugs,

Tara

ps. Have you seen all the great stuff on sale in the store right now for Valentines Day? Happy shopping!

Tuesday with Tara {take 84} Read More »

TBT with Shari T – Two Hearts

So here’s a throw back to  A Vintage Journey today for Annie’s Tic-Tac-Toe challenge— a la Tim Holtz, of course!!  You can find the game board at A Vintage Journey with inspirational projects that each of the Creative Guides made to fire you up!!

DSC06040

As we are winding down the Valentine’s Day weekend here in the US, I thought I’d share one last Valentine’s creation that I made using several moves on Annie’s Tic-Tac-Toe board.  I didn’t mean to use almost every square!! 😉

I only started out taking the Left-Vertical move of *Idea-ology/Paint/Foil Tape*.  Then as I started gathering my goodies, I found I was also moving Bottom-Horizontal with *Foil Tape/Texture Fades/Stains*.  And as easily as that, I found I had also moved Right-Vertical with *Ribbon-Twine/Die Cuts/Stains*.

I’m so glad that it’s OK with Annie if we make more than one move!!  🙂

DSC06030

One of my very favorite Tim Holtz-things to do is create my own backgrounds.  The process of blending and swirling and layering his inks, paints & stains has actually led me to not depend on decorative papers as I once did.  Believe me, I did not create the way that I do now, when I first started card making almost 18 years ago!  I was very clean and simple back then and OMG–smudge anything–Blasphemy!!  😉 🙂

I started my Tic-Tac-Toe project with layering color onto Tim’s Idea-ology Cabinet Card first.  I finger painted Picked Raspberry & Barn Door DPs randomly over the surface and heat dried.  Then I rubbed Tea Dye & Vintage Photo DIs over the painted surface and used my Hearts LS to add a few hearts here and there with Walnut Stain DI.  I finished with a spritz & flick of water to create those awesome water spots!!

DSC06044

Here’s the back of the cab card.  I didn’t stencil hearts on the back, but I did spritz and flick water spots to my hearts content!!  I love water spots (and paint splatters, too!)!!

DSC05947

I picked this lovely couple from Tim’s Found Relatives cards and tinted the woman’s blouse and barrette with my Worn Lipstick DM.  To age the image a bit, I lightly pulled my sanding block over the surface and edges and then inked with Tea Dye DI and my ink blending tool.

DSC05943

Here’s my little piece of embossed foil tape.  I almost had a “whoopsie” moment, not realizing how limited a supply of foil tape I have on hand.  This little strip represents one of the pieces I had left, which I had already embossed with polka dots.  Well, this is for Valentine’s Day and I wanted hearts!  I don’t have a heart texture fade or embossing folder, so I used my Hearts Layering Stencil and embossed the hearts that way!  OK–So, I may have cheated just a little bit!  But, using your Layering Stencils to emboss, is a great way to extend the usefulness of those stencils!

DSC06049

Here’s that same piece of foil tape, tucked neatly inside the cab card, next to the two Sweethearts!  That’s the love exuding from them 🙂 🙂

DSC06029

I used my Tattered Florals & Garden Greens dies to create my blooms and leaves.  I used a few different colors of card stock for the flowers and I used Tim’s Tissue Wrap to cut out the leaves.  I also layered the blooms with gesso’d & stained pieces of tulle.  I gave each flower a gumdrop center that I colored with Adirondack Alcohol Inks.

DSC06037

This corner was really fun to embellish!  It’s so frilly and girly–completely unlike me–although, I do love hearts and crystals and fun little trinkets!  Here, I’ve stained some seam binding with Worn Lipstick, Picked Raspberry & Barn Door Distress Stains and tied into this lovely little bow.  I adorned the hangar clip with a heart charm, red heart crystal, and key locket and glued into the tied bow.

DSC06034

I stamped the words using mini alphabet letter stamps (that I’ve had forever!) with Jet Black Archival onto previously stained manila stock.  I fussy cut and inked the edges with Black Soot DI and mounted onto black stock.  I fussy cut the mounted words and adhered to the cab card with matte gel.  I’ve also altered a couple of mini corners-the corners I used were the antiqued bronze finish-with Brushed Pewter DP.

DSC06032

My finishing touch was rubbing Black Soot DP onto all of the edges with my finger–kind of my ‘signed-sealed-delivered’ I’m done!!  🙂 🙂

If you haven’t made your move yet, you’ve still got time to play and enter your Tic-Tac-Toe creation at A Vintage Journey!!   The challenge is open until February 19th @ 6pm (GMT) and Country View Crafts is sponsoring the challenge with a voucher to their online store to the challenge winner!!

I’m so happy to have been invited to join in the game as a Guest Creative Guide–BIG THANKS to Brenda and all of the Creative Guides for having me in for a play or two or three!!  This was fun!!

Thanks for stopping by!!  Until next time–Stay Artsy Fartsy!!

DSC04507

SUPPLIES I USED:

  • Tim Holtz/Idea-ology Items:  Cabinet Card Frame, Found Relative Card, Tissue Wrap; Gumdrops, Hangar Clip, Locket Keys, Heart Charm, Mini Corners, Jump Rings
  • Paint & Stains:  Distress Paints, Inks, Stains & Markers (Tim Holtz/Ranger)
  • Foil Tape (Inkssentials/Ranger)
  • Texture Fades/Embossing Folder:  Polka Dots (Sizzix); Hearts Layering Stencil-in lieu of a Texture Fade (Tim Holtz/Stampers Anonymous)
  • Ribbon/Twine:  Seam Binding (The Funkie Junkie Boutique)
  • Die Cuts:  Tattered Florals & Garden Green Dies (Tim Holtz/Sizzix); Big Shot Machine (Sizzix); Silicon Pads
  • Everything Else:  Archival Ink (Ranger); Ink Blending Tool; Craft Sheet; Heat Tool; Matte Gel; Hot Glue Gun; Sanding Block; Self-Healing Cutting Mat; Finger Knife (Fiskars)

TBT with Shari T – Two Hearts Read More »

Free Shipping Anywhere In Canada