TRY ADDING FOILING FUN WITHOUT EXTRA TOOLS!
Hello crafting friend! It’s Deb here today, with something new for you to try. Have you been wanting to add foiling to your projects, but you’re not sure about committing to a foiling tool? Well, I have a great way for you to try adding foiling fun without extra tools! I ordered some of the fun Ranger Shiny Transfer Foil sheets from the Scrap ‘N Stamp online store. All you need to use them is your cardstock base, some adhesives and a bit of elbow grease.
APPLYING THE FOIL – TAPE METHOD
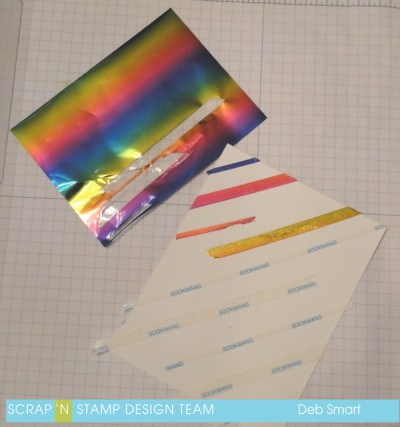
When I say that these Shiny Transfer Foil Sheets are easy to use, I’m not kidding! First, cut your panel of cardstock. Any colour you want to work with! I started with a white panel, but in the end changed to black. Next, add your adhesive. I used two different widths of Be Creative (Sookwang) Tape; the 1/8″ and 1/4″. I lay them in alternating strips across the panel. Remove the backing from the adhesive strips one at a time, and lay the foil over top of the tape. Rub firmly with your fingers, or use your bone folder, to press the foil onto the tape. Gently peel the foil sheet off of the adhesive; pull slowly in one direction. As you’re pulling off the foil sheet, look at your panel to make sure that the foil has transferred. If you notice that it hasn’t, simply lay the foil back down on top of the tap, and rub more firmly. If you accidentally lift off the tape and find that an area is without foil, simply lay the foil back down on the tape, and repeat the process – u
sing a piece of the foil that hasn’t already been transferred. The photo below shows how the foil looks once transferred onto the cardstock, and the blank space left on the foil sheet, where the colour once was! I chose the ‘Celebrate’ package of foils to use, as it has a variety of patterned colours.
CREATE YOUR CARD
When I finished the foiling on the white panel, I like it, but it wasn’t quite the ‘wow’ that I had in mind. So, I repeated the whole process, this time on a black cardstock panel! Don’t worry – I saved the white one to use in another project. Since this was my 2nd panel, I thought I’d try & be more quick about it – and I lay the entire foil sheet (you get 2 of each colour/pattern per package) onto the taped panel. Well, it did work out, but I can’t say it was much quicker! Because I had my tape beginning and ending in different directions, I had to take more time to burnish the foil onto the tape, as I was peeling off the foil backing. I also had to go back in more places & add the foil onto places where it didn’t stick. So – the lesson in this is – don’t rush! Just have fun and enjoy the process!
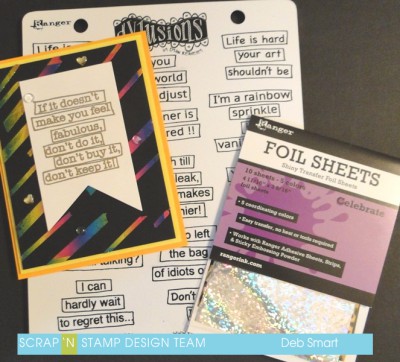
To create the sentiment piece, I stamped the sentiment from the Dylusions Laugh Til You Leak stamp set in Versamark ink and heat set it with gold embossing powder. Cut banner tails at the bottom, and add it on top of your foiled panel with foam squares. Next, I layered the panel onto a panel of bright yellow cardstock, and then onto a light orange card base. These were from my stash, and unfortunately I don’t remember the names of the colours! I think they were from the Lawn Fawn Rainbow pack of cardstock. Pop them up with foam tape, for extra dimension. To finish off my card, I used some embellishments from my personal stash (we all have one of these, right? goodies we’ve had for ages, and don’t remember from where we got them?).
GET FOILING NOW!
I hope that you’ve enjoyed this project, which shows you how easy it is to use the Ranger Shiny Transfer Foil Sheets. Be sure to check out the store – there are lots of different colours available! If you’d like to see another technique using these foil sheets and Ranger Sticky Embossing Powder, you can head over to my blog to see it!


