
Happy Monday!

As the weather turns cooler, I am spending more of my time inside. Which leads me to my two favourite activities, crafting and reading! Today we are creating something a bit different…..here’s a hint…It’s in a Book!
If you guessed bookmark, you’re right! I love to be able to add special elements to my cards that double as gifts. I have added other things like necklaces, bracelets, brooches, earrings, etc. into my cards that the recipient can remove and use. I think it is a very unique way to actually gift give.
We are back to school in my house and the birthday invites are starting to come in and I am beginning to think about teacher gifts, etc. I thought this was a good way to bump up my emergency gift cupboard.
There are three bookmark sizes we will be using today, 2″x6″, 2″x7″ and 2.5″x8.5″,
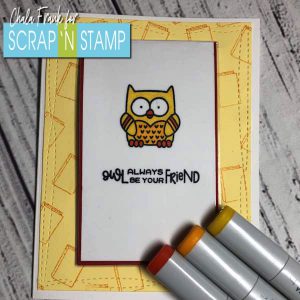
The first one we will make is actually a card with a removable bookmark. The card size is a standard A2 size card and the bookmark size is 2.5″ x 8.5″. This is a great size if you want to ensure maximum paper usage.
I dug through my stamp inventory and found a TON of images that would work perfectly. Any smaller image is going to work great if you want it to have a focal point. Although, you can use background stamps as well for a more abstract look. I pulled out some Taylored Expressions and Lawn Fawn images.
I like to plan my layouts by roughly stamping my ideas onto a scrap piece of paper to see how they will look and it helps me if I am doing complex stamping that require masks. Once I like an idea, I can then go ahead and stamp them out onto the cardstock. I will then save that scrap layout piece for future reference. Currently, I am saving these with the stamp set….but, I think I might either create an idea book or perhaps a digital binder to save space….it’s a work in progress. Lol!
https://youtu.be/b0OeJ4cl7bU
I want to start on the bookmark first. I score the bookmark at 4 1/4″. The bookmark will be woven into the card front…but we will get to that in a bit. I then stamp the owl and coordinating sentiment from Taylored Expressions Punny Notes stamp set with Memento Tuxedo Black ink and set it aside to ensure it dries completely before Copic colouring.
I then move onto the card panel. I found a tiny book stamp from the Teacher Lady stamp set from Ellen Hudson and used that to create a custom stamped background using Distress Ink on some yellow cardstock. To help me create an evenly spaced stamped background I like to use a T- square ruler. I then cut that panel with the MFT Wonky Stitched Rectangle Die to add a bit of interest. I attached this panel to a standard A2 size card panel.
I did simple colouring of the owl in the following Copic colours: Y15, Y17, YR18 and because the Copic bled through a bit I backed the bookmark onto some coordinating coloured cardstock. I wanted the bookmark to hold up well so I then ran it through my laminator and attached some thin magnets onto the inside fold. This will help hold the bookmark in place on the page. You will want to burnish that fold and you may want to even place something heavy onto of it overnight to really reinforce the fold and to ensure it will lay flatter on the card. It will lay down nicely the more it is used in a book, so if it pops open a bit, don’t worry!
Now we need to create slits in our card base to weave the bookmark through. *Measure the size of your bookmark again if you have laminated and backed onto cardstock. You will want to create slits a few millimetres longer than the width of your bookmark so it slides nicely. I cut two slits horizontally and parallel to each other in the centre of my card. Although, you could offset it to onside or another. To create the slits in the card you can use a straight edge and a craft knife or a Fiskars Surecut Trimmer.
Once your cuts have been made you will insert the back flap of the bookmark into the front of the card’s top slit and then back out towards the front of the card through the bottom slit. You should be able to connect the magnets together. If you want you can add a sentiment onto the inside of your card and then write a note to the recipient letting them know of the surprise gift with the card.
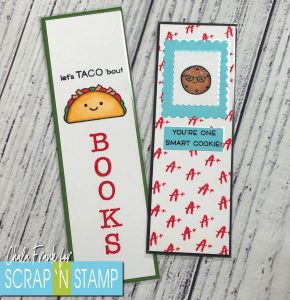
My next bookmarks are super simple. I pulled out my Lawn Fawn Year Nine (Taco) Stamp Set and the Smart Cookie stamp set. Check your Lawn Fawn stash as their images are perfect for bookmarks!
For the Taco stamp set I used the 2″ x 7″ bookmarked and the “let’s taco ’bout” sentiment and the taco stamping in Memento Tuxedo Black ink and Copic coloured (E34, E35, Y23, YR02, R08, YG17). I wanted the full sentiment to read “let’s taco ’bout Books”. I didn’t have a ready made “book” sentiment that I could easily use…so, I pulled out an alphabet stamp set and created the “BOOKS” sentiment with that. I stamped it vertically with Distress Ink and I like how it filled the bookmark. Again, I layered this onto some coordinating coloured cardstock and laminated.
I did pretty much the same thing with the Smart Cookie stamp. Using another smaller image from the Teacher Lady stamp set and my T-ruler and creating a custom stamped background. I then found some scalloped rectangle dies and layered the image onto coloured cardstock and backed the entire bookmark onto black cardstock and laminated. This time I added some Nuvo Shimmer Pen onto the cookie before laminating to add some sparkle!
My final bookmark is a shaker bookmark. It is somewhat similar to the first one that you can add it to a card.
I found used my square stitched dies and some images from the Loads of Fun stamp set from Lawn Fawn. I found a cute sentiment from the Bedtime Stories stamp set from Clearly Besotted that says “If you have time to clean you are not reading enough”. I did some masking on this one to give the effect that the laundry soaps were infant of the basket and some simple Copic colouring. I layered the stamped images onto grey and black cardstock.
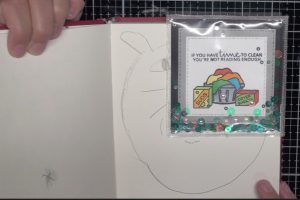
To create the shaker I am using a clear heavy weight sheet protectors (I got mine from staples) and my We R Memory Keepers photo FUSE tool. I have to admit I haven’t used this in a while so I had to relearn how to use it and which tips work best.
I place my square image into the protector and then trimmed it leaving enough material to fuse together around the edges and taking into account that I also wanted to add sequins, etc. inside. I sealed the bottom and sides leaving the top open. I then added some Picket Fence Spiked Ocean Water sequins and some Studio Katia bubbles and then sealed the top and carefully trimmed up any excess material from the edges being careful not to trim too close that I reopen the seal.
Now we need to create the element that will hold the bookmark to the page. I cut a piece of cardstock that measured 5 1/2″ square and cut on the diagonal to create triangles. I then used my scoreboard to score at 2 3/4″, turned and flipped the triangle and scored again at 2 3/4″. This basically fold the tips of the longer edges of the triangles in to create a smaller square. I then used Scor-tape and adhered the flaps down onto the top left corner of the back of the shaker piece with the opening of the square element piece being on the lower right hand corner. (Sorry, I know this is confusing…the video will help!)
Now when you flip it over to the front you should be able to slide the bookmark onto the top right hand corner of a page of a book. The one thing I didn’t do, but will do for next time is laminate the element piece that holds the bookmark onto the page. I think it would hold up better that way.
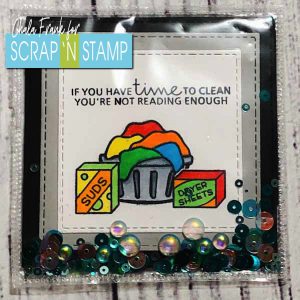
If you want, you can then add this shaker bookmark onto a card front. Keep in mind though when you create your slits they will need to be on a diagonal with the slits closer together. For this bookmark I would need to make my slits angle from the top left down to the lower right of the card.
I hope that today’s blog has inspired you to look at your stamps in a way that you can create fun bookmark cards or quick and easy bookmarks. I know I will be creating a ton of these to go in Christmas cards for my kids’ friends as well as Valentine cards and I have a few special jewellery items that I will be giving as gifts for birthdays that will be fun to incorporate this way.
May your week be full of crafting!
~Chala

Love the bookmarks Chala, what a great idea to have it as part of a card that the recipient can remove and use. The sentiments made me chuckle, I will need to look for a stamp that refers to crafting(as I walk past an overflowing laundry basket…to get to my craft room!!!) tee-hee. Will look for the video. Thanks for sharing !