
 Happy Tuesday! Today we’ve got another fun blog hop, this one we are calling ‘Distress to Impress’ because all of our projects feature Tim Holtz’s Distress Crayons! We will be sharing with you some fun ideas for these great coloring tools… and maybe you’ll even WIN a new set by leaving comments on all the blogs along the way! You can also get yourself some new sets, saving 25% in the store until the end of the month! Even the new metallics are on sale…yay!
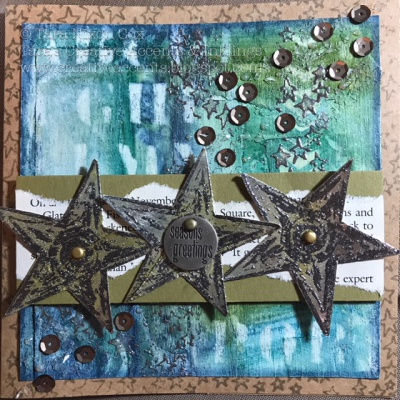
To be honest, I really struggled finishing up this card… almost didn’t share it with y’all today! BUT, I do love the background I created with the Distress Crayons, so even if you’re not loving my card (like me!) I hope you’ll enjoy the background technique I used!
First, I started with a simple collage of torn book paper on some cardstock, painted with a thin coat of white gesso. I pulled out an assortment of greens & blues from the sets of Distress Crayons I have…
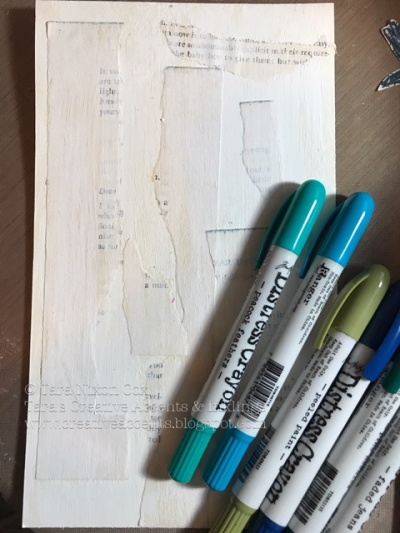
I scribbled bits of color all over my background… as you can see, I was very careful 😉
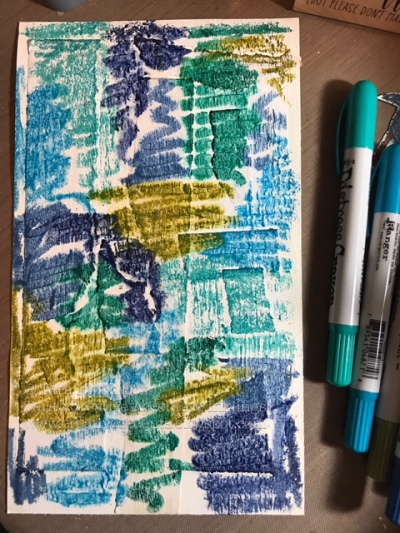
Then I misted some more water and got my fingers inky, smearing & blending the colors! I added some extra depth of color by highlighting along some of the torn edges with more crayon.

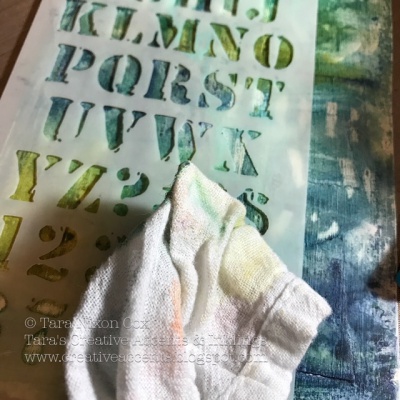
I selected a couple different stencils and used a slightly wet rag (I just sprayed a bit of water in a corner of it) to rub through the stencil and remove some of the color.
… and my background was complete! I really love how it turned out! 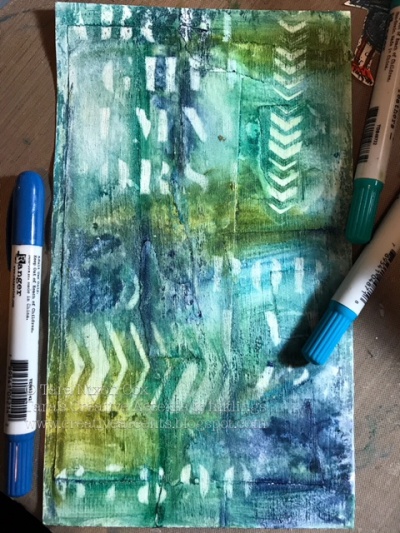 I trimmed the background to fit on a square card and used one of the crayons along the edges of the piece to finish it off, again just blending with my fingers. I think the finger blending worked so well because of the gesso underneath. Love it!
I trimmed the background to fit on a square card and used one of the crayons along the edges of the piece to finish it off, again just blending with my fingers. I think the finger blending worked so well because of the gesso underneath. Love it!I wanted to try the crayons on another surface as well, so prepared another piece of card stock with some torn foil tape layered on it.
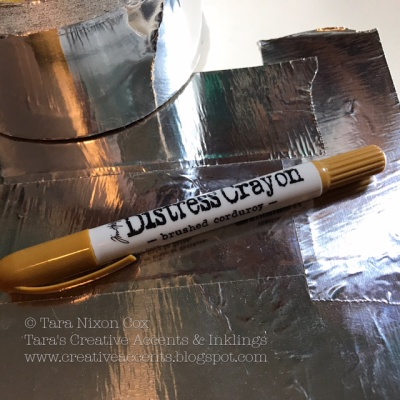
Because the surface was shiny & slick, I used a blending tool to add color and keep my fingerprints off of it 🙂
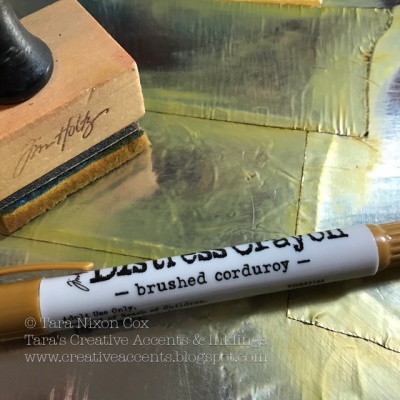
I stamped some stars in black Archival ink on the foil tape and cut them out. The ink did not dry and the black was a bit too harsh, so I embossed the stars in silver (this powder is slightly translucent, so they have a pewter look because of the black peeking through).
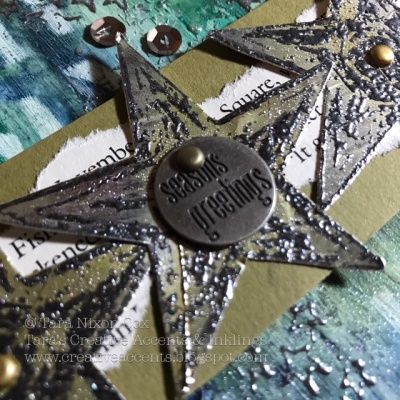
Even with the Distress Crayon added, the metallic foil shines through!
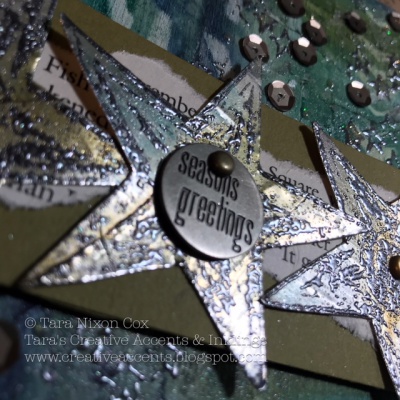
I embossed some stars on my background to tie it all together… added sequins and some glitter for extra bling. It’s actually pretty sparkly for a masculine Christmas card! LOL
I’ve got another piece from my background that I’m working with to create another card… with a little luck I’ll end up with something I like enough to share next week! Now I happen to know that there’s some very creative pieces waiting for you on the following blogs… so please enjoy our ‘Distress to Impress’ blog hop! It’s been a fun challenge working with Distress Crayons 🙂
Get hopping and prepare to be impressed:
- Amber Trubiak http://foreverambersart.blogspot.ca/
- Amy Rysavy http://prairiepaperandink.typepad.com
- Julia Chupik http://paradiselostyyc.blogspot.com/
- Karen Warner http://KWarnerStudio.com
- Nancy Frustaci http://www.nancygracecreations.com/blog
- Karla Yungwirth http://creative-love-affair.blogspot.ca/
Thanks for hopping along with us! Don’t forget to leave comments along the way for a chance to win a set of Distress Crayons! Stop back here if you happen to get lost along the way… 🙂
Inky hugs,
Tara
Materials Used:
Tim Holtz Cargo & Chevron Stencils
Star stamp by Ken Oliver
Star background stamp by Dylusions
Silver Embossing Powder
Tim Holtz Embellishment
sequins & glitter…

Hi Tara! I love your card!! I love the combinations of the blues & greens. Those stars you created are amazing too. Love love love it!
wow awesome techniques and beautiful results. 🙂
I love how this turned out Tara!! Thanks for sharing all those super cool techniques! I wouldn’t have guessed the stars were handmade!!
I think your card is really striking. There’s lots of wonderful texture – love what you did on the background as well as the effects you got on the stars. Looks like I need to get out my distress crayons and play some more…
Wow – I never really knew what to do with Distress Crayons – I love the idea for the technique.
I love how your card turned out! The background is great and those stars are amazing!
Love the different choice of colours and the findings
I love how your stars came out! You couldn’t have ended up with that fabulous result if you has started out with that intended look probably. Happy accidents!
I like your card. You used my favorite colors.
I love the card! I think the stars are very effective. I might like it for a birthday card more than Christmas.
great tutorial, and love the metalics
Thank you for detailing all the steps, I am inspired to use my distress crayons 🙂
Great result. Inspires me to get the crayons out as haven’t had much practice
Love your beautiful card. Thanks for sharing the great technique. I haven’t used the crayons, but after seeing all of the fabulous ideas, they are a must have.
Love this card you made! Looks so easy to make yet looks so nice like those fancy mixed media projects. Thanks for sharing!
I really love this card..even if you say otherwise. great work:)
Great blog hop thx
I Love it… Out of the box thinking for a seasonal card….
Wow, this is beautiful,love, love the colours.
Looks lovely! I loved looking through each blog and seeing how they used the distress crayons. I learned some new techniques and got some ideas to try out now!
Hey Tara! Your card is great. I do love your background! I have never used distress crayons! They look fun to use.
Thanks for sharing your card.
I love this. Lots of colour and texture – my favorite type of card.
I love the colors. Perhaps I should take my crayons out and try it again.
Really liked these colors you used. I am thinking a mixed media journal page with these distress crayons for the back ground on the page.
Blog hop?
Yes! Hop along to the next blog on the list… each will link to the next one!
Great creation ! I still didn’t have a chance to try these crayons.