Scratch-N-Stamp
Search

Checkout

Keep up with Sales, New Products and other events at Scrap `n Stamp. Sign up for our newsletter now!

What's New

Hot Deals


Blog Hop

Watercolour Wishes Blog Hop

Hi & welcome to the Scrap ‘N Stamp September Watercolour Wishes Blog Hop! The design team has been busy creating with a variety of mediums. We are so excited to share some beautiful watercolur projects with you today.

Details

The Watercolour Wishes Blog Hop starts right here, on the SNS blog! I’ll share a list of the full link up at the bottom of this post, after my project. Be sure to leave some love for the team along the way- your comments, as well as likes & shares when you see our projects on social media, earn you a chance to win a great prize! One lucky comment, like or share will be randomly selected to win a $50 gift certificate to the SNS online store!

Bonus- shop this weekend and save 20% on all Watercolour products in the shop! Woohoo!

Watercolour Stamping

For my project today, I decided to showcase a stamp set that is designed to give you a watercolor look simply by stamping. I’ve used the Hello Lovely stamp set by Concord & 9th, which is a beautiful floral image with coordinating sentiments and several images designed for layering colours so you will get a watercolor look.

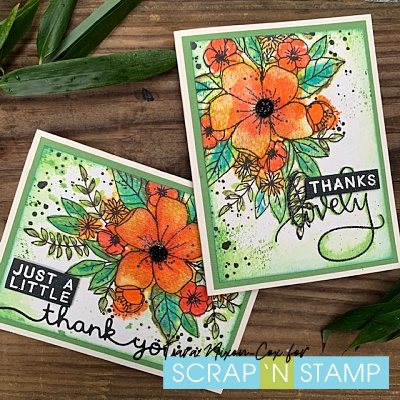
I made two very similar cards, both started the same way- layering Distress inks over the stamped image. I used a variety of original Distress Ink colours stamped onto watercolor paper. Here’s what they looked like before I added any water to them, except for a light spritz before stamping on the larger portions.

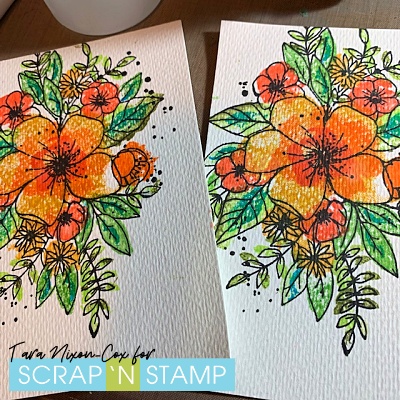
You could easily leave the images as they are, and would actually get more of a watercolored look and softer color blends if you were stamping on smooth card stock instead of the textured watercolor card stock I used.
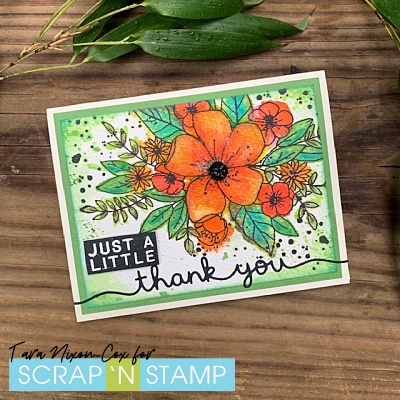
Simple Watercolour

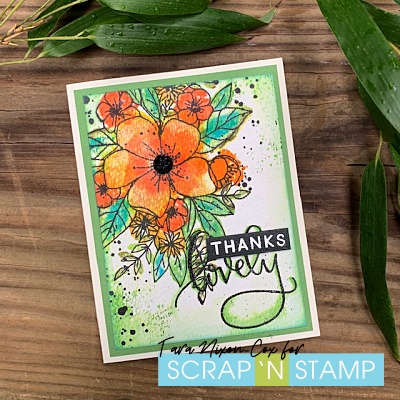
For my first card, I decided to add just a small amount of water from a water brush to soften & blend the inked colors. This left a good amount of white space in my image, but still allowed me to get a soft watercolor look quickly and easily. I finished off the card with a black embossed sentiment together with a bold block embossed on black cardstock with Wow Opaque Vanilla White Embossing Powder.

Colour Blending

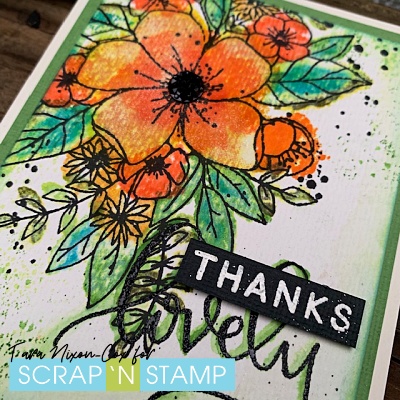
For my second card, I stepped up the colour blending a little bit. I applied some ink to an acrylic block and added more layers of colour to my design by picking up the ink with my water brush.

The colours on this second card ended up a bit bolder and more vibrant. I was also able to fill in most of the white spaces and play around with colour tones a bit more. It was hard to stop, but I was trying to focus on this simple technique!

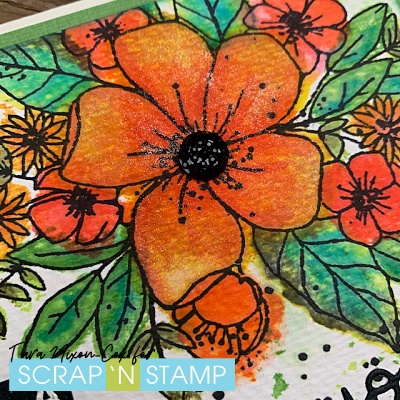
You can see better in this close up photo, I added a touch of clear Wink of Stella shimmer to the large blossom. This card was finished off with another embossed sentiment paired with a die cut thank you by Lawn Fawn.

On both cards, I added a bit of Distress Ink blended around the edges and a little bit of ink splatters using an acrylic block to position them where I wanted them.

I really love this stamp set and am ready to try some freehand watercolour on it next! I suspect you’ll see it again through the month of September!

Get Hopping

Here’s the full Blog Hop order- You’ll be heading over to see Chala next. Enjoy!

Have fun! I hope to see you sharing your Watercolour Wishes projects with us on Facebook this month!

Inky hugs,

Tara

Watercolour Wishes Blog Hop Read More »

Pop ‘N Hop Winner!

A big thank you to everyone who checked out our Pop ‘N Hop Blog Hop on August 2, especially those of you who left such positive comments along the way! We are so glad you had fun like we did! There is still time to join in the 3D Challenge on Facebook and share your creations for another chance to win a great prize…

Today I get to announce the winner of the $50 gift certificate to the online store, and the winner is

Mary Anne V

Congrats! Follow this link to claim your prize!

Pop ‘N Hop Winner! Read More »

Categories: Blog Hop
Tags:

Pop ‘N Hop

It’s a new month, which means we’ve got a new BLOG HOP for you and we are kicking off a new theme over on our SNS Challenge Page on Facebook as well! For the hop today, we are all sharing Pop Up Box Cards! Today I’m using one that was pre-cut and ready to assemble by The Paper Cut, which you can purchase in the online store. On Facebook we challenge you to make 3D Cards: Cards that POP this month! Should be fun to see how everyone interprets it 🙂

As usual with our hops, we have a giveaway as well- a winner will be randomly chosen from those who leave comments along the way to receive a $50 gc for the online store! Yay!

I chose to use a mini box together with this cute little Rock Monster stamp & die set by Mama Elephant. The stamps are pretty small, around 1.5″ tall, so it was perfect in this mini box which folds to fit in a standard A2 envelope! I dug through my stash of 6×6 paper pads and found one by Simple Stories (circa 2013… never even opened. oops) and used it as my color palette to color these little cuties with my Copic Markers. The coordinating dies worked great, and I love all the sentiments that come with the set as well! I planned to send this card to my dad (he is amazing on guitar and will always be a rockstar to me!) so combined a couple of the sentiments for the front panel of the card.

I measured, cut and glued patterned paper onto the individual panels and then I hit a little road block… I wanted to add more to the card, but since this is not my usual style I didn’t have other stamps or small dies to combine with the images. I ended up finding a swirly flourish by Memory Box and a few old school circle punches to kick things up a notch. A bit of bling finished it off. These ‘cards’ are kinda tricky to photograph… so I went overboard a bit to capture a few different angles!

As I mentioned, this little box folds down to fit in an A2 envelope. Here’s a look at the folded card as it would be when the recipient opens it…

I think I’m going to write on the green panels, working my way around the card. This is my first time doing one of these so I’m not really sure what you are supposed to do 🙂 Here’s how it looks as it starts to unfold…

… and finally, a close up of my little Monster Rock Band!

The kit comes with three rows to be included inside the box, but I chose to just use two of them for this little box. It was a lot of fun to make, I’m going to be looking through my stamps & dies to see what other ideas I can come up with! And I’m sure to be inspired by the design team and their projects!

Next on the hop, you can head over and check out Susan’s card! The full order is listed below if you get lost anywhere along the way. Happy Hopping!

Tara

Susan

Chala

Nancy E

Laurie

Nancy F

Sandi

Kia

Deborah

Inky hugs,

Tara

Pop ‘N Hop Read More »

Free Shipping Anywhere In Canada