Scratch-N-Stamp
Search

Checkout

Keep up with Sales, New Products and other events at Scrap `n Stamp. Sign up for our newsletter now!

What's New

Hot Deals


Nestabilities

Winter Thanks

I know you’ve heard it 1000 times already, but how on earth is it 2020? I saw a meme on facebook in the last few weeks that said something about how can it be that the new millennium started 20 years ago when 1980 was only 20 years ago. I had a good laugh at that. I was born in the 70s so the 80s are very vivid in my mind… and there’s no way that was 40 years ago!!!

I am back with the design team, but on a part time basis right now… Hopefully you’ll see some more from me in the coming weeks.

For this month, I knew I wasn’t done playing with my Christmas stamps and dies… so I wanted to create something that shows you can use these images for at least a little while in to the new year. And since I’ve needed quite a few thank you cards in the last little bit, I decided to make a winter thank you card.

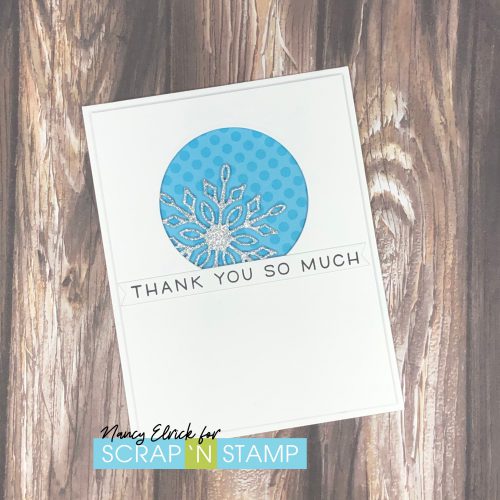
I don’t have any process photos for this card because honestly, it was pretty easy to put together. I cut out the Memory Box Telluride Snowflake using some silver glitter paper from the Concord & 9th 6×6 neutral glitter pack and I trimmed off the extra piece I didn’t need (the hanger). I used a Spellbinders circle die to cut out a window on a 4X5.5″ piece of white cardstock. I added some Gina K Connect Glue around the one portion of the window and glued the snowflake so it was peeking out of the window. I used foam adhesive to put the layer of patterned paper from the MFT 6X6 Over the Rainbow pad behind the snowflake. I added regular double sided tape behind the patterned paper and foam adhesive behind the rest of the panel before adhering it all to the card front. I finished it off using the Lawn Fawn Simply Sentiments stamp with Versafine Clair Nocturne ink and cut it out with the Lawn Fawn Everyday Sentiments Banners die.

Once designed, this card would be great to mass produce as it wouldn’t take long to get a bunch of them put together.

Winter Thanks Read More »

New 2011 Spellbinders Dies Have Just Arrived at Scrap ‘n Stamp

Yippee!!! They are finally here. We just received our first shipment of the new Spellbinders 2011 dies and they are absolutely fantastic. This release included so many wonderful designs and different sizes that there is sure to be something for everyone.

My apologies for the length of this post but there are 45 new Spellbinders die sets to show you. Instead of putting too much detail with each one if you click on the picture it will take you to the description in the store where you can see all the details including the sizes of all the dies for each of these sets.

There are five new Grand Nestabilities. The bigger size of these dies is great for scrapbooking but a lot of card makers are loving them too because they work so well on larger cards. There are lots of  home decor and mini album possibilities too. Here are all the new Grands….

LF-168 Grand Large Labels

LF-246 Grand Labels Eleven

LF -249 Grand Big Scalloped Circles

LF-251 Grand Big Scalloped Ovals

LF-001 – Creative Book Pages

All of the Grand dies are made to be used with the Grand Calibur die cutting machine but some of the smaller ones can also be used with the Big Shot, Vagabond or Cuttlebug using the same sandwiches that you would use for any other Spellbinders die.

In the Nestabilities category there are sixteen new sets to choose from. More Labels, Blossoms and new shapes that are sure to become favorites.

S4-306 Wonky Rectangles

S4-307 Reverse Wonky Rectangles

S4-308 Labels One Small

S4-309 Labels Four Small

S4-310 Labels Eighteen

S4-311 Labels Nineteen

S4-312 Blossoms Three

S4-313 Blossoms Four

S4-314 Lacey Ovals

S4-315 Beaded Squares

S4-316 Heart Circles

S4-317 Fleur de Lis Rectangles

S4-318 Fleur de Lis Squares

S4-319 Lattice Rectangles

S5-026 Labels Twenty

S5-027 Labels Twenty One

The Spellbinders Shapeabilities line has also grown. This is the biggest release of Shapeabilities ever with 24 new dies. There are six new Accent & Motif sets with beautiful borders and individual elements that will work on so many different types of projects. The Carnation & Rose Creations are incredible. There are lots of new Tags in all kinds of shapes and sizes.

S4-321 Nested Leaves

S4-322 Grommet Tags

S4-323 Ribbon Tags Trio Two

S4-324 Ribbon Banners

S4-328 Foliage

S5-028 Nested Pennants

S5-029 Nested Lacey pennants

S5-030 Fancy Tags Two

S5-031 Fancy Tags Three

S5-032 Elegant Posts

S5-034 Parisian Accents

S5-035 Parisian Motifs

S5-040 Floral Doily Accents

S5-041 Floral Doily Motifs

S5-042 Fleur de Lis Doily Accents

S5-043 Fleur de Lis Doily Motifs

S5-044 Banner Basics One

S5-045 Banner Basics Two

S5-046 Banner Basics Three

S5-048 Sprightly Sprockets

S5-049 Carnations Creations

S5-050 Rose Creations

S5-051 Fanciful Flight

S5-052 Creative Page Tabs

Well, that’s it for this post. I know it was a long one but we just had to share all the new 2011 Spellbinders dies with you. New products are arriving at the store every week so we will post more updates soon.

New 2011 Spellbinders Dies Have Just Arrived at Scrap ‘n Stamp Read More »

Tuesday Tutorial: Thinking Outside Your Nesties – Part 1

Hi everyone. This tutorial was put together by Shellie for us last year but I decided that it was time to feature it again because the technique is so much fun. It’s a great way to use your Nestabilities that has a real ‘wow!’ factor and it works with all kinds of shapes – circles, ovals, squares, rectangles, octagons and even the different labels. The key is to choose a stamp that is larger than the size of your Nestie so that it will go ‘hang’ over the edge.

Here is the original tutorial using regular stamps and Part 2 will show you how to use the same technique with our Studio K Digital Stamps.

Thinking Outside Your Nesties:

1. Select a stamp and then coordinate it with a Nestie is slightly smaller so that part of the image will be outside the Nestie shape. I chose  a floral image and inked it with Sage & Pink Petunia VersaMagic  dewdrop ink pads.

I used the direct to stamp technique to ink the different colors on my flower.

The shape of these dewdrop ink pads is perfect for inking small areas.

3. Choose a Nestie that fits the main part of your image allowing part of it to ‘hang out’ of the Nestie.

I used the  Large Standard Circles but you could use other shapes like ovals, octagons or one of the labels sets. Just lay the Nestie over your stamped image and try it out to see if you like it. Try different kinds until you find the one that you think will look the best.

4. Using your craft knife cut around the part of your image that will hang outside of the Nestie. Make sure you cut right against the image where your Nestie will sit.

5. Place your Nestie over your image making sure your cut area is on top of the Nestie.

6. Run your Nestie/image stack through your Big Shot or Cuttlebug.

7. Cut around the rest of the image that was outside your Nestie with scissors or your craft knife.

This is what is will look like when you are done.

To Finish The Card:

1. Emboss a piece of Core’dinations Cardstock using the Diamonds in the Rough CuttleBug Embossing Folder.

Once embossed gently sand the raised image using a sanding block.

2. Create a border for your stamped image using the coordinating size of Petite Scalloped Circle Nestabilities.

Layer the card elements, add a little ribbon and you are done!

Thanks for dropping by. Hope you give this fun technique a try.

Happy crafting!

Shellie

© Scrap ‘n Stamp Canada 2010

Tuesday Tutorial: Thinking Outside Your Nesties – Part 1 Read More »

Free Shipping Anywhere In Canada