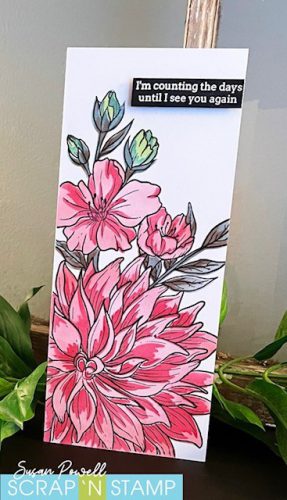
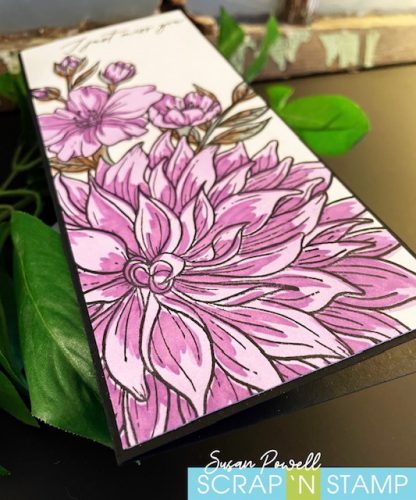
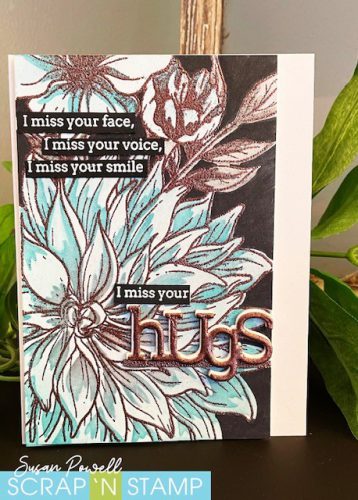
Hi Everyone! It’s Susan here today with the Random Acts of Cardness word prompt of Layering Stencils. I’d never used layering stencils before which is why I chose the prompt. I wanted to challenge myself to use a new technique and be completely honest with you all about how I feel about them. I wanted to know if they were worth the money.
Yes they are!!!
I’m sharing three cards with you today and a video. All the details on how the stencils work and some tips on using them are over on the video. (I can’t seem to share it here).
I used the Pinkfresh Miss Your Smile Layering Stencils. They are a higher price point than regular stencils but it comes with 4 stencils. I admit I was unsure about them at first because of the price. I was wondering if I would use them very much and the answer is Yes, I’ll use them a LOT. I made 5 cards on day 1 of playing with them and have ideas for more. I’ll be sharing the other 2 I made over on my blog soon.
Happy Stampin’
and thanks so much for visiting!
Stay safe everyone!!
Susan
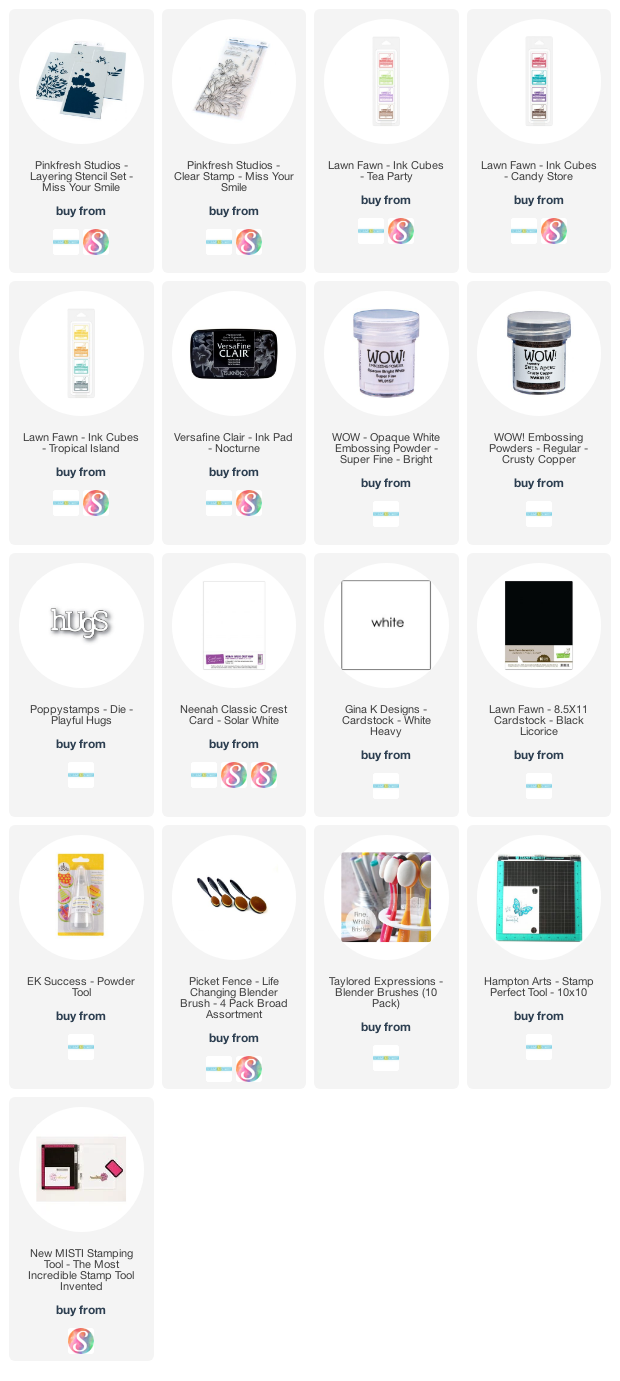
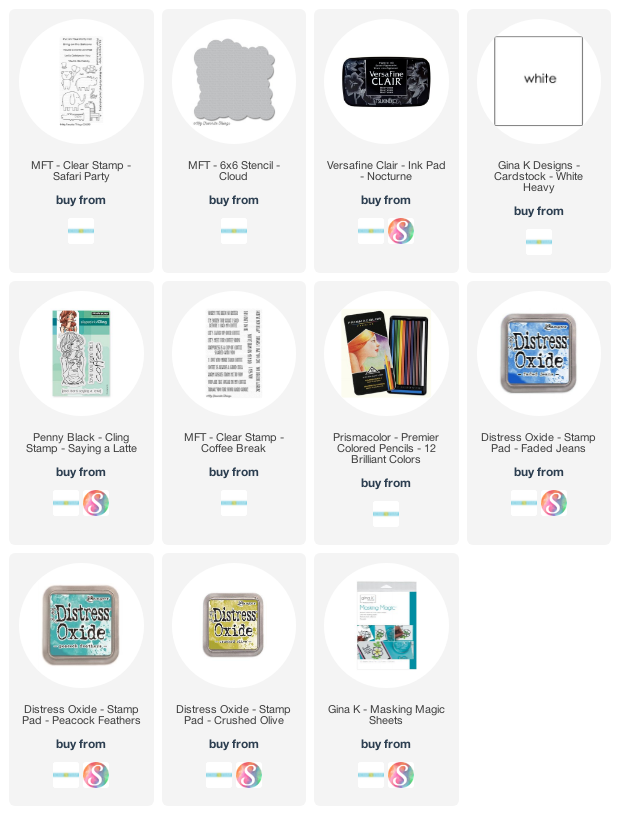
SUPPLIES
If you’re interested in purchasing any of the supplies I’ve used I’ve listed them below. I use compensated affiliate links which means if you make a purchase after clicking one of my links below I will earn a small commission at no additional cost to you.
I hope this blog post finds you well! Today I want to share with you my Lawn Fawn Swish & Pop with a Twist card.
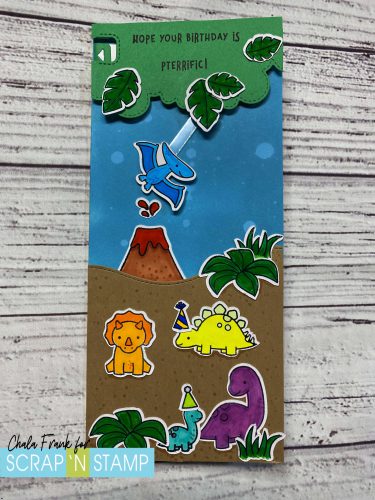
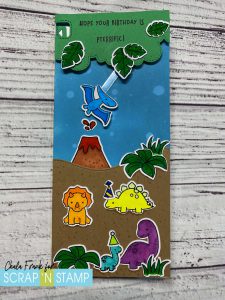
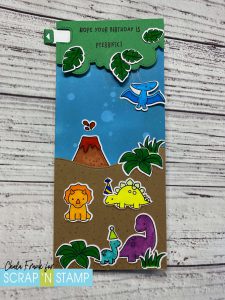
I love this new interactive Swish & Pop die from Lawn Fawn and wanted to see how I could use it with some older stamp sets. As I was flipping through my Lawn Fawn stash I came across the Rawrsome stamp set. I thought these cute little dinos would make an awesome card for a special boy’s birthday that we are celebrating this weekend.
As there are several steps (although they are easy) you may want to watch the video here:
I started by creating a background piece by ink blending on an A2 size card panel with Broken China Distress Oxide Ink and an ink blending brush. I like to do the blending on my Waffle Flower Mini Media Mat as it helps keep my project in place. I then added some water droplets to reactivate the ink and give the background a bit of interest.
Next, I die cut the slider portion from some 120lb cardstock and the interactive arm with some clear acetate. I will then use the “L” shape die. Instead of using this by lining it up in the traditional way on the bottom of the card I will turn it upside down and line it up with the upper left-hand side of the card panel. Once the panel is cut there should be four small holes in your card panel.
I will turn the interactive arm so that the tall portion is on the left and the portion with the two holes is on the right. I will place a brad through the hole in the slider portion and then through the bottom hole of the interactive slider arm and secure the back of the brad. I will then take the second brad and place it through the top hole of the interactive arm and through the second hole in the distress-inked panel attaching the two pieces together (Again, if this all sounds confusing, I encourage you to watch the video linked above). Now rotate the pieces so that the clear acetate arm is pointing down and the pull tab is at the top either to the left or right, whichever way you want it to pull from depending on the element you are attaching to the acetate arm. My image is facing to the right, so I want my pull tab to be on the left-hand side.
At this point, I want to adhere the inked panel to my card base. I decided it would be fun to do a slimline card and adhered it with a tape runner and trimmed the excess. I will then add some foam squares as stoppers around the acetate piece so that the arm can only swing a certain distance across my card.
Now for the little critters! I stamped out the dinosaur images from the Rawrsome stamp set and a few leaf and grass images from the Critters in the Jungle with Memento Tuxedo Black Ink and cut them out with my Brother Scan’N Cut. I kept the colouring simple with my Copic Markers. Next, I adhered the pterodactyl with some Glue dots and then trimmed the acetate arm.
To create the tree canopy I used the Stitched Rolling Clouds Edges from My Favorite Things I die cut a piece of green cardstock that would fit over the interactive mechanism. I also thought that you could use the Falling from the Clouds die frame and trim it to fit. I then used the notch piece for the pull tab and die cut that on the left-hand side of the canopy piece. For the sand portion, I used the Slimline Stitched Hillside Borders from Lawn Fawn and die-cut some craft cardstock.
Before we begin assembling, we need to decide if we want our sentiment to be stamped on the canopy portion of the sand. I decided I like it best on the canopy, thus giving me more room to add lots of dino critters on the bottom. I stamped the sentiment “Hope Your Birthday is Pterrific” in VersaFine Claire Nocturne Ink. I then add further foam squares to the back making sure I don’t add them where they can interfere with the swinging element and secure that to the card base.
It’s time to decorate! My favourite part is creating the scene with the images. I adhered to the sand portion with a tape runner and the rest of the images with Gina K Connect Glue. I think the little party hats are adorable!
The last step is to die cut the little arrow for the pull tab. I pushed the pull tab all the way into the right and trimmed it and then die cut that tab arrow in the same green cardstock and again adhered that with Gina K Connect Glue.
Now it is time to play with it!
I hope you enjoyed today’s card and that it helps you to look at how you can use new and old products together!
Todays Random Acts of Cardness prompt is one layer.
I’m sharing two one layer cards but they are very different. Let me know in the comments if you make one layer cards and what if you prefer to put lots of detail on it or keep it really clean and simple.
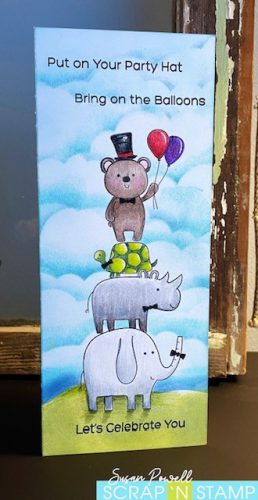
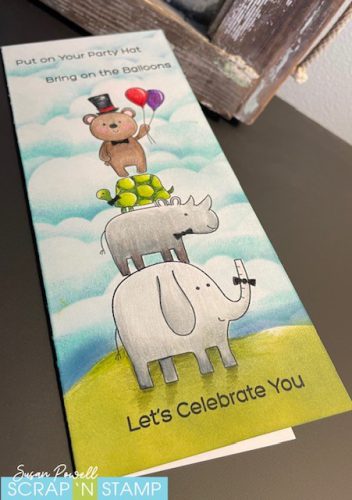
The first card I’m sharing with you today has lots of detail. The trick for this is masking.
Masking is not something I do a lot of. Sometimes you really have to plan it out. Since my images were just piled on top of one another there isn’t a lot of planning involved. If I wanted images in front of one another then you start with the image you want in the foreground, mask it, then stamp the next one and so on. I more times than not mess up when I do that so I chose to make a slimline card and have all the images standing on top of one another.
I stamped the elephant, then masked him, stamped the rhino, masked him and so on. Then I blended on some grass. Next I used a cloud stencil and blended on the clouds. I removed all the masks then set about coloring the images with my Prismacolor pencils. I used the pencils to add some shading under the elephant and along where the grass meets the sky.
This isn’t a hard technique but it can take some time to plan out and do it…
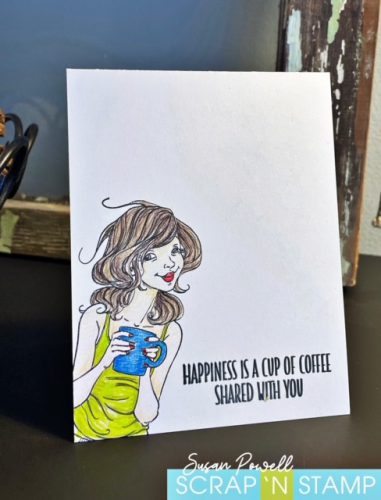
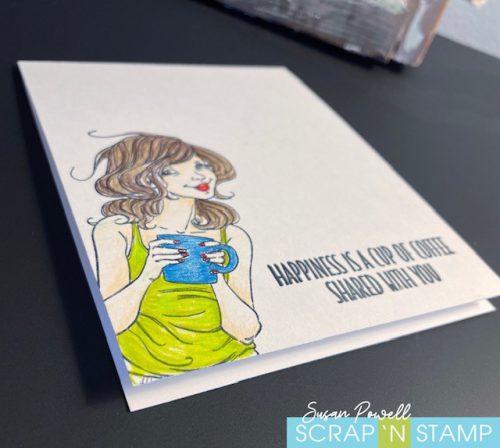
…and as much as I like how the first card turned out this next one is my favorite. I love how the image is off the edge of the paper. It’s like she’s peeking in to say hi.
I stamped the image, colored her in with my Prismacolor pencils, then stamped the sentiment.
That’s it.
Leave me a comment and let me know if you make one layer cards and if you have a favorite way to make them.
Happy Stampin’
and thanks SO MUCH for visiting!
Stay safe everyone!!
Susan
SUPPLIES
If you’re interested in purchasing any of the supplies I’ve used I’ve listed them below. I use compensated affiliate links which means if you make a purchase after clicking one of my links below I will earn a small commission with no additional cost to you.