Scratch-N-Stamp
Search

Checkout

Keep up with Sales, New Products and other events at Scrap `n Stamp. Sign up for our newsletter now!

What's New

Hot Deals


Slimline

Trees, Trees and More Trees!

Hey creative friend! It’s Deb here, for the Design Team. Do you known what I realized, today? I realized that I have a LOT of stamp sets with trees! Trees, trees, and more trees! I guess that’s why I chose trees for today’s prompt for the Scrap ‘N Stamp challenge. My house is also surrounded by trees – it’s lovely to look at, especially at this time of year. We have evergreen trees, but we also have a lot of deciduous. So when the leaf buds start emerging, it’s a riot of all shades of green!
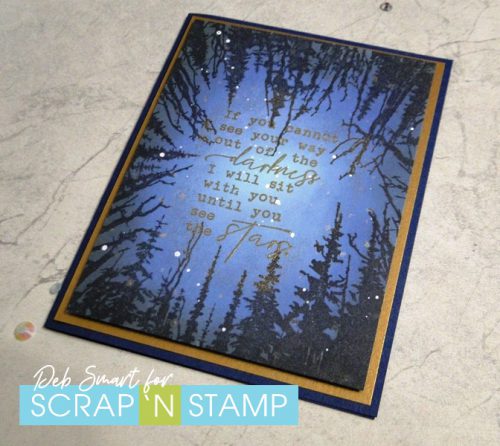
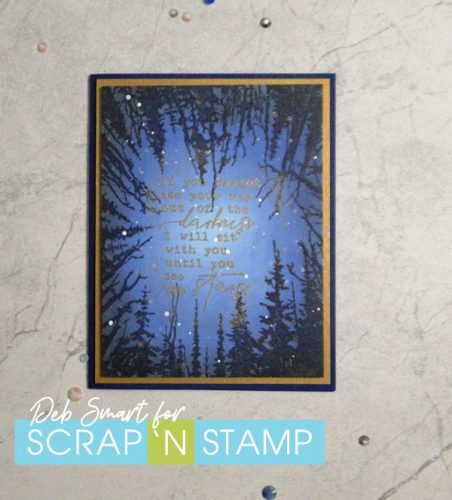
CATHEDRAL OF TREES

This first card uses an ‘oldie but a goodie’ stamp from Hero Arts, called Cathedral of Trees. I love this perspective of looking up, from the middle of a grove of trees.

Trees, Trees and More Trees!

CARD DETAILS

A trick I like to use when doing an ink blended background is to start with a piece of coloured cardstock, rather than white. Choose the lightest of the colour you’re using – in this case, start with light blue. Next, blend on Distress Oxide inks in (from  outside in) Black Soot, Chipped Sapphire and Faded Jeans. Leave the very middle without ink – so that just the cardstock shows through. This gives you the illusion that the center is ‘glowing’ with light.

Next, set up the blended panel in your stamp positioner, with the Cathedral of Trees stamp. Cover the stamp with Nocturne ink, and press firmly. With these large background stamps, I always find it best to ink & stamp twice, to ensure full coverage.  With the panel still in the positioner, line up the sentiment stamp Darkness Stars from Impression Obsession. Stamp with Versamark ink. Remove the panel, cover the sentiment stamping with gold embossing powder, and heat set.

To add some stars, mix a bit of white gouache or acrylic paint with water. Pick up the paint with a small brush, and splatter onto the panel. I also added some gold stars by dotting a Nuvo Glimmer Pen in Midas Touch randomly onto the panel.

Layer the finished panel onto a piece of Gina K. gold cardstock, and then onto a dark blue card base.
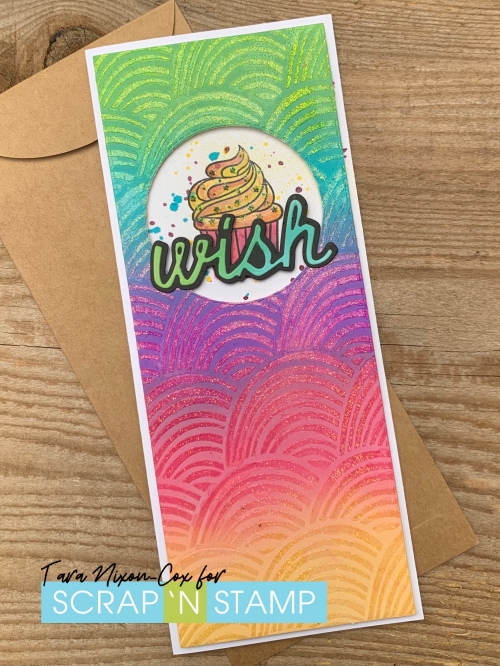
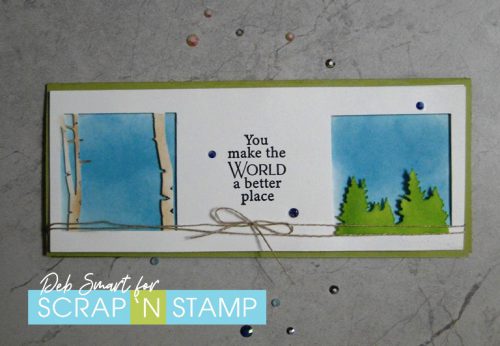
Trees, Trees and More Trees

SLIMLINE TREES

This next card doesn’t use any tree stamps – but it does use tree dies! I chose the Picket Fence Studios Slimline Die Cutting System with the 2 tree square dies.

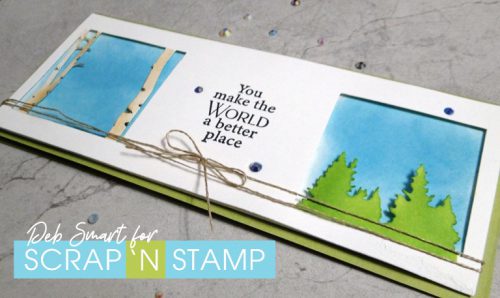
I love the simplicity of this card! The blended blue sky just shines, doesn’t it?

CARD DETAILS

First, use the smaller of the slimline dies to cut 2 pieces from white cardstock. Put one aside – this will be for the background. Place the 2nd one back onto your Big Shot cutting plate, and place the 2 square tree dies at either end, and cut. To colour the birch trees, lightly blend on Vintage Photo distress oxide, and then add the black with a fine marker. Colour the evergreen trees with Mowed Lawn distress oxide, and a blending tool. Now, stamp the sentiment from the Poppystamps Diamond Sentiments in the middle, with Nocturne ink.

Place the die cut layer over top of the uncut piece, and lightly trace out the square openings with a pencil. Next, use a blending tool and apply Broken China distress oxide. Layer the 2 panels together with foam tape or squares. Decorate the front by wrapping some linen thread around the front, tying off with a small bow. Add a few coloured rhinestones, and then attach the card front to a green card base.

JOIN THE DAILY CHALLENGE

Are you playing along with the Scrap ‘N Stamp daily challenge? You don’t have to play every single day – play as often as you can! You can find the details HERE in the Facebook group, along with the list of prompts for this month. At the end of each month, one lucky participant is randomly chosen, and wins a $50 Gift Certificate to shop the Scrap ‘N Stamp store! I hope that you’ll join me in today’s challenge with trees, trees and more trees!

SUPPLIES

Speaking of shopping the Scrap ‘N Stamp store, I’ve listed the products I used for my cards, below. Affiliate links for supplies are provided. If you choose to use my links, you help support me in maintaining my blog, at no extra cost to you. Thanks in advance!


Trees, Trees and More Trees! Read More »

Tuesday with Tara {take 292} Birthday Wishes & Giveaway!

Happy Tuesday!  The birthday celebrations are continuing here on the blog (and also on instagram, so be sure to visit SNS & my personal feed-I’m “msespresso” for more chances to win)!  My card today is a slimline one, featuring the Make a Wish stamp set by Gina K.

Today’s card started with a background I made a couple months ago when I made this birthday card– I’ve used similar colors (but more of them!) and the same stencil & glitter paste.   This panel had a few smudges and imperfections, but it’s still so pretty with all that glitter I decided to use it anyways!  I used the Picket Fence Slimline dies to cut the panel and a circle window out of it.  I placed the die cut panel over my card base (which measures 3.5 x 8.5 inches folded) and stamped the cupcake inside the window with Archival Ink.

The stamp set which includes the cupcake is part of the Present Parade Giveaway, along with a Mini Slim Trifold Template & Dies by Taylored Expressions (together they are worth $48.75).

The mini slim set looks like a ton of fun in a little size- it’s designed to help you make a tri-fold card with die cut windows.  The mini slim cards measure a fun 3.5 x6 inches!  It’s a size I’m definitely going to try out soon!  You can enter to win this great prize by leaving a comment here on this blog post. You can also get extra entries over on Instagram- by dropping a like, comment and a follow on my post featuring this card & giveaway!

Okay… now that you’ve got all the Present Parade Details, let’s get back to my card… Once the ink was dry, I did bit of watercolor with Distress Ink.

I brought in a mix of yellow, pink & purple inks since I planned to add this die cut ‘wish’ word that was in my little scrap bin.  I finished it off with some glitter and then some paint splatters to add to the party vibes!

Since I had some pre-done pieces, this card actually came together pretty quickly… apart from the drying time of my paint splatters 🙂  There’s nothing like glitter, confetti and cupcakes to set the party mood!  I’ll be adding one of the sentiments from the stamp set to the inside to tie it all together.  Here’s another look at the entire card, I hope it makes you smile!  

Be sure to leave me a comment for a chance to win this fab gift in the present parade!  I’d love to know what you prefer at a party… cake or cupcakes?  And if you haven’t yet, check out the rest of the giveaways the team is sharing… and there’s more to come, so be on the watch for them!

Inky hugs,

Tara

Tuesday with Tara {take 292} Birthday Wishes & Giveaway! Read More »

Tuesday with Tara {take 285} Wild About You

Happy Tuesday and happy February!  I’m kicking off the new month with some Valentine’s Vibes and a fun twist on a tropical stamp set, Toucan Paradise by Concord & 9th!  I pulled out a mix of pink, coral & orange Distress Oxide Inks (the new color, Kitsch Flamingo would be a great addition!) for a fun slimline card!

It felt really good to pull out these tropical stamps and cheerful colors in the middle of some chilly weather!  I used the three colors you see above, Picked Raspberry, Abandoned Coral & Crackling Campfire (along with black & white) in Distress Oxide on the card base and with regular Distress Ink on the toucan (I found I lost some of the detail on his beak with Distress Oxides).  There’s a ton of great images in the set- flowers & leaves & fun texture stamps.  I dug through other stamp sets to find a tiny heart to add in a few of those.

I was tickled when I looked at the Picket Fence Slimline dies and looked at the tree window sideways and noticed it was perfect as branches for my bird to sit on!  My card base is the same oatmeal color as the top layer, but I did a bit of ink blending in Raspberry & Coral, then stenciled some hearts with Picket Fence Distress over it.  The top layer was adhered to the base card with some foam adhesive squares to make the background stand out a bit more.

I heat embossed the large sentiment, which was great for a tall card like this one, with Distress Embossing Glaze in Crackling Campfire over Versamark (clear) ink.

Do you enjoy making cards for Valentine’s Day? I have to confess, even through my many years as a single woman, I’ve always loved making fun Valentine’s and coming up with new ways to use my stamps to celebrate love & friendship!  Plan to join us back here on Friday for our February blog hop with more fun 🙂

Inky hugs,

Tara

Tuesday with Tara {take 285} Wild About You Read More »

Free Shipping Anywhere In Canada