Welcome to a new week! I’m really excited about today’s project that I have to share with you. It’s Deb here, with my word of ‘resin’ for the Daily Challenge. So today, I’m sharing how to create art with resin!
RANGER CLEAR RESIN
Most people think of resin as just a sealant. As in, create your artwork, and then pour the resin on top, to seal it. Resin has come a long way from that! Of course it has excellent sealing properties, but today, we’re adding colour to our resin, and creating a scenic art piece.
The Ranger Clear Resin is super easy to use; it’s a simple 2 part system of resin plus hardener. You combine half resin with half hardener – the mix must be an exact half-half ratio- and stir for 2 minutes. Then you’ve got about 30 minutes ‘working’ time before the resin starts to thicken and become unusable. Thirty minutes is plenty of time, don’t worry!
It’s important to remember that resin is toxic! Always work in a well ventilated area; have a window open, and/or a fan going. You also should always wear gloves to protect your hands. It’s also important to note that this resin is NOT FOOD SAFE, nor are alcohol inks. This means you should not use it on plates, cups, etc. that are to be eaten or served food from.
GETTING READY
Being aware of the working time is important. Get your work space all set up & ready to go, before you mix your resin. For the beach scene we’re creating today, first use masking or painter’s tape to tape off the underside and edges of your Ranger Hard-Core Art Panel. This is to stop any dripping resin from accumulating on the sides & bottom of your panel. Next, put out 1 plastic cup for each colour, and one for mixing the clear resin. For this piece, I mixed 1 oz. of each the resin & hardener, and mixed for 2 minutes. Next, pour some of the resin into each single cup. The amount of resin your put in each cup depends on how much of each colour you’ll need. The 4 colours we’re using are Ranger Latte, Glacier, Laguna and Snowcap. We need less of the Latte & Snowcap, so put smaller amounts in each cup. To colour the resin, simply add 4-6 drops of the ink into the cup with resin, and then mix. The more ink you add, the darker the colour will be. Here’s how my set up looks, with my colours mixed, and ready to go!
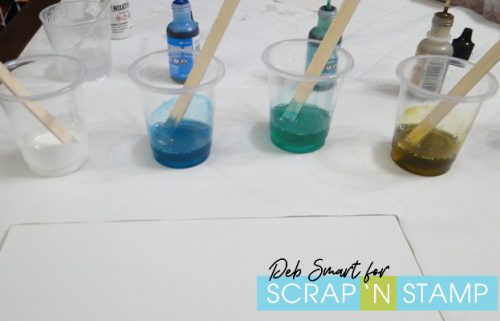
I decided that the Latte wasn’t dark enough, so I added 2 drops of Teakwood, and mixed that in. That’s the colour you see, above. In front of the cups, you can see my Hard-Core Art Panel, with the tape on the sides.
CREATE YOUR ART
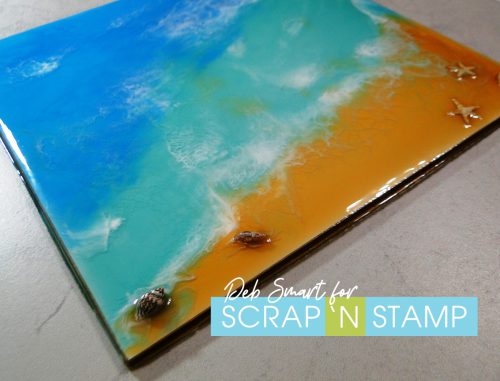
First, start by pouring the Latte & Teakwood resin on an angle along the bottom of the panel. This is your ‘sand’ area. Use your stir stick to spread the resin from side to side. Next, pour the darker blue Glacier resin on an angle at the top of the panel. Again, use your stir stick to spread the resin. This is the darker part of the water, which is furthest away. Now, add the lighter blue Laguna resin mix in between.
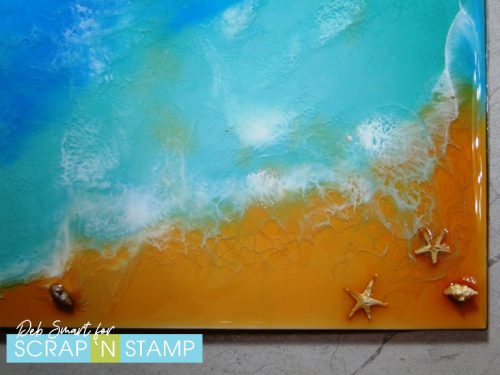
Now you’re ready to add the waves! Lift some of the Snowcap resin mix with the stir stick, and drop it in a line between where the Latte/sand and the Laguna/water meet. Now, use your heat tool or a blow dryer and direct the air on an angle, so that it pushes the ink into the resin, first away from you, and then towards you. This part is such fun! By blowing the ink & resin, it creates the cells and mixes the two, making it look like waves & foam.
Add more ‘lines’ of Snowcap resin mix into different areas of the water, creating more waves. I had ordered some tiny sea shells & starfish from Amazon to add to my piece, so now is the time to do that. Check for any air bubbles that may be trapped in the resin. You can get rid of air bubbles by holding your heat tool over them, or a butane torch, until they pop. A torch is much faster – it only takes a quick pass to pop the bubbles – but not everyone has one of these. Once you’re happy with the total look, you’re finished!
THE HARDEST PART
I think the hardest part of creating art with resin is waiting for the resin to cure, or harden! You want to leave your art piece for 6-10 hours, or overnight, without touching it. If you touch it before this, you may cause indents or marks in the resin, which can’t be removed. After 6-10 hours, you should remove your masking tape. Doing it at this stage will be easiest, as any extra drips will still be a bit pliable, and easier to remove. The resin takes a full 3 days to fully cure; meaning that you can handle it without any fear of leaving marks.
THE FINISHED BEACH SCENE
All of the work & waiting is worth it! Stand back and admire your gorgeous artwork!

Here’s a close up look at the cells and ‘foam’ created by the Snowcap ink.
SUPPLIES
I hope that today’s create art with resin project interested and inspired you! If you’re like me, once you’ve tried it once, you’ll want to do it again.
All of the supplies you need to create your own resin beach scene are listed for you, below. Have fun creating, and be sure to share your project on the Scrap ‘N Stamp Daily Challenge page HERE! Remember to use my special DT Discount Code 10DEB at checkout, to receive 10% OFF regular priced items!