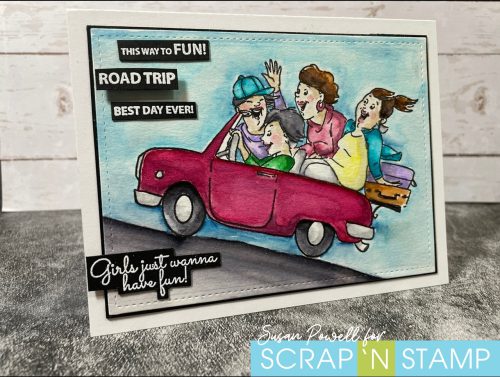
Scratch-N-Stamp
Search

Checkout

Keep up with Sales, New Products and other events at Scrap `n Stamp. Sign up for our newsletter now!

What's New

Hot Deals


Art Impressions

ROAD TRIP!!

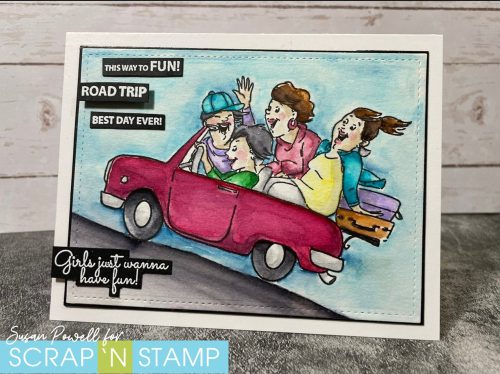
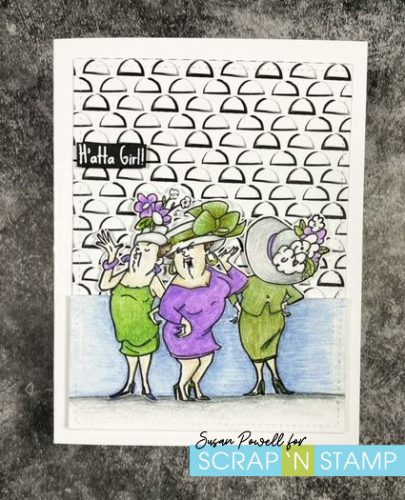
Hello and welcome!! It’s Susan here with you today and I’m sharing today’s Random Act of Cardness post. The prompt today is ROAD TRIP!! I don’t know about you but with the warmer weather coming it makes me want to do a road trip. My husband and I just got back from one last week and are going to head out again next week.  I colored this image while we were on our trip. I ALWAYS take some form of stamping with me and this time I took some watercolors and images to have some fun with.

I used a stamp Set appropriately called Road Trip from Art Impressions. I LOVE this stamp set. I pretty much love all Art Impressions stamps – they’re such fun to color. I used my Tombow Dual Brush Pens for this image. I didn’t keep track of what colors I used where but I did link to them all below.

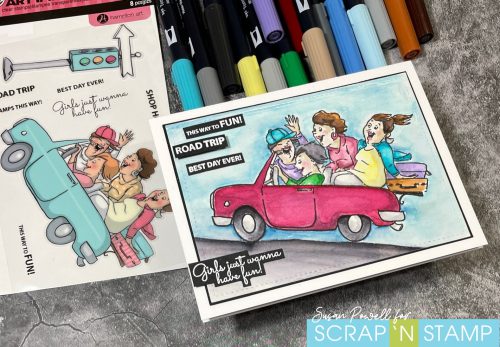
I stamped the image onto some Canson Mixed Media paper using Versafine Nocturne ink. I used the image on the stamp set as a guide for where to place shadows as that is something I tend to not take a lot of care in and have noticed sometimes I have shadows where there wouldn’t actually be any. I don’t tend to worry too much about that – as long as I’m having fun doing it and like the results then I’m good wherever the shadows appear. But if I have a guide then I’ll use it.

I’ve seen Kristina Werner stamp out the image she is using onto some scratch paper to figure out where the shadows are then shade them in with a pencil and use that as a guide. Maybe I should give that a try?

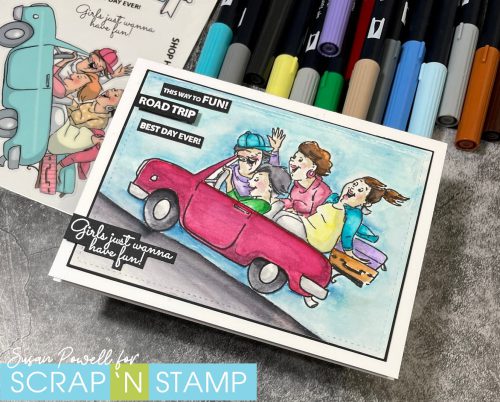
I cut the image out using the large die from the Lawn Fawn Small Stitched 4 Bar Die Set then layered it onto some Licorice card stock from MFT and adhered that directly to a white card base.

Next I stamped the sentiments with Versamark ink onto some Licorice card stock and heat set them with WOW Opaque Super Fine White Embossing Powder. My original plan was to try them out on the card then choose the one I liked best but I decided to use them all. I popped the Road Trip one up on some black craft foam for a little dimension.


Thanks so much for spending a part of your day with me.
Take care,
Susan
Shopping list:
I use affiliate links when I can. If you shop through one of my links it will allow me to earn a small commission at no additional cost to you. Thank you for your support!!


ROAD TRIP!! Read More »

H’atta Girl!

Hi Everyone! It’s Susan and I’m here today with a card for the Random Acts of Cardness Challenge.

Today’s challenge prompt is FANCY.

I chose fancy strictly because of Easter and the Got Style Stamp Set from Artist Impressions. I remember my youngest daughter making a fancy Easter bonnet at school one year. It was either kindergarten or grade 1 – a LONG time ago. It looked very fancy and she was so proud of it. The whole class was wearing them and we had an Easter egg hunt and a bbq at the school while they wore them. It was a lot of fun.

I stamped the image using Nocturne ink and my mini MISTI. I used the MISTI for two reasons. The first one being I wanted to be sure to get a good impression. The second reason is I like to restamp images after I color them and leaving the stamp in the MISTI means I can do that and it will line up perfectly every time. I like the black lines to be noticeable.

I thought about doing this in all kinds of color but opted for keeping everything green, purple and white/grey.

I’ll list all the Prismacolor pencil colors that I used below – be warned – there’s a lot. If I had tried out the colors first on a scratch piece of card stock I may not have used as many colors. I started with some, decided I wasn’t happy with it so layered on some more and in the end I’m happy with all the layers of color.

When I was done coloring and restamping the image I drew a straight line on either side, then fussy cut the image out to that line. I ran it through my die cutting machine using the largest die in the Lawn Fawn Small Stitched Rectangle Die set.

Looking at it now, my background doesn’t make sense to me. Essentially I have sky behind the ladies then I put patterned paper on the card behind the panel. I was thinking it was cool looking wallpaper but wallpaper with sky? Oh well? What are you going to do? I still really like the card.

The  sentiment is from the same Got Style Stamp Set and embossed with WOW white embossing powder onto some black card stock.

Thanks so much for hanging out with me today.

I hope you’re inspired to join in the Random Acts of Cardness challenge.

Here is the list of Prismacolor pencils I used.

934 – Lavender

956 – Lilac

1008 – Parma Violet

1086 – Sky Blue Light

1079 – Blue Violet Lake

1025 – Periwinkle

1018 – Pink Rose

120 – Sap Green Light

910 – True Green

912 – Apple Green

988 – Marine Green

1020 – Celadon Green

1021 – Jade Green

1090 – Kelp Green

1096 – Kelly Green

1097 – Moss Green

1059 – 10% Cool Grey

1060 – 20% Cool Grey

1061 – 30% Cool Grey

1063 – 50% Cool Grey

1065 – 70% Cool Grey

1085 – Peach Beige

997 – Beige

941 – Light Umber

947 – Dark Umber

1094 – Sandbar Brown


Happy Stampin’

and thanks so much for visiting!

Susan
Shopping list:
I use affiliate links when I can which means I earn a small commission if you purchase through one of my links – this is at no cost to you. Thank you – I appreciate all your support.


H’atta Girl! Read More »

Using up your scraps with a CUPPA LOVE

Good morning crafty friends! Amy here with my last post for Scrap N’ Stamp. It’s been a pleasure creating with these fun products and alongside some AMAZING ladies!

Today I have a little fun tutorial to use up your scraps along with Spellbinder’s CUPPA LOVE die set.

Here’s the fun and BRIGHT card I made using up a few pieces of scrap along with some adhesive.

I started by cutting 1/4′”strips out of my collection of scrap cardstock pieces. I then applied Be Creative Adhesive sheet to the back of a piece of copy paper cut to 4.25″x 5.5″. I  then peeled of the release paper and started lining up my strips…really quick and easy! ;o) I started with the colors of the rainbow but lost a bit  of the ROY G BIV order when I cut it down for my panel. BUT I still think it’s fun and pretty! lol

I applied Candied Apple Distress Oxide to Bristol Smooth paper,  straight from the pad, no blending tool and used that to die cut the cup from CUPPA LOVE. I  then used Vintage Photo Distress Oxide applied to Bristol Smooth to die cut the Coffee portion from the die set  as well. I adhered it all together and added some leaves and a little heart from the same set to complete my mug. Some little white gel pen highlights and some Nuvo Crystal Glaze applied to the coffee and heart finished it off…doesn’t it look good enough to drink???

A sentiment from Art Impressions Latte Love Set stamped with Black Onyx Versafine Ink die cut with MFT-  Fishtails completed my sentiment. I adhered the panel to black cardstock and applied it to my base card with fun foam. A natural hemp ribbon finished off my card.

So  there we have it, a fun and relatively easy way to use up some scraps to get a BRIGHT background for your cards.

I sure hope you’ve enjoyed this tutorial and don’t forget to check out the LOVE IS IN THE AIR Challenge over on or FB page here.

Happy Craftin’!

~hugs~

Amy

Using up your scraps with a CUPPA LOVE Read More »

Free Shipping Anywhere In Canada