Scratch-N-Stamp
Search

Checkout

Keep up with Sales, New Products and other events at Scrap `n Stamp. Sign up for our newsletter now!

What's New

Hot Deals


Big Shot

Christmas Town

I’ve been looking forward to using my newest die set, and today is the day! They are from Hero Arts, called Tri Fold Edge Village Fancy Dies. I saw a great video on the Hero Arts blog on how to create a unique fold with these dies, which is how I created my Christmas Town card.

CHRISTMAS TOWN

If you’re playing along with the Scrap ‘N Stamp Daily Challenge, you’ll know that today’s word prompt is ‘town’. Coincidence? No! First, let’s have a look at the front of the card.

Christmas Town

Looks like your standard slimline card, right? Except – wait for it!

Christmas Town

It opens up twice! The photo above shows the first, top-most layer opening to the left. The second layer, with the 3 line sentiment then opens to the right, leaving you the very middle to write your own message.

CREATE THE LAYERS

You could make your card so that it has the flat base, then the 3 front panels. I decided to make my card base a regular opening card base, because I like to write a lot in my cards to family! To do it this way, your card base measures 7″ x 8 1/2″, scored at 3 1/2″. Set this aside for now, while you create the layers.

Cut 3 pieces of white cardstock, one at 3 1/2″ x 8 1/2″, and 2 that measure 4″ x 8 1/2″.  Use your Big Shot with the die set, and die cut one of each.  If you like, you can use your markers to add colour to the evergreen trees and light the windows. Next, on the 1st die cut that is 4″ wide (this will be your middle piece) score it at 1/2″ on the right hand side. Now, take the final 4″ wide die cut piece, and score it at 1/2″ on the left hand side.  Fold back & burnish the score lines.  On the inside of the scored pieces, attach a strip of double sided adhesive tape.

CREATE BACKGROUND & ASSEMBLE

Now you need to create your background. On a piece of 3 1/2″ x 8 1/2″ white cardstock, blend on Distress Oxide inks for a night sky. I chose Broken China, Dusty Concord and Chipped Sapphire. Add some falling snow by flicking on watered-down white paint. Now, cut the length of your 1st die cut (the 3 1/2″ wide piece) down to about 6 1/2″ tall. Attach it to your ink blended background with liquid glue. Decide on how you want to layer the next 2 pieces, and trim them down as needed.

Next, remove the backing from the tape on your 2nd layer, and attach that to the right hand side of the card front. Repeat this with the final piece, attaching it to the left hand side.  You can now attach your card front to the card base.  Add sentiments to the front and middle layers, in a dark blue ink. I chose sentiments from the Penny Black Peaceful Season stamp set.

Christmas Town

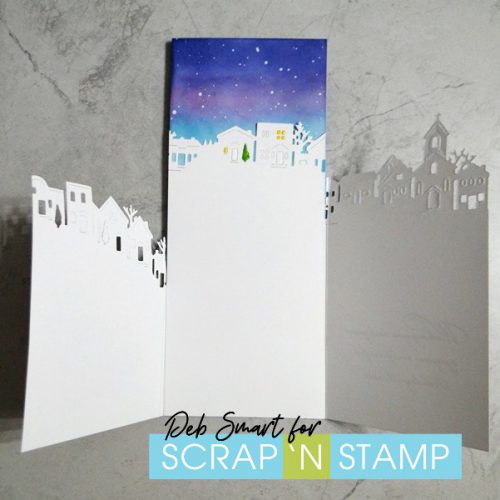
The photo above shows how your card looks, with both front ‘flaps’ open.

CREATE YOUR OWN CHRISTMAS TOWN

Of course you can skip the double flap openings, and simply attach each layer on top of the other! However you choose to do it, have fun, and make it your own creation.   To play along with the Scrap ‘N Stamp Daily Challenge, share a picture of your card on the Facebook challenge page HERE. Be sure to use the hashtag #SNSchallenge there, and on your other social media sharing sites. At the end of the month, one lucky person is randomly chosen to WIN a $50 GIFT CARD to shop at Scrap ‘N Stamp!

SUPPLIES

Shop for supplies to re-create this card at the Scrap ‘N Stamp store.  Be sure to use my Design Team Discount Code 10DEB at checkout, for 10% OFF your purchase! (only on regular priced items).   If you choose to use my affiliate links, you’ll be helping to support my blog, and creative projects. Thanks in advance!

Christmas Town


Christmas Town Read More »

TBT- Industrial Florals

HAPPY HAPPY HAPPY THURSDAY!!

I don’t know about you, but still being buried in a few feet of snow does not make me feel like Spring is right around the corner!  No early Spring flowers shyly blooming from under the veil of Winter’s frozen slumber, here!!  It’s more like—LAME–we need to go cut more wood for the wood burning stove and schlep it through two feet of slushy, wet snow!! 🙂

Oh, we’ll get our Spring flowers–but maybe not until April!!  So until then, I’m finding myself using flowers in some of my latest designs….if I don’t have any flowers outside (yet), I’ll create some inside!! 🙂

Indus Flower

I was inspired by Tim Holtz’s January Tag design and this is my take. Better late than never, right?  One of the creative goals that I set for myself this year is keeping up with Tim’s 12 Tags of 2014 Challenge.  Now, in what order I do them….? 😉

Background

I started with a piece of manila stock cut to about 4″x5.25″.  I smushed Vintage Photo, Crushed Olive and Mustard Seed DI’s onto my craft sheet and dropped some small piles of Pewter Perfect Pearls randomly over the ink.  I spritzed it all with water then pressed my manila stock into the wet ink and dried with my heat tool.  I repeated that process two more times.  This photo does not do the technique proud, but, it’s a very cool effect and the way the ink blends with the perfect pearls–Awesome!!

Rub Ons and Stencils

I used Words & Elements Remnant Rub-Ons on the right hand side and I used the Rays stencil with Antique Linen & Vintage Photo DI’s on the left hand side.  After applying the inks with my ink blending tool, I quickly dusted it with clear embossing powder and set with my embossing  heat tool.

Embossed Rays

The embossed rays gave this background a very subtle texture and image but ‘Big Design Bang’ nonetheless!

Rays

I lightly sanded the rub-ons and distressed the edges.  I inked the edges and over the entire background with Walnut Stain DI and my ink blending tool.

Foil for the flowers

To make the industrial flowers, I adhered a piece of Foil Tape Sheet to a scrap piece of cardstock.  I then added texture to the foil cardstock with a Cuttlebug embossing folder and then ran through the Big Shot machine again with the Tattered Floral Die.

Flowers and Molding

I cut a piece of Molding Film and covered it with a layer of Frosted Film then ran that through the Big Shot with the Tattered Floral die, too.

Foil Tat Florals

Pretty fun, right?  Now, time to get inky and painty!!

The frosted florals that I ended up using, got inked with Orange Blossom and Sepia Archival Inks and the industrial florals got a light layer of Black Soot DP.

Assembly

I shaped the foil flowers with a pencil and I shaped the frosted flowers with my heat embossing tool.  I carefully applied heat to the frosted petals and quickly manipulated into a slight curve with my fingers.  After it cooled, it was time for assembly and layering! More fun pieces of embellishments coming right up!!

I “made” those rusty bits! It’s totally awesome!!  I was introduced to Crafty Notions Rusting Powder by Alison Bomber on her blog Words and Pictures (you gotta check out her blog–Awesome!).  I just started having the chance to play with this magical powder, but so far–it’s easy: apply layer of multi-medium to bit or piece of your choice and then sprinkle Rusting Powder to cover;  a bit stinky: spray vinegar over powdered pieces; and totally worth it: wait for bits & pieces to dry and become rusty.

Flower Assembly

I used a simple black brad and an antique brad to layer with my rusted pieces.  I punched a hole through the layers of flowers and manila stock to secure them all together with the brads.

That splatter brush is a fun tool!  I may have gone a little splatter happy on this card🙂

DSC01569

I finished with a few Chit Chat stickers that I trimmed into little banners and inked with Walnut Stain DI.

Lots of elements in this one–But, they all work!!  With this card heavily inspired by Tim Holtz, it’ll fit right in over at the Anything Tim challenge at A Vintage Journeya new challenge blog on the block, and with all of the textures and the stenciling I did on this one, I’m going to send it over to Frilly and Funky for their Stencils and Textures challenge.

DSC01593

I really am looking forward to actually having real flowers blooming in my yard but, not having to dig in the yard yet and being able to stay in my crafty dungeon to create, is one of the benefits of having a late Winter and two feet of slushy snow hanging around🙂

Thanks for stopping by my blog today! Have a GREAT weekend and Stay Artsy Fartsy!!  XOXO-Shari

SUPPLIES I USED:

  • Distress Inks & Paint (Tim Holtz/Ranger); Archival Inks (Ranger); Perfect Pearls (Ranger); Embossing Ink (Clearsnap)
  • Modeling Film (Wendy Vecchi/Studio 490); Frosted Film (Tim Holtz/Idea-ology);  Foil Tape Sheets (Ranger); Rusting Powder (Crafty Notions);
  • Stencil (Tim Holtz/Stampers Anonymous); Tattered Florals Die (Tim Holtz/Sizzix); Cuttlebug Embossing Folder (Provo); Big Shot Machine (Sizzix)
  • Splatter Brush (Liquitex); Multi-Medium (Claudine Hellmuth/Ranger); Sanding Block; Craft Sheet; Ink Blending Tool; Distresser
  • Chit-Chat Stickers (Tim Holtz/Idea-ology); Remnant Rub-Ons (Tim Holtz/Idea-ology); Brad; Antique Brad (SU)

TBT- Industrial Florals Read More »

Tuesday Tutorial: Thinking Outside Your Nesties – Part 1

Hi everyone. This tutorial was put together by Shellie for us last year but I decided that it was time to feature it again because the technique is so much fun. It’s a great way to use your Nestabilities that has a real ‘wow!’ factor and it works with all kinds of shapes – circles, ovals, squares, rectangles, octagons and even the different labels. The key is to choose a stamp that is larger than the size of your Nestie so that it will go ‘hang’ over the edge.

Here is the original tutorial using regular stamps and Part 2 will show you how to use the same technique with our Studio K Digital Stamps.

Thinking Outside Your Nesties:

1. Select a stamp and then coordinate it with a Nestie is slightly smaller so that part of the image will be outside the Nestie shape. I chose  a floral image and inked it with Sage & Pink Petunia VersaMagic  dewdrop ink pads.

I used the direct to stamp technique to ink the different colors on my flower.

The shape of these dewdrop ink pads is perfect for inking small areas.

3. Choose a Nestie that fits the main part of your image allowing part of it to ‘hang out’ of the Nestie.

I used the  Large Standard Circles but you could use other shapes like ovals, octagons or one of the labels sets. Just lay the Nestie over your stamped image and try it out to see if you like it. Try different kinds until you find the one that you think will look the best.

4. Using your craft knife cut around the part of your image that will hang outside of the Nestie. Make sure you cut right against the image where your Nestie will sit.

5. Place your Nestie over your image making sure your cut area is on top of the Nestie.

6. Run your Nestie/image stack through your Big Shot or Cuttlebug.

7. Cut around the rest of the image that was outside your Nestie with scissors or your craft knife.

This is what is will look like when you are done.

To Finish The Card:

1. Emboss a piece of Core’dinations Cardstock using the Diamonds in the Rough CuttleBug Embossing Folder.

Once embossed gently sand the raised image using a sanding block.

2. Create a border for your stamped image using the coordinating size of Petite Scalloped Circle Nestabilities.

Layer the card elements, add a little ribbon and you are done!

Thanks for dropping by. Hope you give this fun technique a try.

Happy crafting!

Shellie

© Scrap ‘n Stamp Canada 2010

Tuesday Tutorial: Thinking Outside Your Nesties – Part 1 Read More »

Free Shipping Anywhere In Canada