Scratch-N-Stamp
Search

Checkout

Keep up with Sales, New Products and other events at Scrap `n Stamp. Sign up for our newsletter now!

What's New

Hot Deals


birthday cards

Birthday Sweets!

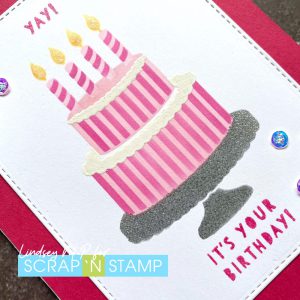
Happy Monday! Today’s Random Acts of Cardness prompt is SWEETS, and I chose a big stencilled birthday cake!

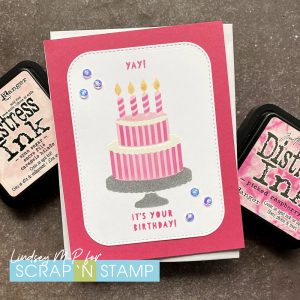
The Cake Maker stencil from Simon Hurley Create has all kinds of options for creating different styles of cakes, and as long as you keep a few things in mind, it’s fun and easy to use. The main thing to remember is MASKING! The stencil has a lot of different images quite close together, so masking all around the part of the stencil you’re using is important. And you know how I figured that out, lol. Making this particular cake, I also discovered using smaller blending brushes – such as the smaller Picket Fence brushes – helps to keep ink in control.
I started with the candles, using spun sugar and picked raspberry distress inks along with squeezed lemonade and carved pumpkin for the flames, then masked them so I could add the cake base in spun sugar. The stripes are picked raspberry. Next I added the cake stand in Colorbox silver and embossed it with Wow clear sparkle embossing powder. Finally, the white icing was added with Versamark and Wow detail white powder.
I wanted a fun font for the sentiment, so picked this pair from Concord & 9th’s Birdie Talk turnabout set, inked in Versamark + Memento rose bud, and embossed with the same sparkle embossing powder as the cake stand. I die cut my panel with a stitched die and found some bright pink cardstock in my stash for the card base. For the finishing touches, I added some sequins from my stash with Stickles in the centre, and some shimmer to the candle flames.

Phew! I think that took longer to describe than to make! I hope I’ve inspired you to make some paper sweets today!

Birthday Sweets! Read More »

Simple Stencils

Welcome Back!

I hope you all had a great weekend and were able to “Stencil Us In” for our latest blog hop!  Today I am continuing to play with some simple stencils to create some fun birthday cards.

I have also been really enjoying playing with my Distress Oxides lately and creating ink blended backgrounds.  The colours I am using today are Fossilized Amber, Picked Raspberry and Seedless Perseveres.

To start I masked out a white border using post it labelling tape that I got from Amazon.  You can use any masking paper that you have on hand, I also recommend Gina K’s Masking Magic.

I blend the Distress Oxide Inks with a foam blending tool, moving back and forth between the colours to get a beautiful transition from one ink to the other.  I love how easily Distress Oxides blend together.

The next part is the hardest, picking which stencil to use!  I chose the Jet Wing by Carta Bella.

Lay the stencil onto your inked background.  You can leave the masking on for the next step, I was a bit absent minded and took mine off.

Using a finger dauber I apply a generous layer of Brilliance Pigment ink in Moonlight White.   I will then carefully remove the stencil and the masking paper.  You will need to let this dry completely.  I suggest setting it aside for a couple hours….or, if you are impatient like me, you can use your heat tool.

I love the way the stencilling pops off the page and the way the vibrant colours of the Distress Oxides show through.

For the sentiment I used the big and bold Happy Birthday from Hero Arts Snarky Messages stamped in VersaClaire Nocturne Ink.  I recommend using a stamp platform like the Stamp Perfect to ensure you get a good impression of your sentiment.  I played with a few other Carta Bella stencils and love how each card turned out!

I couldn’t resist making one more, this time with in Peacock Feathers, Broken China and Cracked Pistachio.  I think a big bold Thank You sentiment would also look really nice with this background.

Hope you enjoyed today’s cards!

Have a wonderful and crafty week!

~Chala


Simple Stencils Read More »

Polar Bear Pals

Hi crafting friends and welcome back. Sandi MacIver here and today I’m sharing Polar Bear Pals, and in keeping with the Distressed Oxide Theme for this month, I did a quick Blended Distress Oxide background for my cute little bear.

Polar Bear Pals from Scrap 'N stamp

The My Favorite Things Polar Bear Pals is a fun stamp set with a great selection of sentiments covering many occasions. I love the fact that I can use it for a winter birthday as well as the holidays.

Polar Bear Pals

I started the card by borrowing the snowflake stamps from the Warm and Feathered Hugs stamp set, also from My Favorite Things. I white heat embossed them on the card front.

Next I used my Ranger blending tools to add Mustard Seed, Broken China and Blueprint Sketch Distress Oxides to my card front. This is the Embossed Resist technique as the embossed snowflakes resist the ink and pop from the colored background.

Polar Bear Pals

After that I mixed a little white paint and water and spattered onto my card base to create more snow.

Polar Bear Pals

To create my snowy mountain I cut another piece of card stock and then die cut it with the MFT Stitched Basic Edges Dies. I added a sentiment stamped in black ink before attaching to the bottom front of my card.

Polar Bear Pals

Finally, I stamped my bear on white cardstock. Coloured his scarf and skates with my Prismacolour Pencils before die cutting him with the coordinating Polar Bear Pals Dies. I added small pieces of Foam Squares to pop him up just a bit.

My only embellishment is I used my Signo White Gel Pen to add lines to his scarf.

Thanks so much for stopping in today. I have linked all the products I used below for you. Simply click on the link to see a larger image and to shop through our Scrap ‘N Stamp Store.

Polar Bear Pals Read More »

Free Shipping Anywhere In Canada