Watercoloring with Zig Clean Color Real Brush Markers
Hey crafty friends! Chala here and today I am sharing a super quick and beginner friendly card using Zig Clean Color Real Brush Markers.
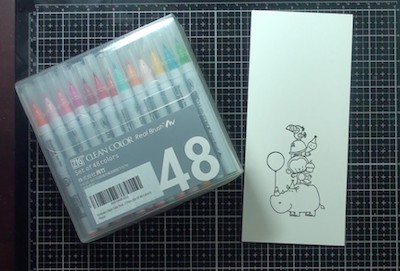
If you are just starting out I recommend the set of 24 which give you a great selection of colours at a fair price point.
Getting started:
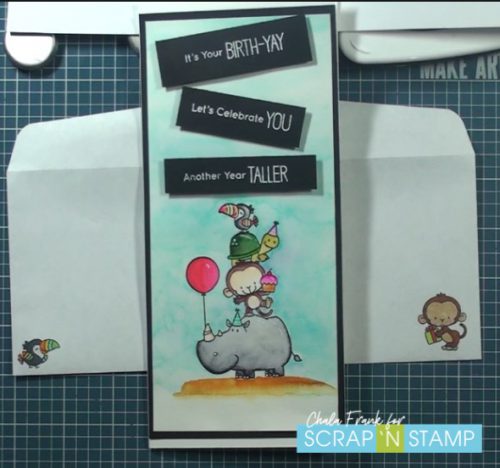
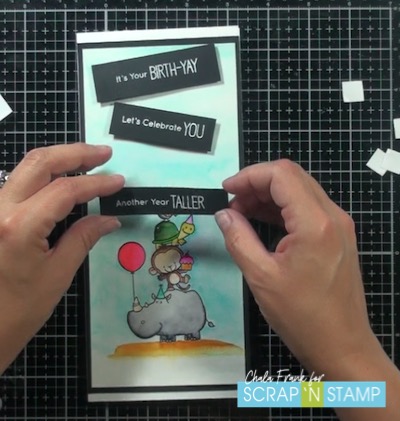
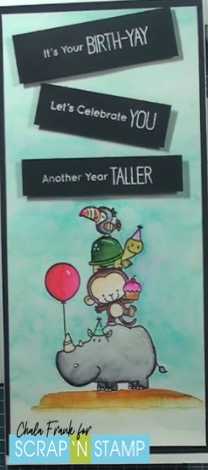
For today’s card I pulled out the Birth-yay stamp set from MFT. I stamped it with VersaClair Nocturne Ink onto some Canson Cold pressed water colour paper cut down to 4″ x 9″.
The Technique:
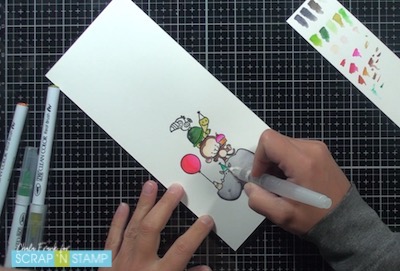
I am using a wet on dry technique. Start colouring with your lightest colour. You can then go back after to add a darker shadow or shading. It is always easier to cover lighter colours then try to mute darker ones!
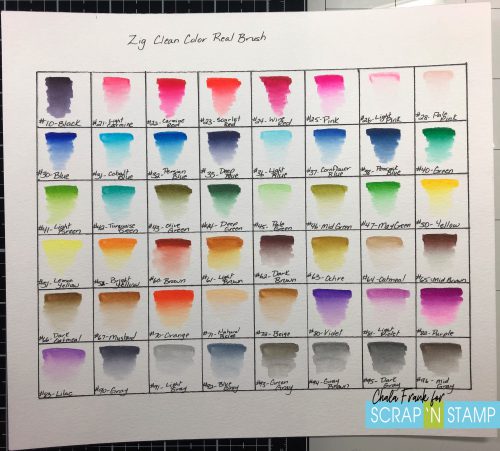
Take time to swatch your mediums so that you have a better idea of what colours you would like to use. You can see I did not do this in the video…but decided to take time to do it once I was done. This will make colouring on future projects much easier and quicker!
Once I achieve the shading I like I will go back over with my darker colour and use my Aqua Flow waterbrush to pull the colour out.
To avoid getting a “muddy” look with the watercolours (and because I am impatient) use your heat tool to dry the image in between.
A few of my thoughts:
The Zig Real Brush markers are very user friendly. I shared with you in a previous post my experience with Nuvo Aqua Flow Brush Pens and to me they are night and day. I love both for very different reasons. In my opinion, I found the Nuvo Aqua Flow Brush Pens to be very juicy and heavy pigmented.
You may find as a beginner to watercoloring that the Zig Real Brush markers give you a bit more control and are more forgiving. The look is more translucent and in keeping with a more “traditional” watercolour look.
To create the blue wash background I scribbled the Zig Real Brush marker onto my Tim Holtz Glass media mat. Then I picked up the colour with the Aqua Flow water brush and applied it direct to the watercolour paper.
Finishing Touches:
Once the image was dry, I trimmed down the panel and matted it onto some Lawn Fawn Black Licorice carstock and adhered that to the card base. My card base measured 9″ x 8″ and was scored it at 4″ creating a unique business envelope sized card.
I stamped the coordinating sentiments from the Birth-yay stamp set onto Lawn Fawn Black Licorice cardstock. Then using Versamark ink I heat embossed with white embossing power.
By using foam squares to pop the sentiment strips up I add a nice layer of dimension and interest to the project.
I added some highlights to the card with a white gel pen. and stamped a few images onto the envelope itself and coloured them with Copic Markers.
I was so excited to send this card in the mail I forgot to take nice close up pictures of the finished product. 🤦🏻♀️ So I apologize for the grainy look of this photo.
The Video:
Remember you can watch the video of how I painted and put this card together by clicking below.
As always, I appreciate you spending time with me today. Don’t forget to head on over to the What’s New and Hot Deals section to check out the latest arrivals and savings!
Did you know?
Did you know there are several ways you can win prizes with Scrap’N Stamp? Here are a few ways you can participate for your chance to win!
- Hop along with us at the beginning of each month to find out our monthly theme. We have an amazing design team and I am sure you will leave feeling inspired!
- Leave comments on our blogs and social media sites. (That includes the Design Team Members personal blogs and social media sites!)
- Participate in Scrap’n Stamp’s monthly challenges by posting your creations on the Scrap’N Stamp Facebook Challenge Page
Have a wonderful crafty day!
~ Chala
"Crafting Through the Chaos of Life"
Materials used:
- My Favorite Things Birth-yay Stamp Set
- Canson Watercolour Cold Pressed Paper
- Business Size Envelopes
- Zig Clean Real Brush Markers Sets of: 12 – 24 – 60
- Copic Markers
- Aqua Flow Pen
- Versafine Clair Nocturne Ink
- VersaMark Ink
- Heat Tool
- Lawn Fawn White Embossing Powder
- Uni Ball Signo White Gel Pen
- Foam Squares
- Tim Holtz Glass Media Mat
- Wendy Vecchi Make Art Stay-tion
Watercoloring with Zig Clean Color Real Brush Markers Read More »