Scratch-N-Stamp
Search

Checkout

Keep up with Sales, New Products and other events at Scrap `n Stamp. Sign up for our newsletter now!

What's New

Hot Deals


clean and simple

Time to Celebrate

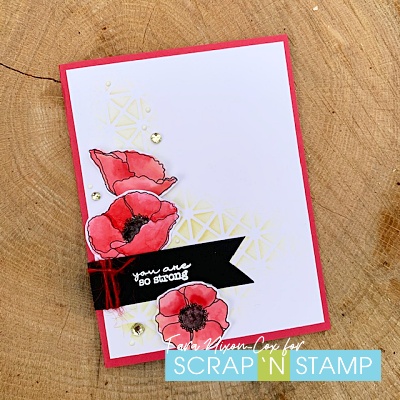
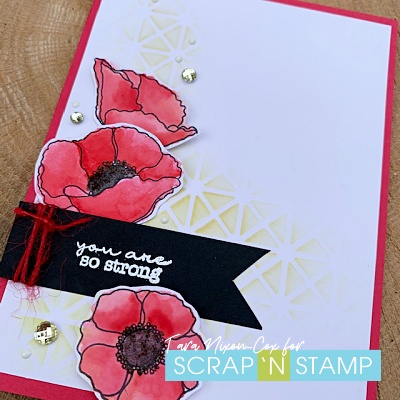
Welcome back to real life after a holiday weekend! Today’s Random Acts of Cardness prompt on the Facebook Scrap ‘n Stamp challenge page is CELEBRATE! It would be easy to use this prompt for a Christmas card, but I’m ready to ease back into regular cardmaking. 😉  Here’s what I came up with:


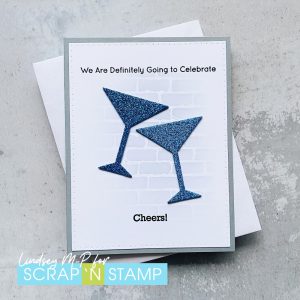
When a card is this clean and simple, it’s nice to add a bit of a WOW factor, and for me, it was cutting the two My Favorite Things martini glasses out of sparkly blue Memory Box glitter cardstock. It’s one of teammate Jess’s “picks”, and it’s a good one! Gorgeous shimmer, and die cuts beautifully. I also cut a few extra martini glasses out of some scraps of blue cardstock – the narrow stems of the glasses are hard to pop up with foam tape, I find.  For a little background interest, I added a light grey stencil of brickwork… perhaps this celebration is taking place in a trendy bar? 😀  The sentiments come from two different MFT stamp sets, Balloon Bundle and A Toast to You. To finish, I layered everything on a grey card base to pick up on the stencilling.


Just a reminder, if you’re doing some after-Christmas shopping, you can use the code 10Lindsey for 10% off your order! Have a great week.


Time to Celebrate Read More »

Tuesday with Tara {take 237} Hogs & Kisses

Happy Tuesday!

I’ve been seeing so many fab Valentine’s Day cards from the girls on the design team lately, I thought I should probably make a few myself!  Here’s a quick card I put together since I couldn’t wait to try out the new Falling Hearts die from Tim Holtz.  It is one large die that perfectly fills the front of a standard A2 sized card, plus 3 different sizes of individual hearts.

I cut the falling hearts on the front of a top fold dark pink card, then lined it with an off-white card which I cut just a smidge smaller so it would sit inside better.  I used some adhesive to attach the panels near the fold on the inside of the card and tied some ribbon around the front panels to keep them together.

Hogs & Kisses Card with Tim Holtz Falling Hearts die by Tara Nixon Cox

Once I die cut a few panels (you may be seeing a lot of this die, I kinda dig it!) I starting looking to see what stamps I had that would be fun to use along with it.  I noticed the Tim Holtz Funny Farm stamp set has several images I hadn’t used yet… including this little pig!  Together with his ‘hogs & kisses’ sentiment, he’s perfect for a cute Valentine!  I stamped once in Versafine Clair, carefully positioning him over the hearts.  I stamped him a second time on water color paper, then did some quick coloring with watercolor pencils in shades of pink.  After trimming him out, I simply glued him over the image I had stamped directly on the pink.  Looking at the front of the card, you’d never know I was ‘hiding’ a heart shaped hole under Mr.Piggy 😉

I had a few ideas for things to add… but I think it’s perfect in it’s simplicity!  I hope you like it too!

Inky hugs,

Tara

Tuesday with Tara {take 237} Hogs & Kisses Read More »

Tuesday with Tara {take 225} Pretty Poppies

Happy Tuesday! Today I’m sharing another card with you that uses some of the same products I featured on my card last Friday in our Poignant Poppies Blog Hop. I chose to make more of clean & simple card (inspired by the current AAA Challenge to make a card with maxi white space and an optional geometric element). Here’s what I came up with:

I stamped the poppy images in black permanent ink & did some quick water coloring with a few shades of red Distress Ink. While the images dried, I selected a shade of red card stock to be my card base. Next I embossed a simple sentiment from the stamp set in white on a scrap of black card stock. I had a general idea of my card layout, so added some geometric stenciling (using a Life Changing Blender Brush) to the background in a rough L shape.

I did some loose fussy cutting (ie. not so “fussy” LOL) of the poppy images and played around with the arrangement until I was happy with it. Once I settled on that, I trimmed the sentiment strip and added a bit of red twine. I added partial dimension to the poppies by adhering part of them with a flat adhesive and part of them with foam squares. This allowed me to tuck the flat parts under other layers and give a bit more movement to the card. Lastly, I finished it off with Distress Stickles in the flower’s centers, a bit of gold tone bling and some dots of white Enamel Accents.

I’m loving challenges to do CAS cards these days as they allow me to focus on my card design and take some of the pressure off to create something over-the-top amazing! I hope you like what I came up with 🙂

Inky hugs,

Tara

Tuesday with Tara {take 225} Pretty Poppies Read More »

Free Shipping Anywhere In Canada