Texture Paste with a Twist
Hey Guys! I am so excited to be back sharing my next card that features texture paste with a twist!
Our Design Team absolutely rocked the White Christmas them and I was so inspired by them that I had to create one more to share!
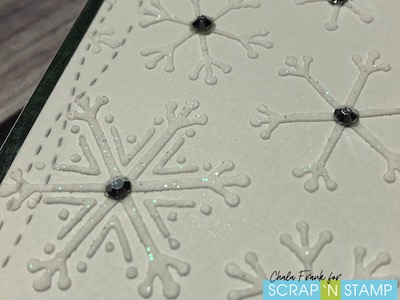
You got a sneak peek a few weeks ago during my Foil Quill video of the Carta Bella/Echo Park Snowflake Fun Stencil. I was so excited to be able to use it for this card as it was perfect to show off the detail that texture paste can give you on a project.
The Technique…
I only have one texture paste and wanted to jazz it up a bit so I decided to mix my own custom paste. To do this I grabbed my Tim Holtz craft mat, palette knife and Ranger opaque matte texture paste and mixed in the Nuvo Glitter Drops in Silver Crystals until I got the amount of sparkle I liked.
The great thing about this technique is if you are short on craft space like me, you can still get the look of all the colours without having to own ALL the colours. I encourage you to try mixing difference mediums to see what custom creations you can come up with! Remember to share your White Christmas theme cards over at the Scrap’N Stamp Facebook Challenge Page!
Spread the texture paste in thin even layers. This will help with speeding up the drying time and keeping your textured image looking even.
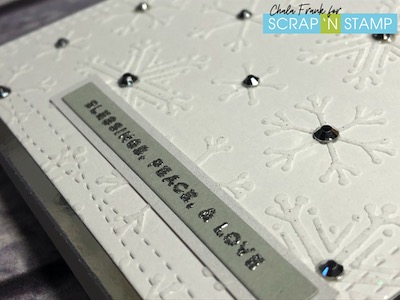
Once my piece was dry, I die cut it with the MFT Wonky Stitched Rectangle dies (one of my favourites). I then mounted that onto a 5 1/2″ x 4 1/4″ card panel made from silver mirror cardstock. (Here is a link to a similar cardstock) and adhered that panel to the A2 card base.
Make it Sparkle!
I wanted to up the sparkle factor just a bit and decided to add some Studio Katia sliver crystals.
So as not to detract from all that bling, I kept my sentiment very simple. So, I layered grey cardstock on top of a small piece of shimmer cardstock that I had laying on my desk from the blog hop card I created. I heat embossed the sentiment with some tinsel embossing powder. However, in hindsight I would use an embossing powder like Wow Metallic Embossing Powder Super Fine as the tinsel embossing powder was just a bit too chunky for that small and detailed of a sentiment.
I still liked how it turned out and will be making more of these to give out to friends and family.
The Video Tutorial
Thanks so much for stopping by and I hope you liked today’s card! You can check out the video here.
Giveaway Reminder!
Remember: if you have not participated in the hop, I encourage you to do so for your chance to win a $50 Scrap’N Stamp Gift Card! You also have until Saturday, December 14th, 2019 to comment, like and subscribe on my White Christmas Blog Hop video for your chance to win a set of Picket Fence Life Changing Blending Brushes. I will announce the winner of that prize on Sunday, December 15th, 2019 on my personal blog and YouTube channel.
Here are some photos of the finished card. Thanks for stopping by!

~Chala
Texture Paste with a Twist Read More »