Scratch-N-Stamp
Search

Checkout

Keep up with Sales, New Products and other events at Scrap `n Stamp. Sign up for our newsletter now!

What's New

Hot Deals


distress inks

My Neighbourhood

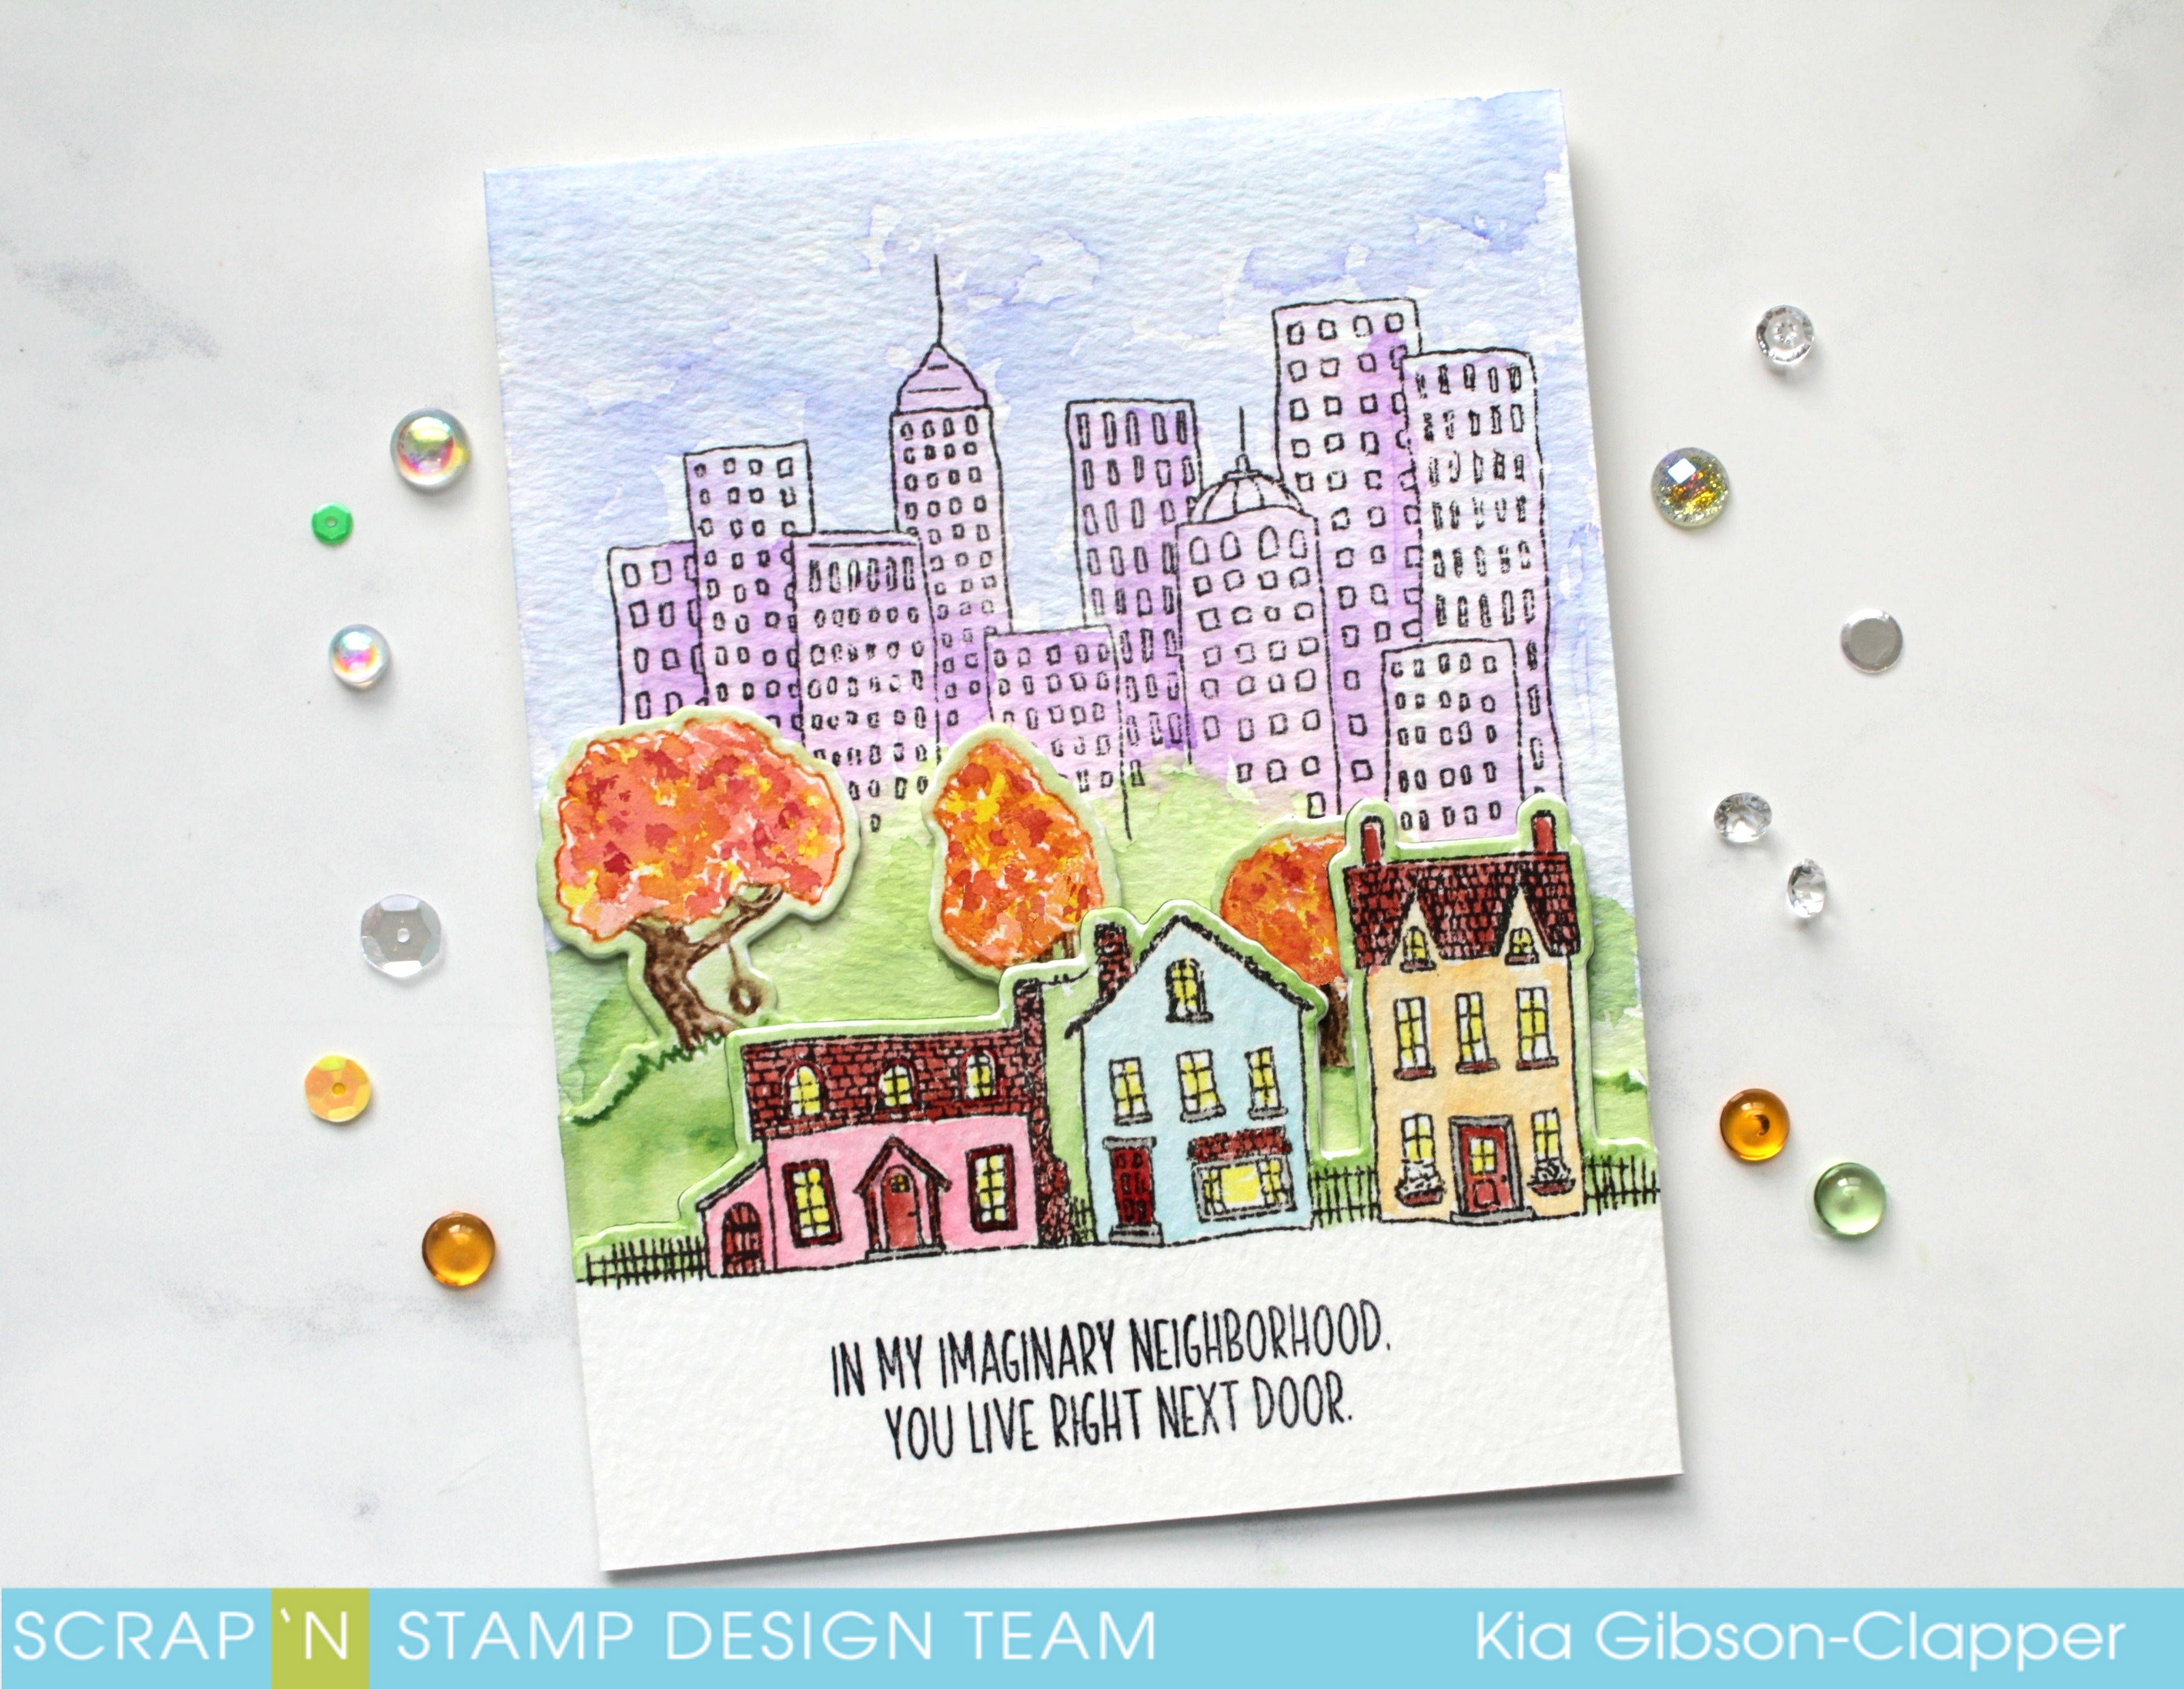
Hello. Kia here with you today to share this card I made using stamps and dies from Concord & 9th called City Stacks.

My inspiration for my card comes from my neighbourhood.  I am an apartment dweller, who fortunately overlooks a beautiful old street that has homes which were built in the 20’s and 30’s. They are huge homes with beautiful old trees and wonderful landscaping. And, fortunately, we do not have any other apartment buildings that block the views. And, as you can imagine, autumn is stunning in my neck of the woods.

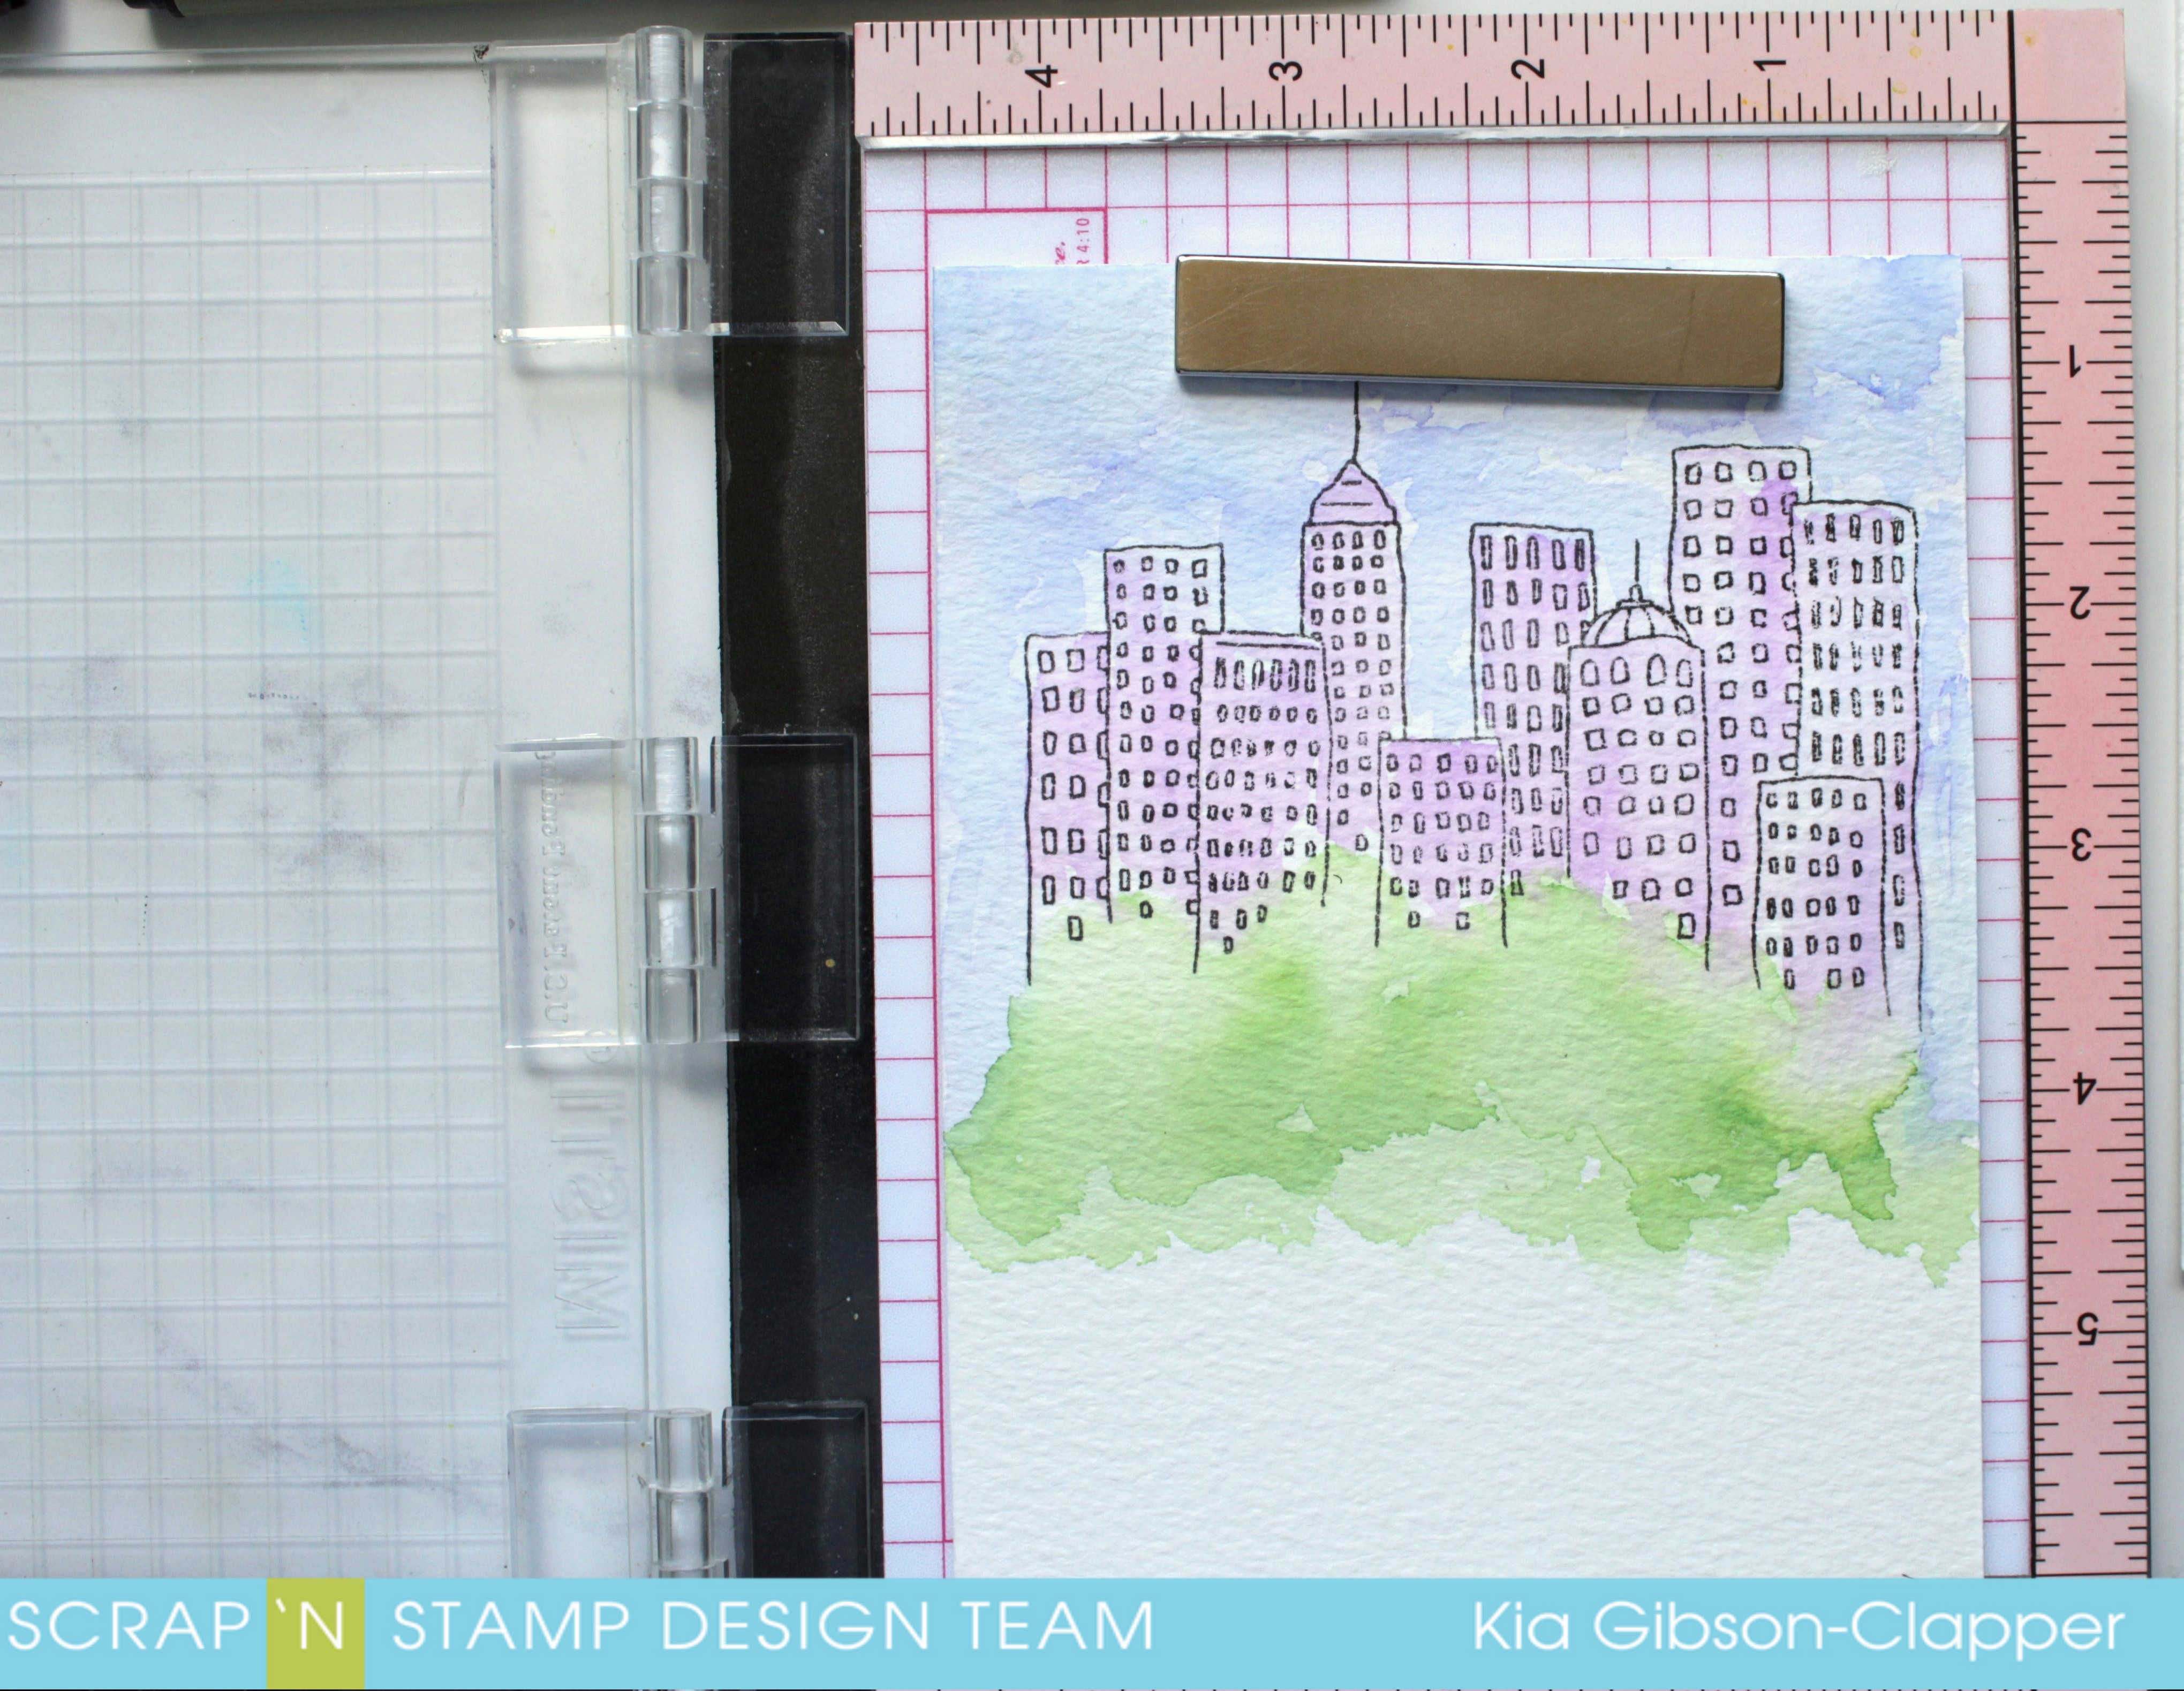
I am using Arches cold press watercolour paper for my card today, but any watercolour paper can be used. I am also using distress inks for this card. I have both the markers and mini cubes, and if I am missing a colour in one, I will have it in the other.

I started by stamping the building using jet black ink, then painted the sky using tumbled glass and blueprint sketch. I then did the building using wilted violet. The green is the background that will show when I attach the tree stack, so I have painted it using mowed lawn.

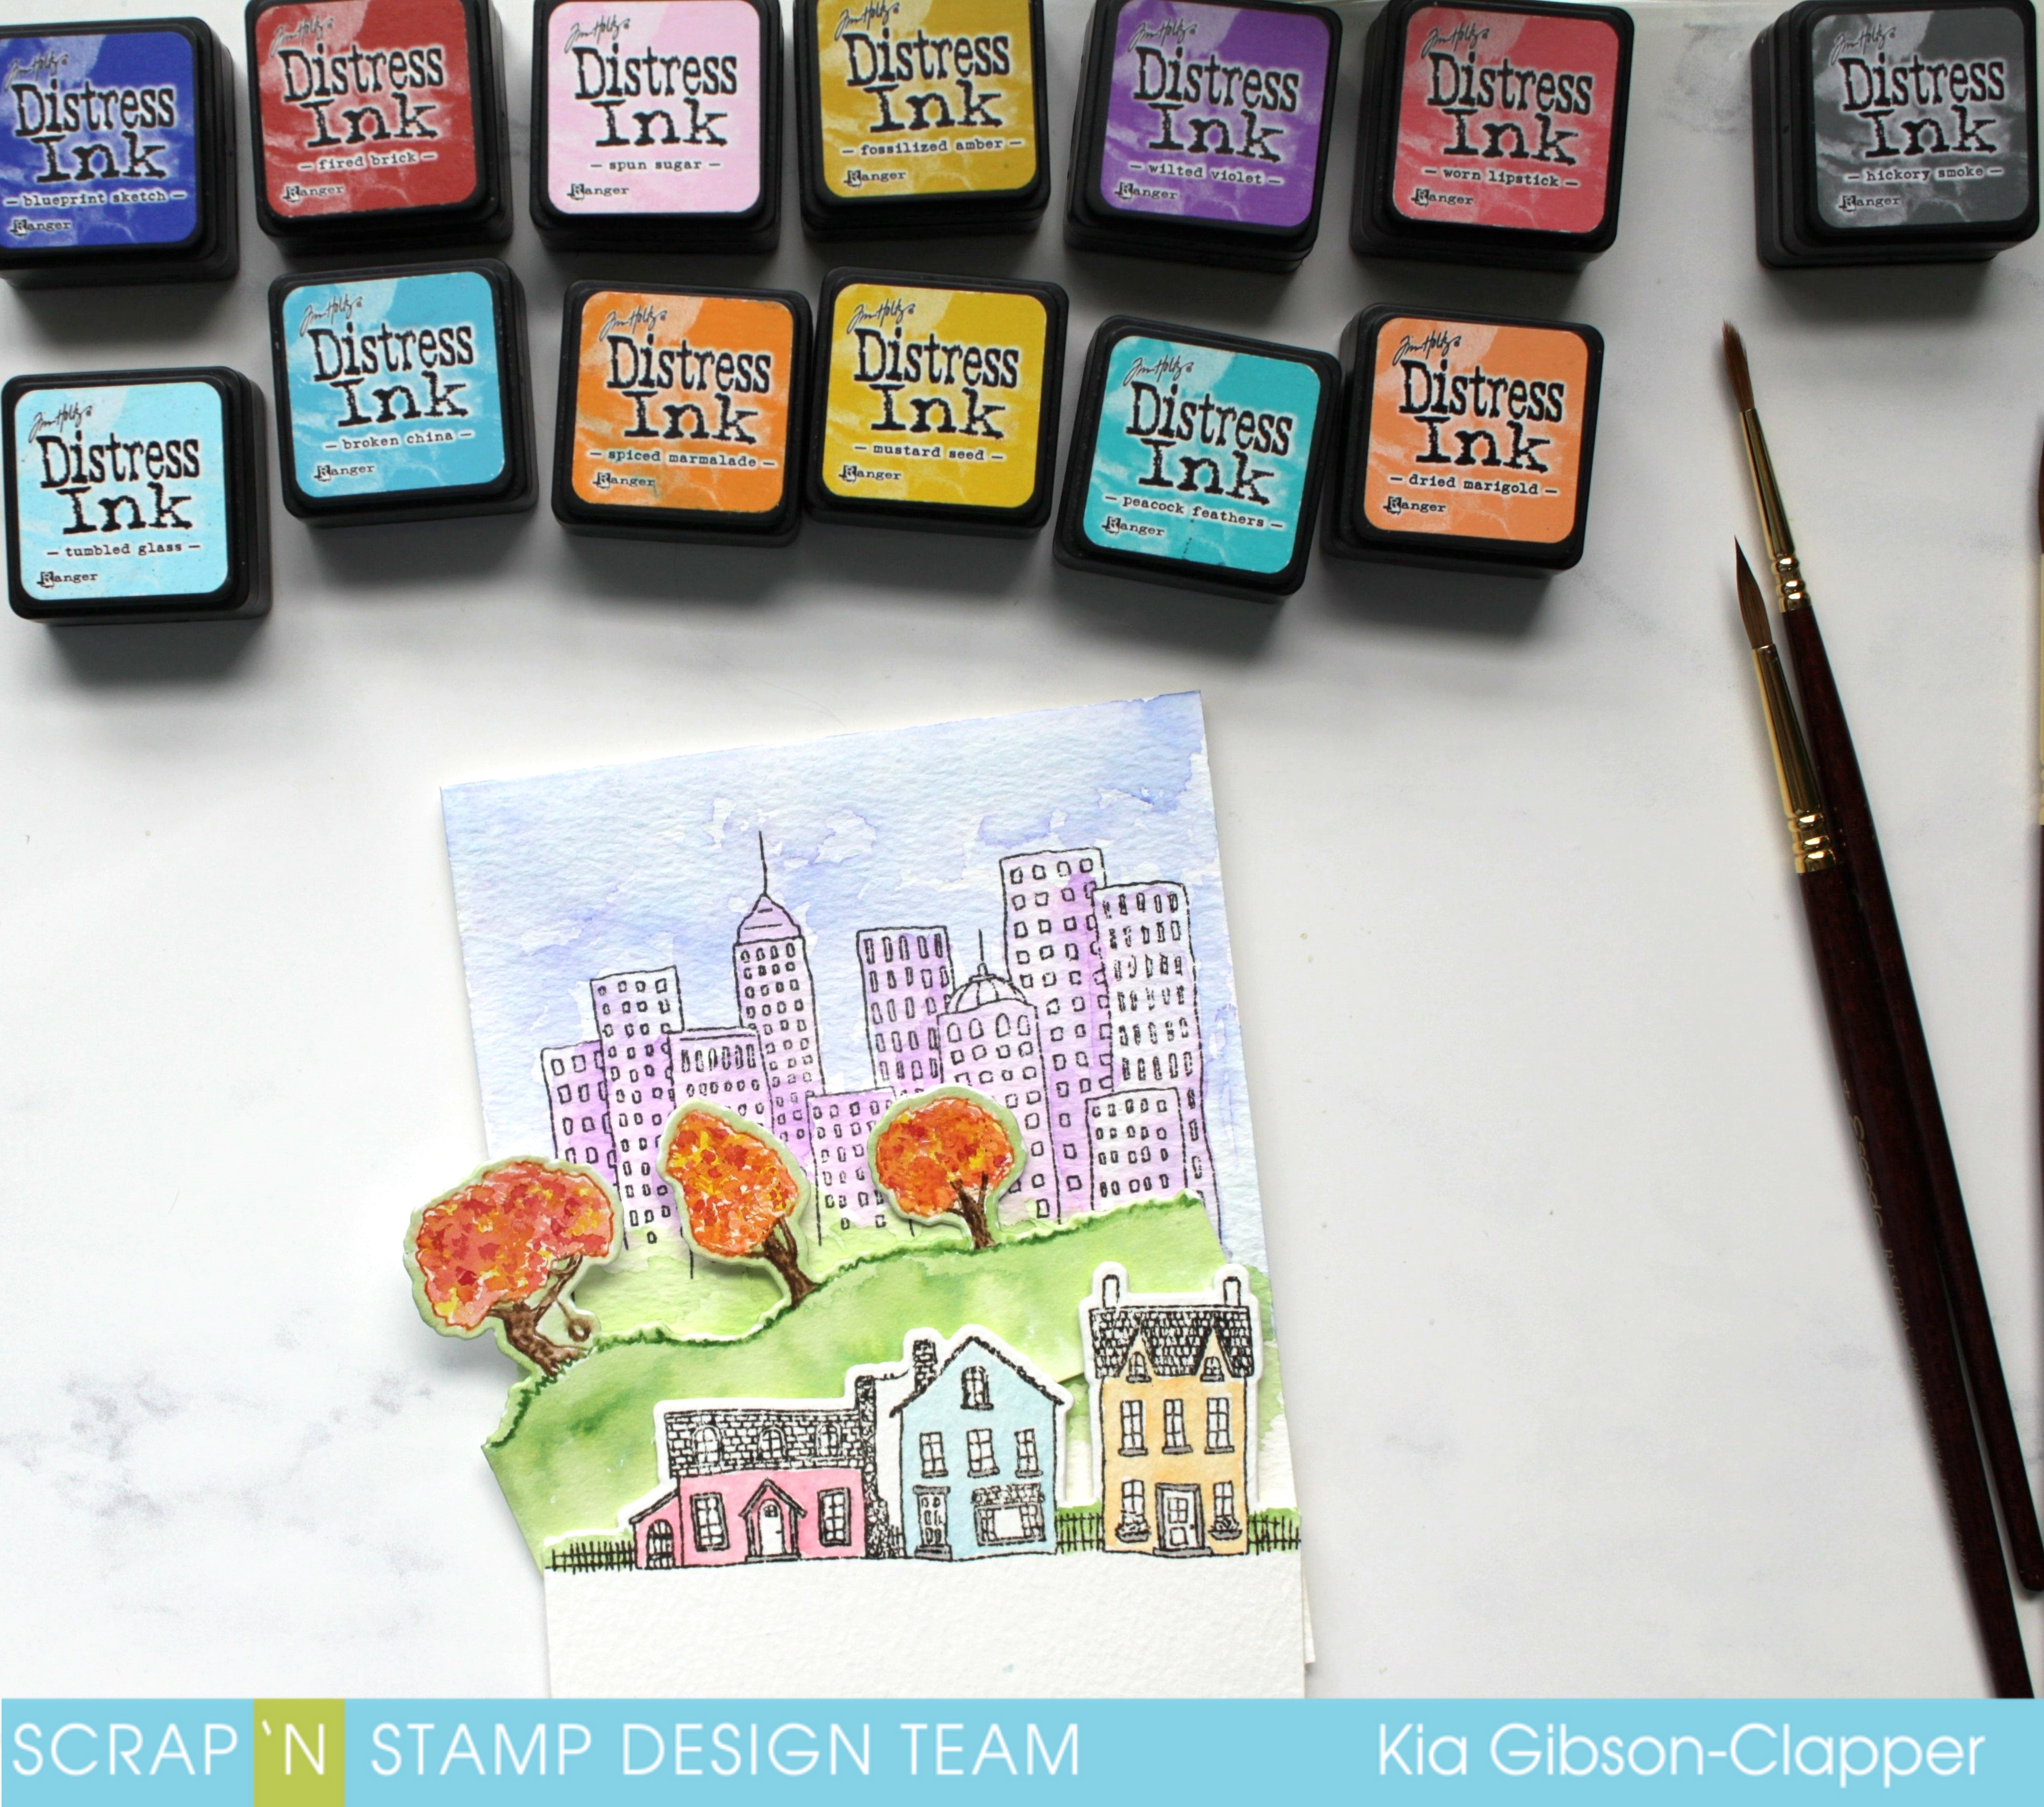
I then stamped and die cut the tree line stack, keeping in mind that this stack will be behind the row of house, so I cut my paper accordingly. As I do not want a lot of bulk here, I go along the bottom of my cut piece with my bone folder, which flattens it somewhat, therefore not adding extra bulk. I then watercoloured the grass with the mowed lawn, and the trees I did using dried marigold, fozzilized amber, spiced marmalade and a bit of candied apple.  I also went around the trees with the mowed lawn as I did not want any of the white showing.

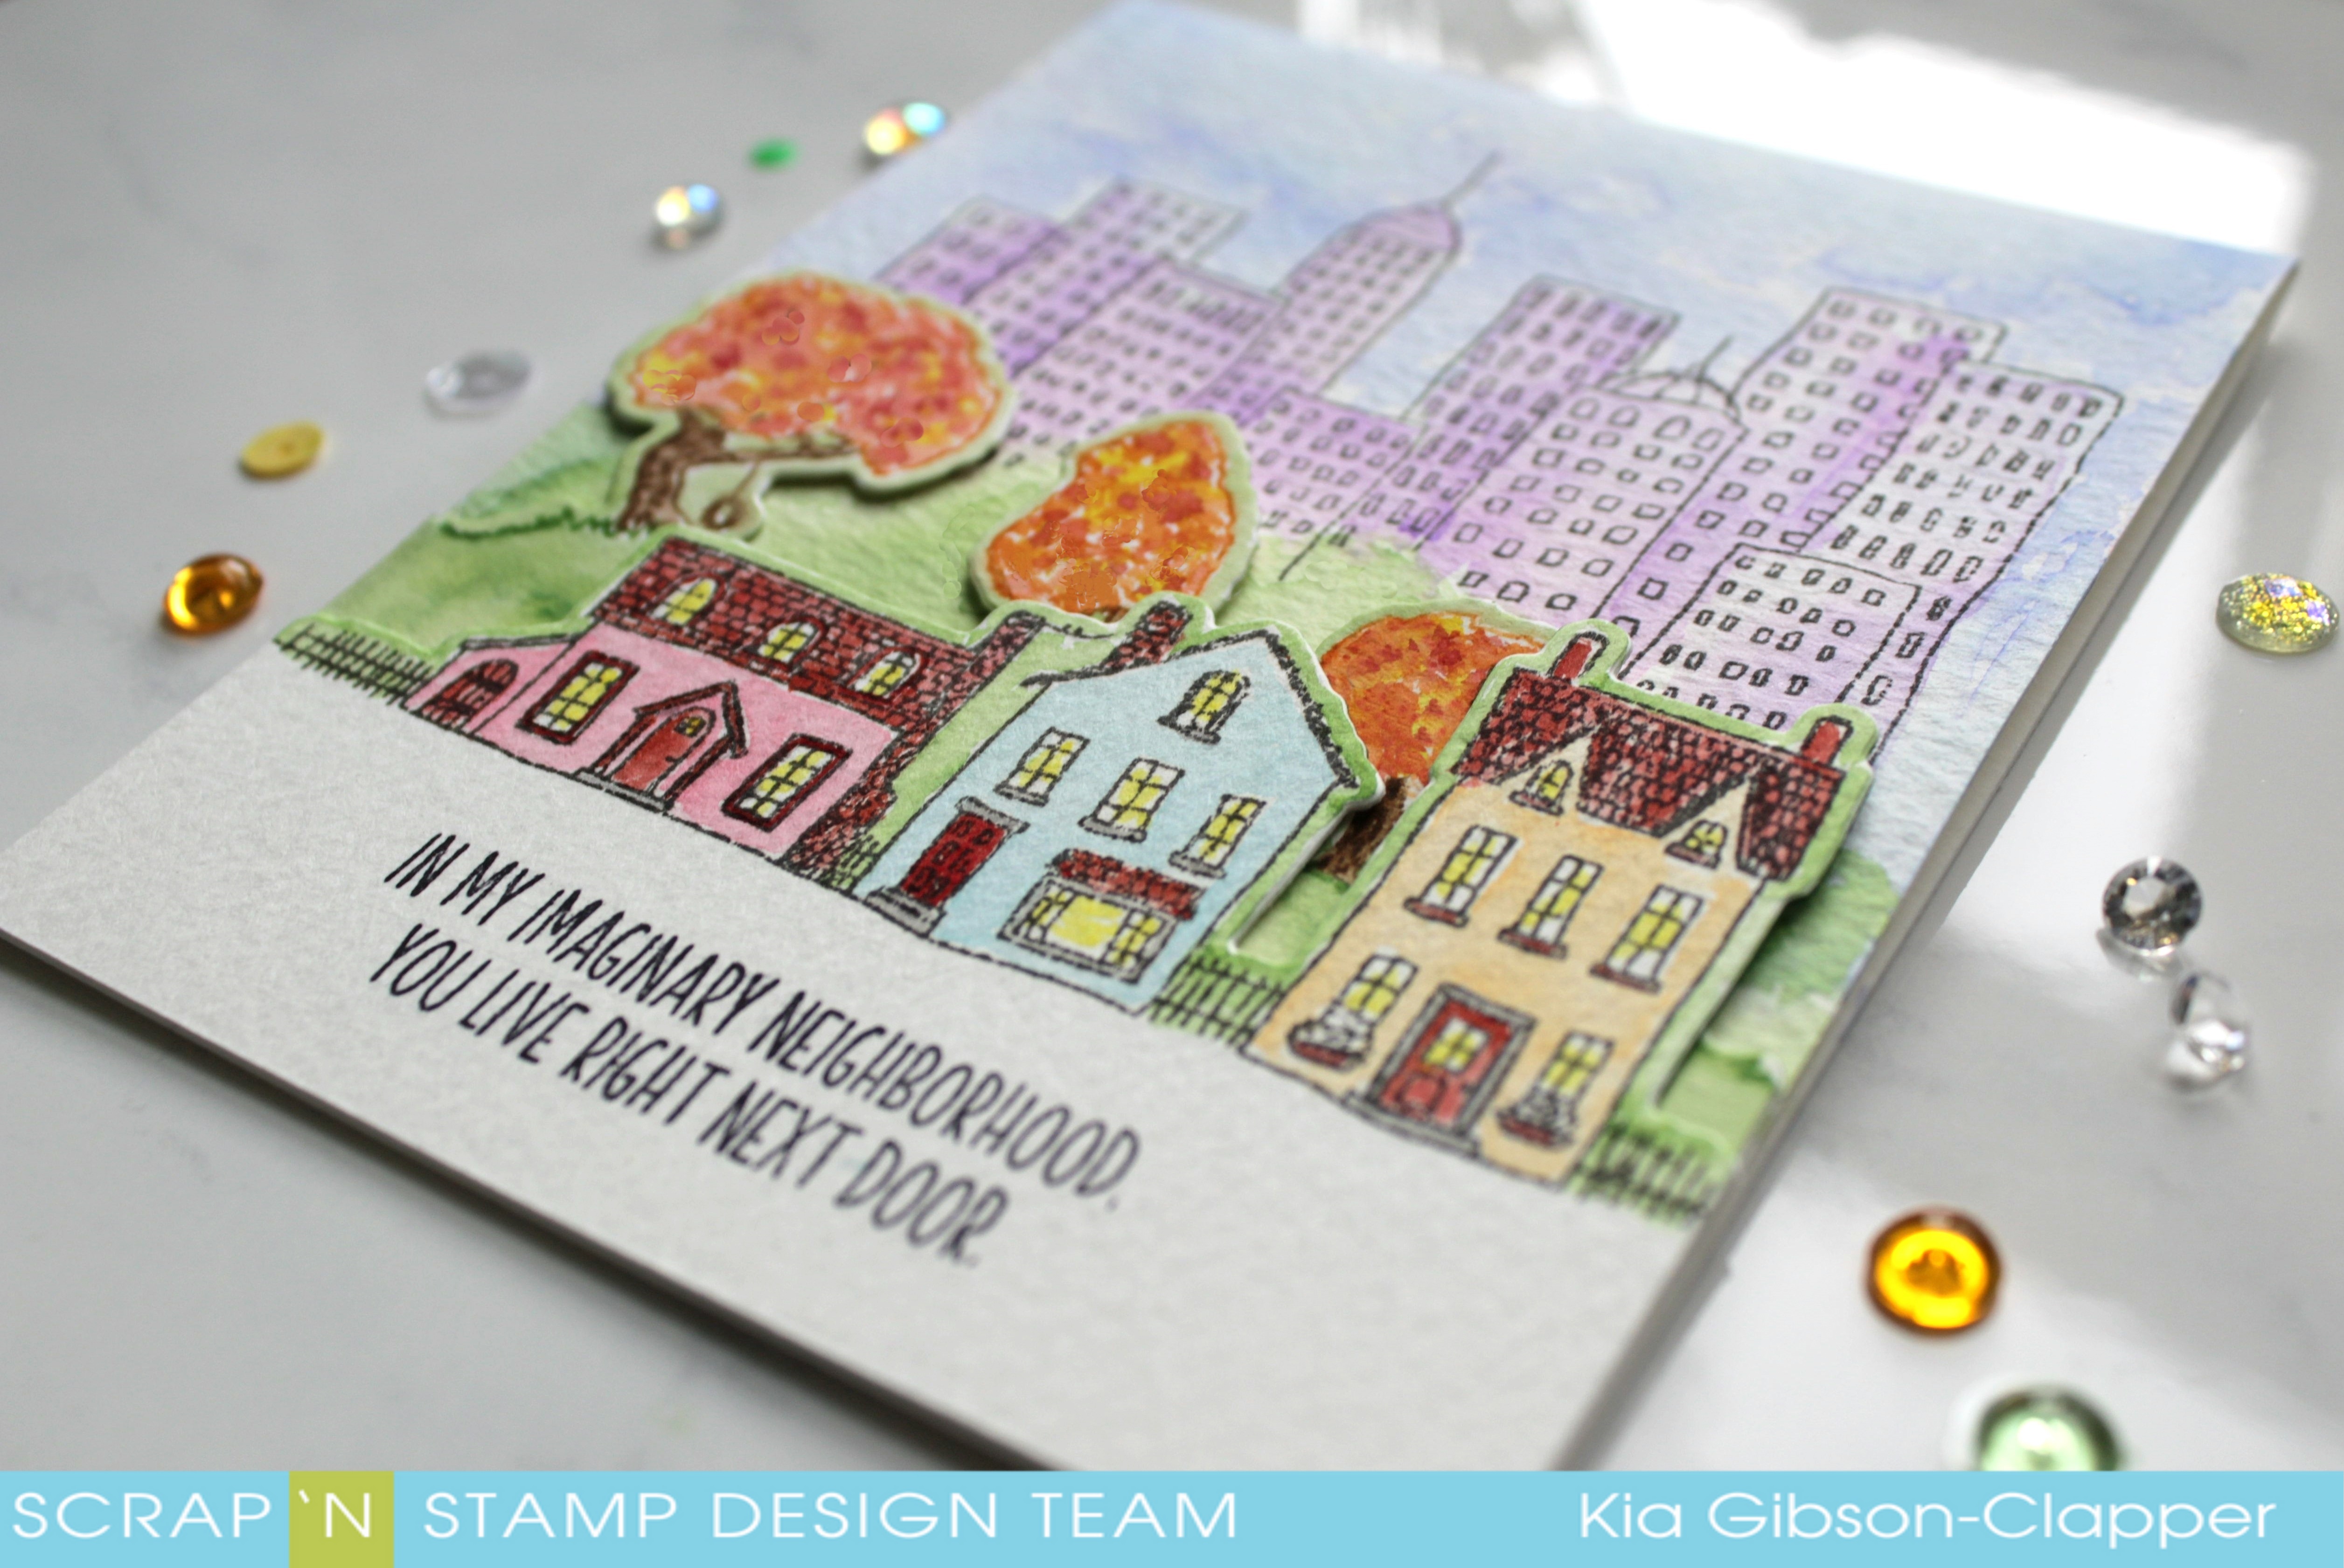
I then moved on to the house, stamping and die cutting the piece to allow for my sentiment. I painted the houses in worn lipstick, tumbled glass, dried marigold and used fired brick for the doors and roofs. I added squeezed lemonade in the windows for light. I have some hickory smoke on the window ledges and steps. And, it is while I am typing this and looking at the card below that I realize I did not paint the flowers in the window boxes. Well, the flowers were pulled to make way for the coming autumn. 🙂

I finished my card by stamping one of the sentiments from the set in jet black ink. So, in the end this is a three layer card, yet it does not feel like it has that many layers.

I hope you have enjoyed this card today and thank you for visiting. The products used today can be found in the store, I have also listed them for you below.


My Neighbourhood Read More »

Tuesday with Tara {take 6}

Happy Tuesday!  It’s a rainy day for me here in North Carolina, so I’m hoping to squeeze in a bit of time in my creative studio getting inky & playing with my new Big Shot machine!  I’ve got some dies that need playing with… and I’m looking forward to sharing with you what I create in the near future 🙂

Today I want to share with you an answer to one of the questions I’ve gotten asked most often when I demo or teach TAG projects- what do you DO with them?  One thing I like to use tags for (besides being a great way to experiment with techniques and just hang on to as inspiration pieces!) is to use them as a focal point on a card.  The card today features what I consider a ‘standard’ #8 tag on a 5×7 card.  Add some ink and some washi tape and you’ve got an easy way to transform a tag into a great card!

My tag was created using a mix of scraps, stencils, embellishments & stamps that I combined to celebrate my Dad’s recent 60th birthday!  I won’t go into a lot of details about the tag, but I hope it shows you a fun way to take some bits & pieces and turn them into a cohesive piece!  The big number was stenciled, outlined and then Clear Distress Crackle Paint was painted over it for texture (you probably noticed by now that I love adding crackle to my projects!).  The idea-ology numbers were painted with a bit of Distress Paint to make them pop and add more color to the tag.  I used black & white elements like the stickers & washi tape in several spots to bring it all together!


To create the perfect card for my tag, I took my base card, which was white, and cut a 1″ strip from the front open edge.  This made my card front a perfect size for a tag to be centered on it!  I used an inking tool to apply Distress Ink around the edges of the card front (lay the card flat on your craft sheet to get good coverage on the open end of the card without getting ink on the inside of your card).  Because I had worked with a mix of Distress Ink & Paint on my tag, I chose to apply Distress Paint along the inside edge of the card, this is the part that shows since I cut that 1″ strip.  Once that was dry I applied a strip of washi tape beside it.  You can make your card look like a perfectly coordinated project by using colors and elements that are the same on the tag and the card base.

supplies used:

kraft #8 tag

crinkle ribbon, inked to match project

5×7 white card

paper trimmer

tim Holtz idea-ology alpha parts, newsprint

distress paint- twisted citron & antique linen

distress crackle paint

tim Holtz idea-ology big chat stickers & small talk stickers

tim Holtz numbers stencil ths020

hickory smoke distress ink & distress marker

mermaid lagoon distress ink

ink applicator tool

washi tape- black with white numbers

assorted scraps of paper from previous projects 🙂

riley the moose stamp


Hope this gives you a bit of inspiration!  If you’ve got a stash of tags you’ve made, why not pull them out and transform them into some quick cards!  Have a creative day!
Inky hugs,
Tara

Tuesday with Tara {take 6} Read More »

Tuesday Tutorial – Creating Vintage with Distress Inks

Welcome everyone it’s Spike here today with this week’s Tuesday Tutorial using Tim Holtz Distress Inks to create a vintage look on embossed paper. I will be using a cream embossed cardstock that has been embossed with the Damask folder Textured Impressions Embossing Folder by Sizzix.

AntiquingTut_Spike9

What many folks don’t know is that Sizzix have their own line of plastic embossing folders. This Damask folder comes in a set with 3 other smaller and elegant folders, it’s a great deal.

AntiquingTut_Spike3

What you will need for this card is:

AntiquingTut_Spike1

-Bouquets of Joy Stamp (Crafty Secrets)
-Small Deckled Rectangles Nestabilities (Spellbinders)
-Ultra Thick Embossing Powder
-Copper Pearls (Kaiser)
-Fleur de Lis Slim Edger Punch (EK Success)
-Dotted Wave Slim Edger Punch (EK Success)
-Textured Impressions Damask Folder (Sizzix)
-Antique Linen Distress Ink
-Tea Dye Distress Ink
-Vintage Photo Distress Ink
-Ranger Inkssentials Ink Blending Tool
-Ranger Inkssentials Blending Foam
-Ranger Inkssentials Non-Stick Craft Sheet
-Paper Flowers
-Cream Cardstock
-Brown Cardstock

Let’s get started:

1. Emboss a 5 1/4″ x 4″ piece of cream cardstock using the Damask folder.

2. Place the cardstock on top of the Ranger Inkssentials Non-Stick Craft sheet. Using the Blending Tool with a blending foam pad, pick up some Antique Linen Distress Ink.

3. Start with the Blending Tool on the craft mat and then with a circular motion apply the ink onto the cardstock about 1 to 1 1/4″ all around. You may have to reapply the ink on the blending foam pad.

AntiquingTut_Spike8

By using the non-stick mat, it keeps ink coverage nice and even.

AntiquingTut_Spike7

4. Change the blending foam pad on the Blending Tool and as in steps 2 and 3 apply the Tea Dye Distress Ink but go in about 3/4 – 1″, depending what you did in step 3. Again, all around the piece.

AntiquingTut_Spike6

5. Change the blending foam pad on the Blending Tool again and as in steps 2 and 3 apply the Vintage Photo Distress Ink but this time just apply ink to the edge.

AntiquingTut_Spike5

6. Here’s the final result. I can’t believe how easy it is to do and the results hit a home run every time!

AntiquingTut_Spike4

What works great with these backgrounds is the Clear Art Stamps line. (click the image to enlarge)
AntiquingTut_Spike2

Thank you for joining me today on today’s Tuesday Tutorial! Happy Stamping!

Love,

Tuesday Tutorial – Creating Vintage with Distress Inks Read More »

Free Shipping Anywhere In Canada