Scratch-N-Stamp
Search

Checkout

Keep up with Sales, New Products and other events at Scrap `n Stamp. Sign up for our newsletter now!

What's New

Hot Deals


Foil

Try Adding Foiling Fun Without Extra Tools!

TRY ADDING FOILING FUN WITHOUT EXTRA TOOLS!

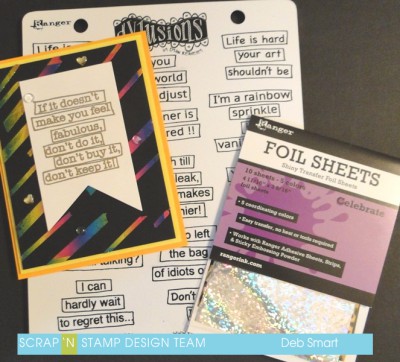
Hello crafting friend! It’s Deb here today, with something new for you to try. Have you been wanting to add foiling to your projects, but you’re not sure about committing to a foiling tool? Well, I  have a great way for you to try adding foiling fun without extra tools! I ordered some of the fun Ranger Shiny Transfer Foil sheets from the Scrap ‘N Stamp online store. All  you need to use them is your cardstock base, some adhesives and a bit of elbow grease.

APPLYING THE FOIL – TAPE METHOD

When I say that these Shiny Transfer Foil Sheets are easy to use, I’m not kidding! First, cut your panel of cardstock. Any colour you want to work with! I started with a white panel, but in the end changed to black. Next, add your adhesive. I used two different widths of Be Creative (Sookwang) Tape; the 1/8″ and 1/4″. I lay them in alternating strips across the panel. Remove the backing from the adhesive strips one at a time, and lay the foil over top of the tape. Rub firmly with your fingers, or use your bone folder, to press the foil onto the tape. Gently peel the foil sheet off of the adhesive; pull slowly in one direction. As you’re pulling off the foil sheet, look at your panel to make sure that the foil has transferred. If you notice that it hasn’t, simply lay the foil back down on top of the tap, and rub more firmly.  If you accidentally lift off the tape and find that an area is without foil, simply lay the foil back down on the tape, and repeat the process – u

sing a piece of the foil that hasn’t already been transferred. The photo below shows how the foil looks once transferred onto the cardstock, and the blank space left on the foil sheet, where the colour once was! I chose the ‘Celebrate’ package of foils to use, as it has a variety of patterned colours.

Try Adding Foiling Fun Without Extra Tools!

CREATE YOUR CARD

When I finished the foiling on the white panel, I like it, but it wasn’t quite the ‘wow’ that I had in mind. So, I repeated the whole process, this time on a black cardstock panel! Don’t worry – I saved the white one to use in another project.  Since this was my 2nd panel, I thought I’d try & be more quick about it – and I lay the entire foil sheet (you get 2 of each colour/pattern per package) onto the taped panel. Well, it did work out, but I can’t say it was much quicker! Because I had my tape beginning and ending in different directions, I had to take more time to burnish the foil onto the tape, as I was peeling off the foil backing. I also had to go back in more places & add the foil onto places where it didn’t stick. So – the lesson in this is – don’t rush! Just have fun and enjoy the process!

Try Adding Foiling Fun Without Extra Tools!

To create the sentiment piece, I stamped the sentiment from the Dylusions Laugh Til You Leak stamp set in Versamark ink and heat set it with gold embossing powder.  Cut banner tails at the bottom, and add it on top of your foiled panel with foam squares. Next, I layered the panel onto a panel of bright yellow cardstock, and then onto a light orange card base. These were from my stash, and unfortunately I don’t remember the names of the colours! I think they were from the Lawn Fawn Rainbow pack of cardstock. Pop them up with foam tape, for extra dimension. To finish off my card, I used some embellishments from my personal stash (we all  have one of these, right? goodies we’ve had for ages, and don’t remember from where we got them?).

GET FOILING NOW!

I hope that you’ve enjoyed this project, which shows you how easy it is to use the Ranger Shiny Transfer Foil Sheets. Be sure to check out the store – there are lots of different colours available! If you’d like to see another technique using these foil sheets and Ranger Sticky Embossing Powder, you can head over to my blog to see it!

Try Adding Foiling Fun Without Extra Tools!

Try Adding Foiling Fun Without Extra Tools! Read More »

Tuesday Tutorial – Impress Me!

butterflyimpress

Hi it’s Spike again with another installment of Tuesday Tutorial!  Since the new Spellbinders Spring 2009 products have arrived and been flying off the shelves, one product caught my eye that I hadn’t seen before!  Spellbinders Impressabilities.

These are totally different from anything I have ever seen for embossing.

impressabilitiesbutterfly

It is absolutely gorgeous and also quite delicate.  Be very careful when using this (and even taking it in and out of the package) as it can easily be bent and warped.  You will also want to rotate it or flip it over every time you use it so that it gets even wear when you emboss.

sideview1

Here’s a side view. Yes it’s THAT thin! So you’ll want to store it in the folder it came in.

Now one thing they didn’t cover in the package was how to actually use it in your embossing machine!  And that was the mission Kate and Shellie sent me on!  I will show you how to use it on paper, vellum and the Spellbinders Craft Foil while making 3 SUPER EASY cards.

Using Impressabilities with Paper

Right on the package it states, “For best results use smooth 65lb cardstock” so I tried it out on some I had kicking around.  Remember this is a different kind of emboss (not as deep) than you would get using a embossing folder.

1. To help the cardstock take more of the emboss, lightly spritz with water (only once or twice) each side.  If the cardstock gets too wet, it won’t keep the emboss as experience has taught me that lesson.

spritzing

2. Next create your embossing sandwich

Please note: I found that these sandwiches work well for me but aren’t set in stone and aren’t the only ways to use them.  You may have to adjust them by adding or removing a shim.  When in doubt, err on the side of thin as you can always pass it through again with an added shim.  Shim: cereal box weight cardstock cut to the size of the Impressabilities (I use a Spellbinders Magnetic Placement mat as it’s usually within arms reach)

If you’re using a Big Shot from the bottom up: Tab 1, shim, Cutting Pad, Spellbinders tan embossing mat, misted cardstock, Spellbinders Impressabilities, Cutting Pad

If you’re using a Cuttlebug from the bottom up: A Plate, shim, B Plate, Spellbinders tan embossing mat, misted cardstock, Spellbinders Impressabilities, B Plate

embossedpaper

Here’s the embossed cardstock from the debossed (back) side.  Sorry, I know it’s a little difficult to see!

3.  So…let’s grab some Black Onyx VersaFine and a Brayer!

brayering

4.  To keep things simple, just cut it to size and place it on some black cardstock

butterflycardpaper

Using Impressabilities with Vellum

For vellum use the exact same sandwiches as for paper but don’t spritz the vellum.  After embossing the vellum, I glued it onto black cardstock with Tombow Mono Multi glue and added some black Kaiser pearls in the corners to hide the glue spots!

embossedvellum

Using Impressabilities with Craft Foil

I just love this stuff!  On Easter Monday, the entire design team got together for our own little crop.  We played around with the Impressabilities and I think it was Marianne who suggested…try it with the foil! It should be soft enough!  Marianne, you’re brilliant!

Before you go embossing the foil, you need to figure out which side you want to be embossed (bumpy side up) as the foil is coloured on top and silver on the back.

In this sample, I want the gold side embossed.

If you’re using a Big Shot from the bottom up: Tab 1, shim, Cutting Pad, Spellbinders Impressabilities, Foil colour side up, Spellbinders tan embossing mat, Cutting Pad

If you’re using a Cuttlebug from the bottom up: A Plate, shim, B Plate, Spellbinders Impressabilities, Foil colour side up, Spellbinders tan embossing mat, B Plate

foilsandwich

Note: you may find that the foil is well embossed and is stuck to the Impressabilities, take care in pulling off the foil.  Trim the foil and stick it onto some black cardstock. Voila!

embossedfoil

Now should you find that some pieces warp or become detached, don’t fret!  You can always cut it up and use the pieces as metal embellishments!

I hope that this has helped in understanding the Spellbinders Impressabilities.  If you’ve found other tips, tricks and hints, we’d love to hear them!

Thanks for dropping in today!

Love,

Tuesday Tutorial – Impress Me! Read More »

Free Shipping Anywhere In Canada