Scratch-N-Stamp
Search

Checkout

Keep up with Sales, New Products and other events at Scrap `n Stamp. Sign up for our newsletter now!

What's New

Hot Deals


Gatefold

Do You Wanna Build a Snowman?

I hope everyone is doing well! It has been a beautiful weekend.   It was made better by all the snowfall we have recently gotten…almost 30cm!  The first thing that came to my mind when I saw all the snow was…..Do you wanna build a snowman?  So, that is exactly what we are going to do for today’s card!

I  want to make a car in which the snowman “came together” on the front like you were building it.  I didn’t think I had enough room on a standard A2 size card so I thought I would use a slimline style.  The base for this slimline card measure 7″ x 8 1/2″ and then is scored at 3 1/2″.  I made two bases and I will adhere them together with scor-tape to create a gatefold / trifold type of card.

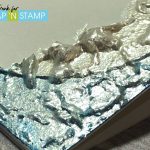
To create a snowy background I ink blend the two flaps (gate folds) with some Distress Oxide Inks in Faded Jeans, Salty Ocean and I will bring in just a bit of Black Soot to deepen the Faded Jeans around the top.  I use two types of blending brushes.  The standard foam brushes and Picket Fence Blending Brushes.  I like how much ink the standard foam brushes lay down and I love the way the Picket Fence brushes blend the colours together so smoothly.

Once the ink blending is done I add some water droplets with a find mist sprayer and some sparkle with the Hero Arts White Iredescent Shimmer Spray.  This will give the look of snowfall in the background by the water pushing the pigment out.  You can create larger snowflakes by unscrewing the sprayer and tapping the water directly from the straw.

Make sure you let this dry or use a heat gun to speed up the process.  You want to make sure that the ink had dried and set before going on to the next step.

While I let the ink dry I die cut 3 circles in 3 different sizes to create the snowman’s body.  I also used my Silhouette machine and a cut file to create a hat, scarf and nose.  You can fussy cut your own accessories if you don’t have an electronic die cut machine.

Once my inked panels were dry I trim down each gate fold so that they measure 1 3/4″ and that they would close nicely against each other.  I then began to adhere the snowman parts to the card with some Gina K Connect liquid adhesive.  I encountered a bit of a snag in my plan and to find out what that is you will have to watch the video below.

http://youtu.be/QxAPyq7NUZw

The base and head of the snowman are adhered directly to the left panel of the card and the middle of the snowman is adhered down with foam squares to allow clearance for the snowman body to interlace into each other.

Now it’s time to decorate our snowman.  I adhere the hat and scarf with some more liquid adhesive and decided to use Nuvo Drops in Ebony Black for the eyes and buttons.

The card needed a bit of glitter so I used the Nuvo Glacier Paste in Winter White to create puffy snow on the bottom and the Nuvo Glitter Gloss to add some magic to the top hat.  The only thing left to do is to write a message on the inside.

I hope you enjoyed today’s Snowman card!  Remember to post the snowmen you build on the Scrap’N Stamp Facebook Page.


Do You Wanna Build a Snowman? Read More »

My Favorite Things Thanksgiving Gatefold Card

Hello and Happy Wednesday my crafty friends. Nancy F on the blog today with a fun Thanksgiving-inspired card. Always a good time creating for Scrap’n Stamp Canada

For today’s cards, I am featuring the My Favorite Things Fall Friends stamp set, the Lawn Fawn Fall Fling pattern and my colouring medium of choice, Ranger Distress ink cubes.

Stamped the images from the Fall friends set on to Bristol cardstock  with versa Clair ink and heat embossed with clear powder colouring all the images in with distress inks and oxides

Being that our October challenge on the Scrap’n Stamp facebook page was to create using distress oxides, I decided to stretch it out a bit and use the regular inks along with one of the oxides. I thought this was the best way to colour in these adorable little images from My Favorite Things. I stamped them out using Versa Clair nocturn ink and heat set using some clear embossing powder and then went to town painting them in with the inks. I ended up mixing and layering colors to get the right shades and look.

The distress inks I chose to use were wild honey, rusty hinge, carved pumpkin, brushed corduroy, ground espresso, both in oxide and regular ink, as well as tea dye, pine needles, and aged mahogany.


Once I was finished painting all the images in, I fussy cut everything out as I did not have the coordinating dies. Good news for you, however, Scrap’n Stamp does carry the die set and I highly suggest purchasing the coordinating die if you get the set. Makes things a lot easier.

I decided it would be fun to create a little bit of a different card than my usual, as I felt a little bit stuck in a rut so I decided to create a gatefold card to really bring this scene to a whole other level.

To create the gatefold card I cut down a piece of 12 x 12 orange cardstock to 4 1/4 x 11 and scored each end at 2 3/4. I then need to figure out my layers and scene for the card. This took me a bit of time but I am really happy with the finished product.

I really wanted to play up the colours I used for the little girls and pumpkin and managed to find pattern paper that really worked well. I used the Lawn Fawn Fall Fling pattern paper as well as some green shimmer cardstock and metallic coooper cardstock.

I cut down three layers for both the front panels and the inside just to add a little extra dimension, stability, and interest. The front panel measurements are as followed, Cooper panels (2) @ 2 1/2 x 4 Green shimmer (2) @ 2 3/8 x 3 7/8, layer 3-pattern paper (2) @ 2 1/4 x 3 3/4.

The inside panel measurements are as follows Copper 4 x 5 1/2, Green Shimmer 3 7/8 x 5 1/8 the Green leafy pattern paper is 3 3/4 x 4 15/16. I also added in a white panel which was die cut from the MFT wonky stitched rectangle dies. While I was die cutting I thought it would be fun to add a little more interest and create not only a scene on the outside of the card but also finish off the inside with a similar look. To accomplish this I die cut the picket fence from Kraft cardstock which I edged with some ground espresso distress ink.

I repeated this on the outside of the card which was the anchor for the rest of my little scene. I cut green cardstock down to measure 1 1/2 x 5 1/8 and layered on a piece of copper 1 1/4 x 4 15/16 and then added a strip of that same pattern paper from the inside which measures 1 1/8 x 4 7/8 on top of the metallic paper. I die cut a white banner strip and stamped the sentiment once again using ground expresso. Before I attached everything to the front of the card I decided to add in that Behind Second die cut fence. this really pulled the scene together. I added each of the cute little girls to the flaps of the card. One in front of the fence, she was popped up with a bit of foam tape and the other girl behind the fence flat to the card. I added some leaves and pumpkins to both the flaps of the card as well as the inside with the little squirel.

I was really quite happy with the way this card turned out. I hope you enjoyed it and come over to the Scrap’n Stamp Challenge page to share with us some of your projects using distress oxides.

Have a wonderful week.

Nancy F.


My Favorite Things Thanksgiving Gatefold Card Read More »

Free Shipping Anywhere In Canada