Scratch-N-Stamp
Search

Checkout

Keep up with Sales, New Products and other events at Scrap `n Stamp. Sign up for our newsletter now!

What's New

Hot Deals


Glitter

My Pumpkins – Halloween Bonus Project

HAPPY HALLOWEEN!!  Hi There, It’s me Shari from Ain’t That Artsy Fartsy and I’m so happy to be here today to share a fun little décor piece I made for Halloween.  With so much Halloween inspiration out there, and with a little apropos change to a song lyric, I came up with…..

dsc00308

…wait for it……

dsc00319

While you’re all laughing and chair dancing, I’ll tell you a little bit of what I did to make this altered wooden house.

dsc00291

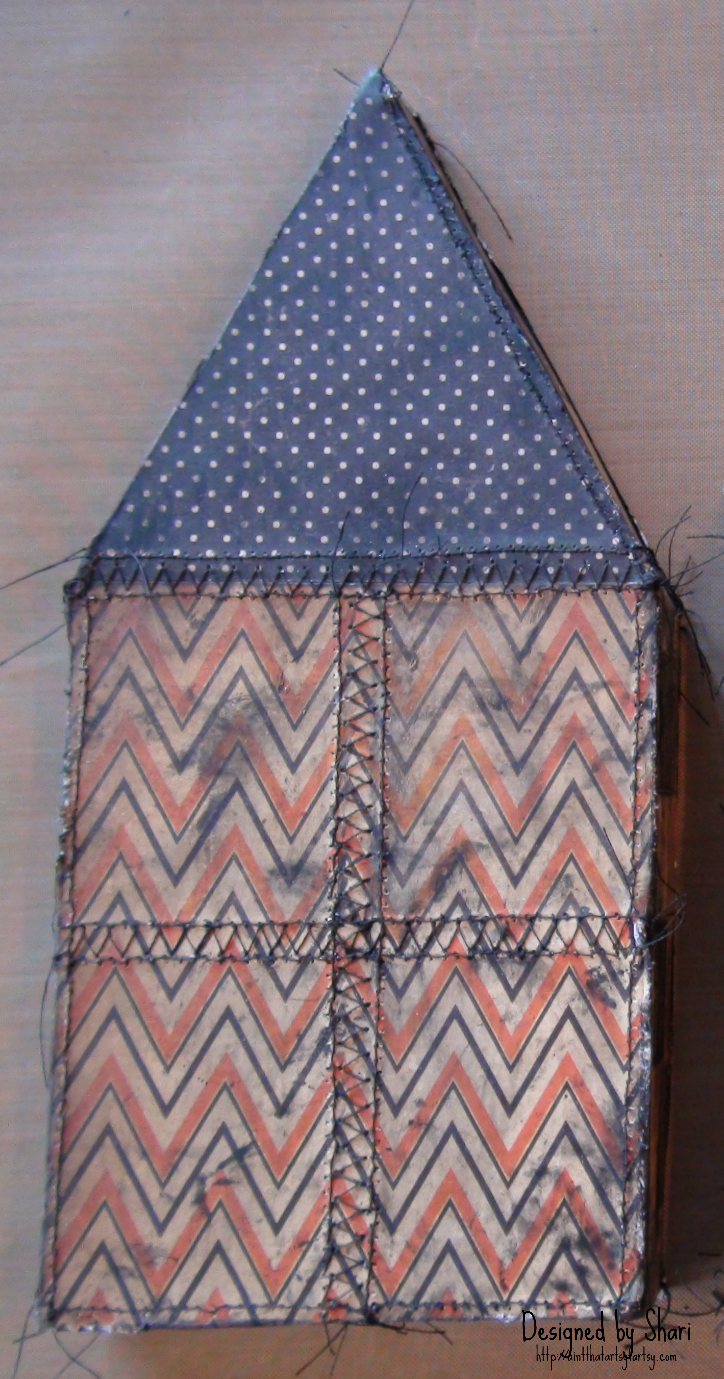
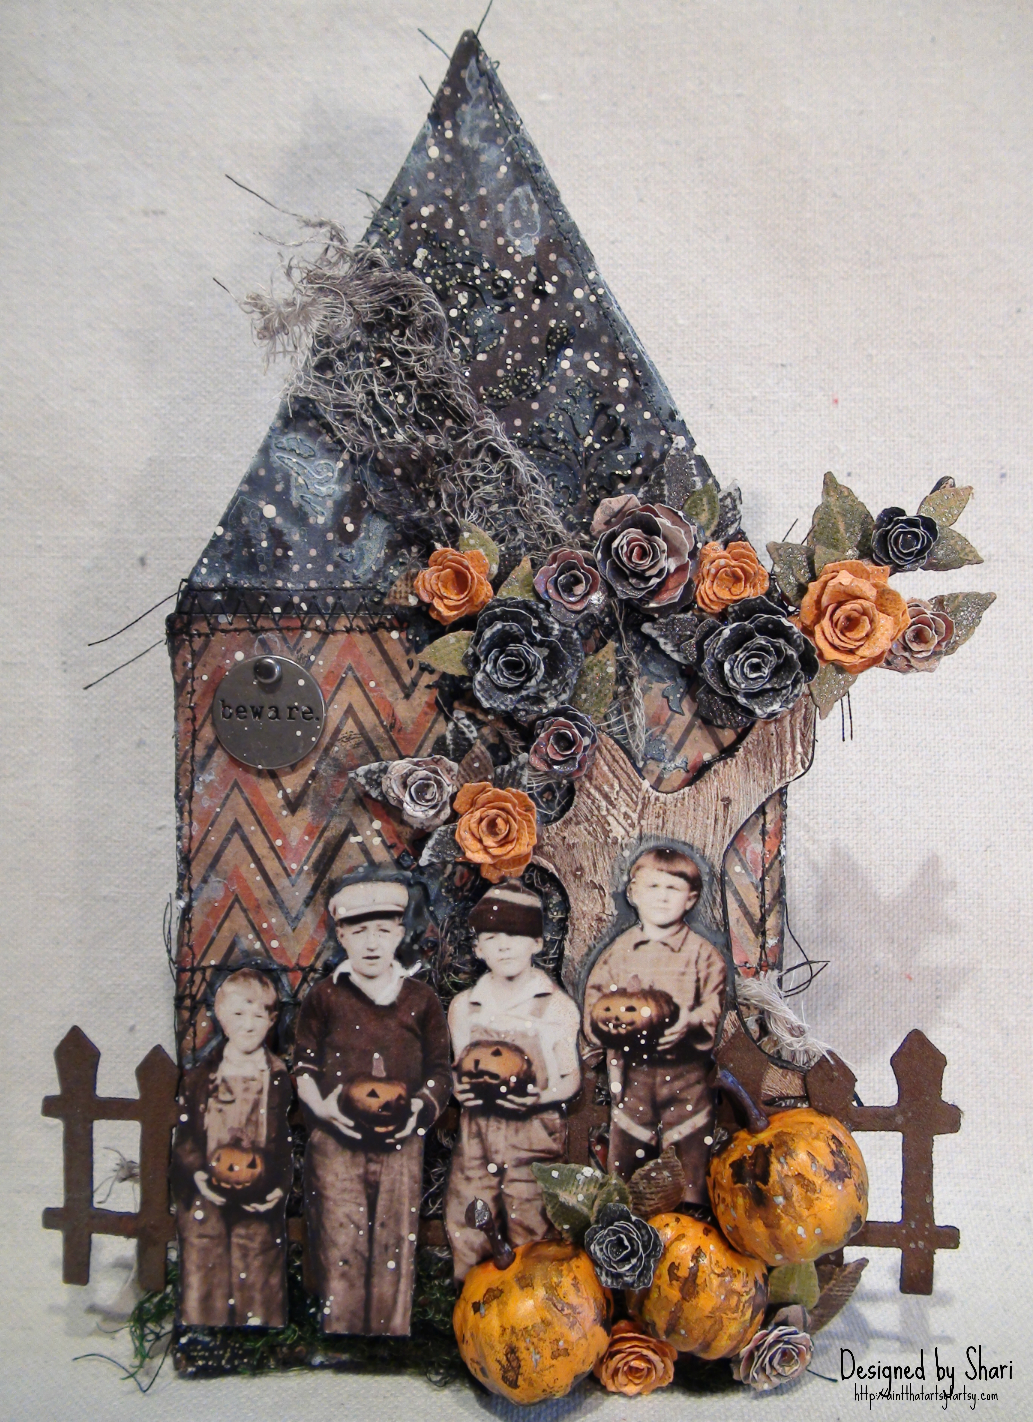
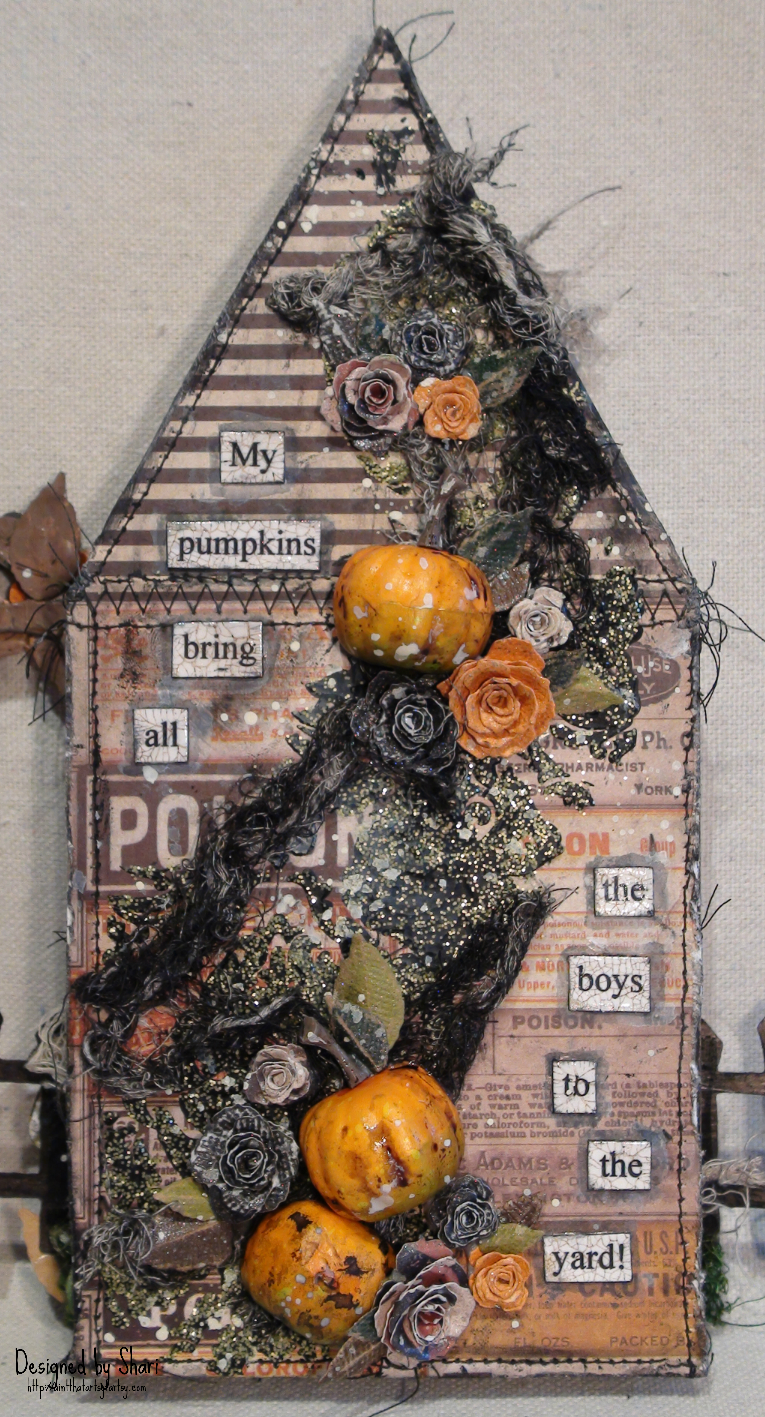
I cut my house out of a piece of unfinished poplar.  This house measures 9″ x 4″ x 1″ and I covered the front and back with pieces of Tim Holtz Regions Beyond Paper Stash that I had stitched together with my sewing machine.

dsc00292

I roughed up the edges with my paper distresser and inked with Black Soot DI then adhered to the front and back surfaces with matte Decou-Page.  I added smears of black gesso with my fingers and adhered a long piece of Design Tape to the outside edge.

dsc00310

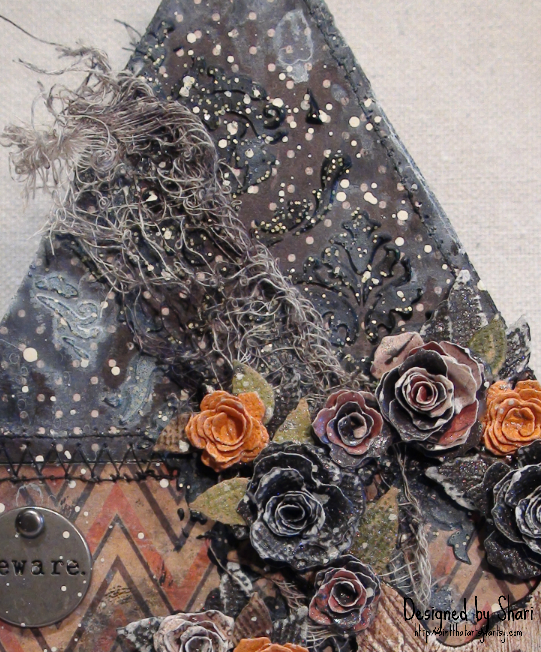
I added stenciling to the front and back sides of the house with Tim’s Gothic Layering Stencil and black modeling paste.  While the paste was still wet, I sprinkled Shabby Shutters Distress Glitter over it, tapped off the excess and let air dry.  While that was drying, I spritzed pieces of cheese cloth with a combo of Hickory Smoke and Black Soot DSS and heat set.

dsc00327

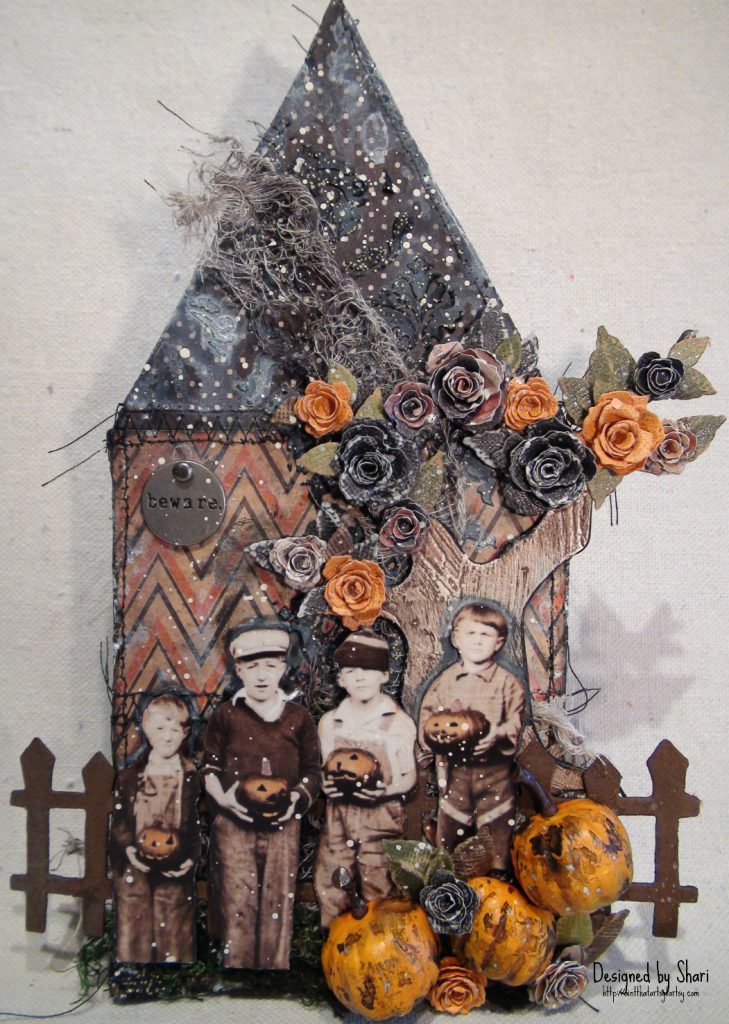
The tree and fence are older Sizzix dies that I treated with crackle paint and rusting powder respectively.  When the crackle paint dried on the tree, I rubbed it with antiquing cream to accentuate all of the neat texture, then I started to adhere the pieces onto the house.

dsc00309

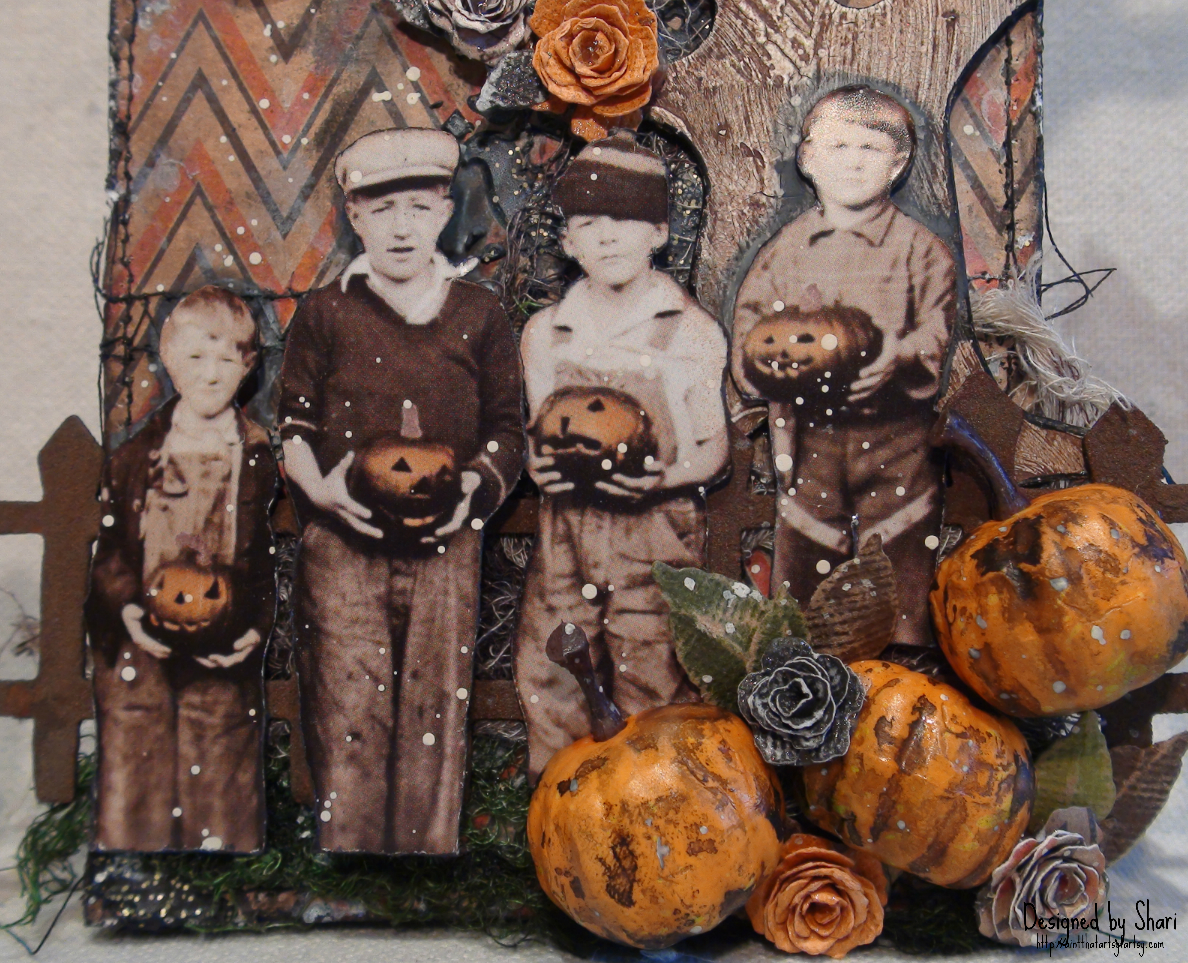
This little foursome of cutie-pies is from Tim’s Found Relatives-Occasions.  I fussy cut them from their card and colored their Jack ‘o Lanterns with my Pumpkin Spice DM.  I die cut a bunch of leaves and roses from the Tiny Tattered Florals die from a mixture of Kraft Core, Color Core and Regions Beyond Paper Stash.  I stained the Pumpkin Pieces with Hickory Smoke DSS and gave all of the roses and leaves a spritzing of Pewter Perfect Pearls Mist.

dsc00321

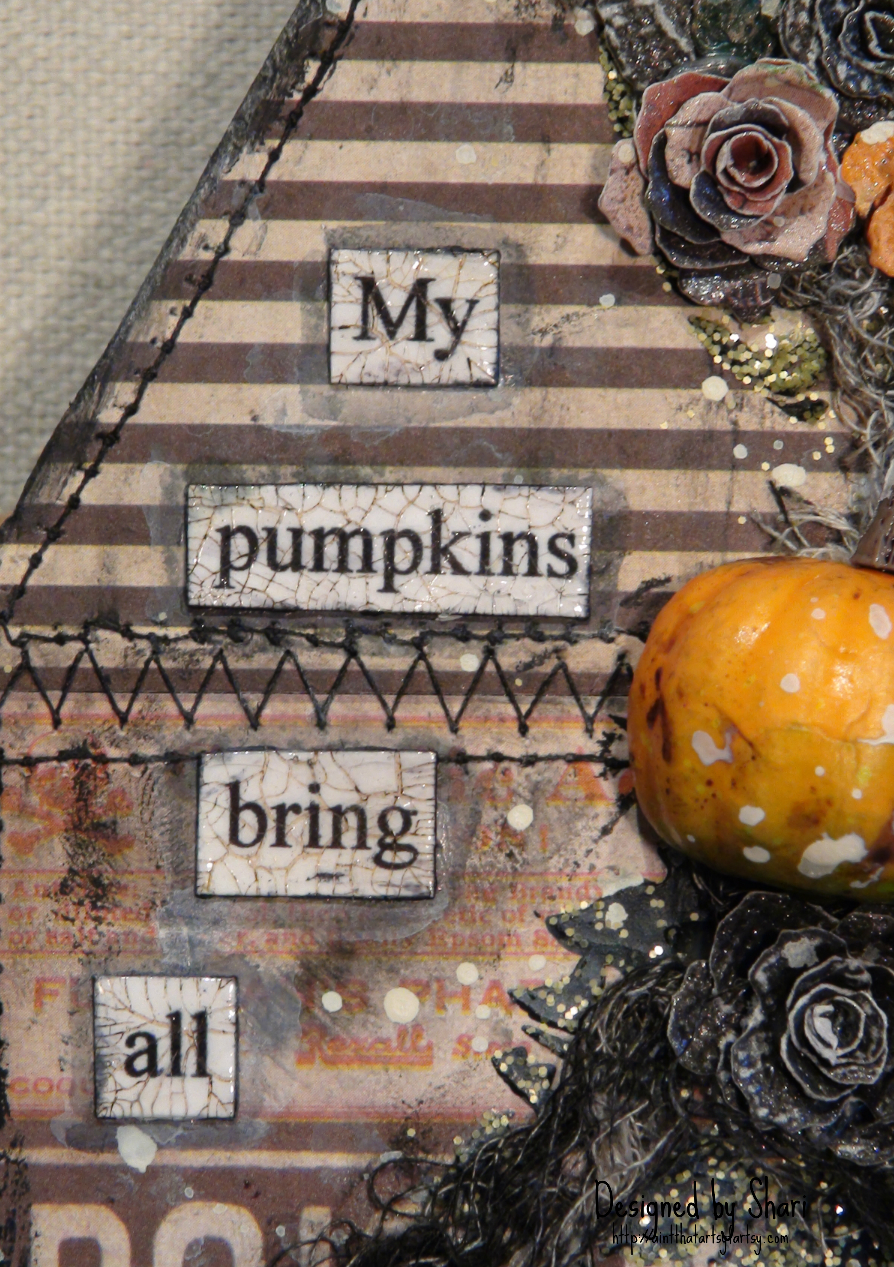
The song lyrics were printed onto white card stock and cut into bands.  I sealed with matte Decou-Page and then coated with clear crackle glaze.  When the crackle glaze was dry, I rubbed with Hickory Smoke DI and adhered onto the house with matte Decou-page.

dsc00322

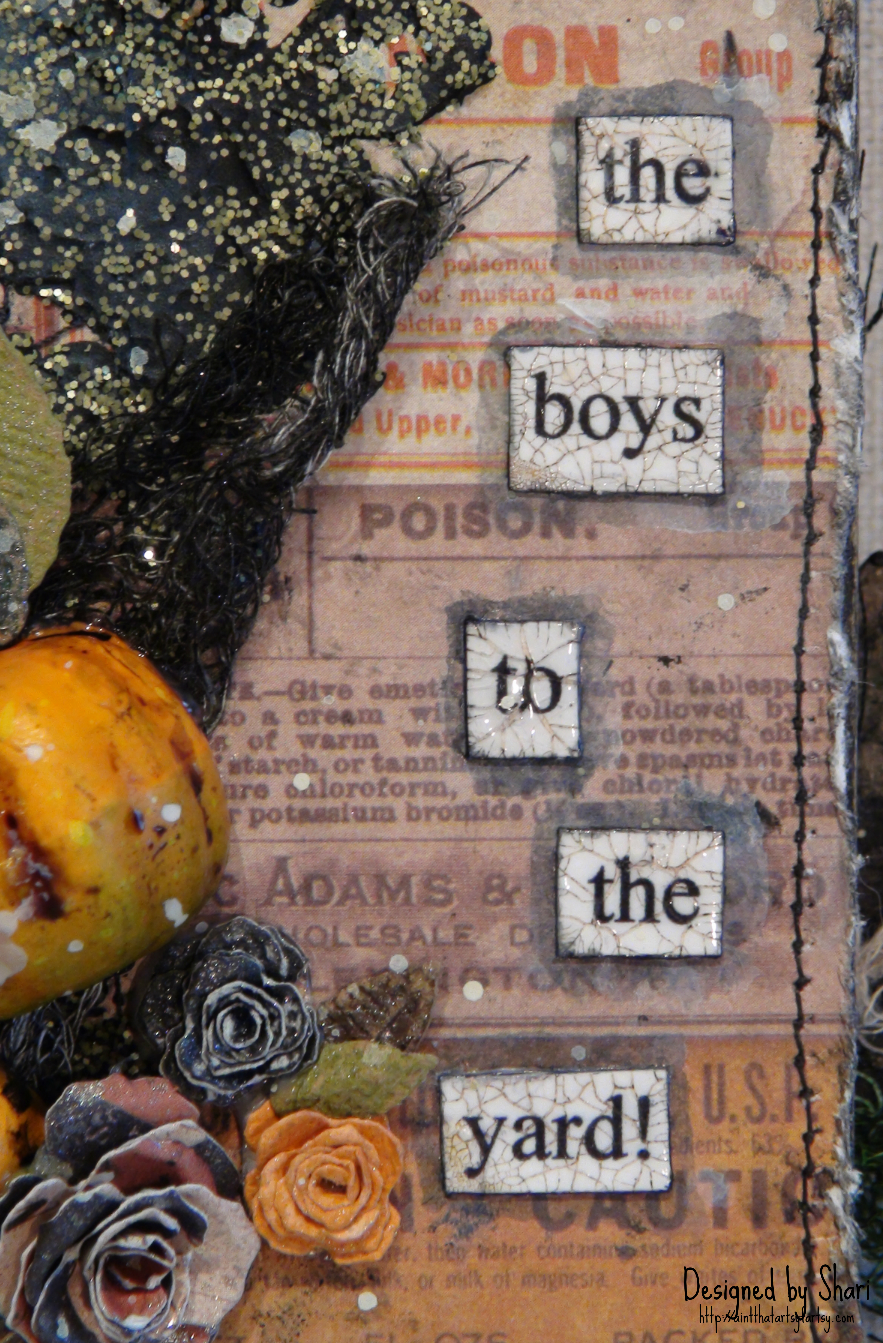
I outlined the word bands with Black Soot DI and my water brush, then brushed a wash of translucent white paint around the edge of the house, spritzed with water and let the watery paint drip down.

dsc00327

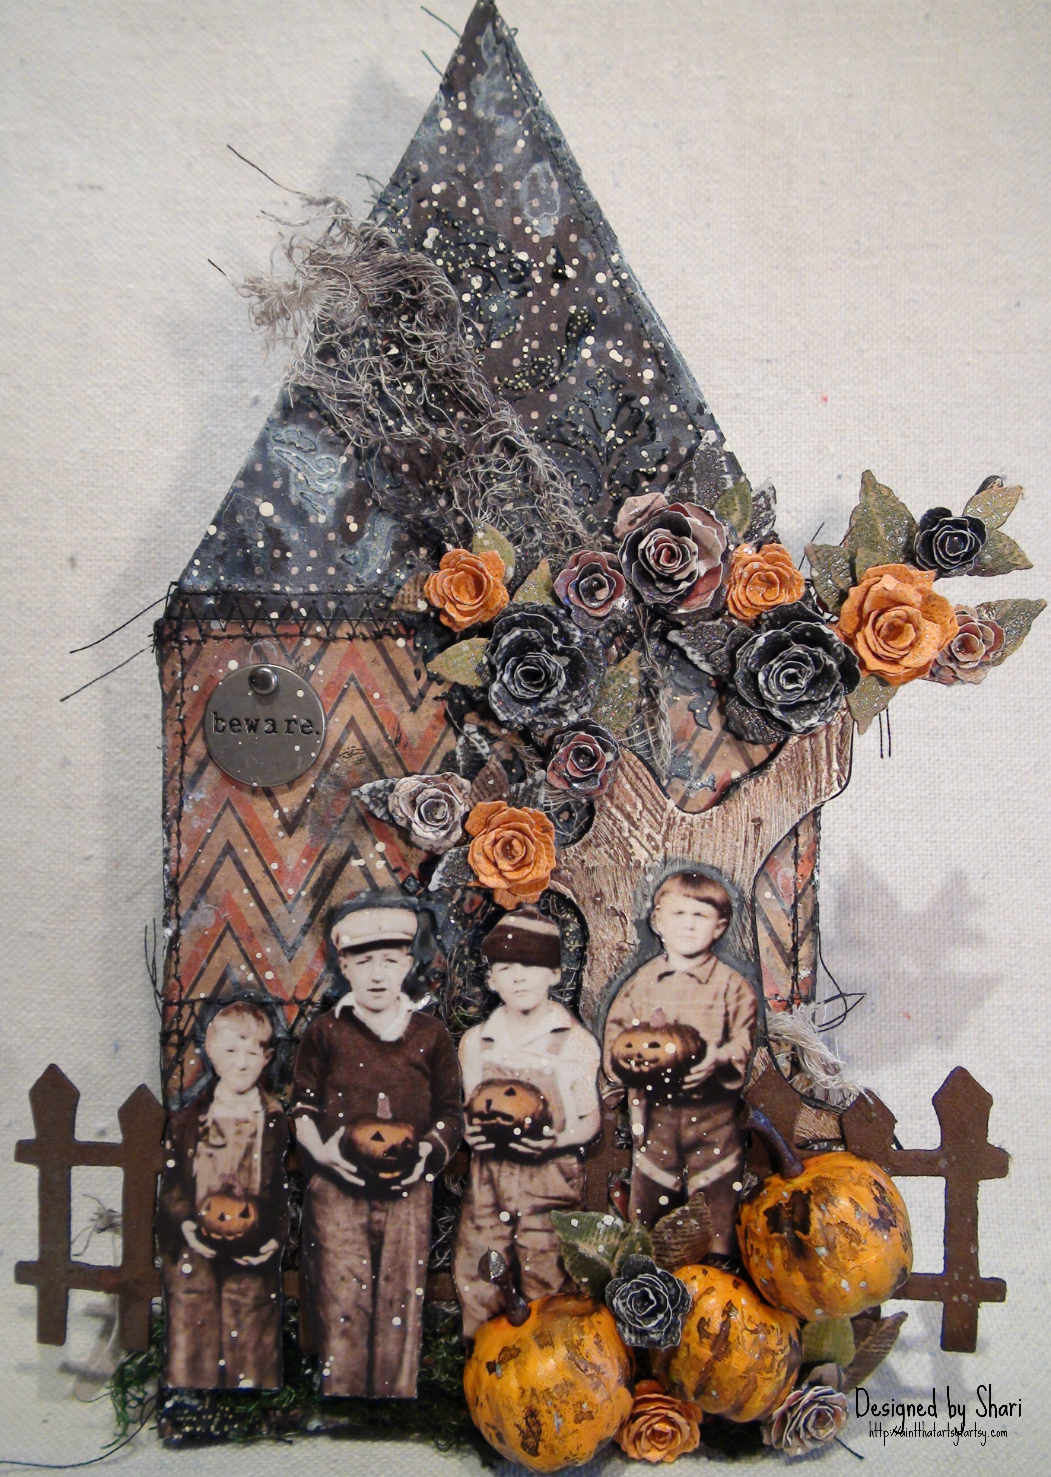
To finish the house, I attached a Typed Token and applied one final splatter of off-white paint to the front and back sides of the house.

I hope you’ve enjoyed my little Halloween house today and will come back later in the week for our Throwback Thursday feature.

Until next time–Stay Artsy Fartsy!! XOXO-Shari

My Pumpkins – Halloween Bonus Project Read More »

Tuesday with Tara {take 46}

Happy Tuesday!  Today I’m getting ready to hop on a plane for a much needed vacation…  I wanted to have the blog prepped and ready for while I’m away, and came across this tag I hadn’t shared here yet, which seemed very fitting!cc3c-2b

This tag uses lots of Tim Holtz products and techniques, including some yummy Distress Glitter on the large heart and airplane shapes.   Some cute brads and fabulous crackle details over all the Distress Ink finish it all off…

cc3c-2d

Couldn’t resist that cute hat brad… gives a his & hers vibe to it 🙂  The heart has Distress Metallic paint under the Clear Crackle Paint with some Archival Ink rubbed into the crackles once it was all dry.  Love it!

cc3c-2c

Some words just need to be highlighted… a black outline and Crackle Accents worked well here!  And here’s one final look, I used a fun buckle embellishment to give this tag a luggage tag feeling.

cc3c-2insta

p.s. that last pic was an instagram sneak peek back when I first did this.  I miss that Distressed frame filter 🙁

Hope you have a great week!
Inky hugs,

Tara


Tuesday with Tara {take 46} Read More »

Tuesday Tutorial: Dreamweaver Stencils, Tape & Glitter Technique

Today I want to show you another great way that you can use Dreamweaver Stencils. I first saw this Tape & Glitter Technique when I was at a stamp show in Portland a few years ago. I had never thought of using my stencils this way and was amazed at how easy it was and excited because it gave me one more way to use them.

To get started you are going to need a few supplies:  a Dreamweaver stencil, a Studio K double-sided Adhesive sheet, cardstock, Studio K glitter (I used Forest Green & Burgundy Velvet Opaque and Crystal Rainbow Transparent), a Glitter Grabber cloth, a bar of soap & Post-it notes.

Step 1:

Cut a piece of cardstock and tape slightly larger than your stencil & apply the tape to the cardstock.

Step 2:

Apply a little bit of soap to the back of the stencil. This will help it release from the tape later. Remove the backing from the tape and place your stencil on the tape, soapy side down. Gently rub all over the stencil to make sure that it is stuck onto the tape.

Step 3:

Use Post-it notes to mask off the areas where you will be putting a different color of glitter. Pour glitter onto the open areas to completely cover them and then use your finger to rub the glitter into the tape. Dump the excess glitter onto a scrap piece of paper or a coffee filter when you have finished.

Use the Glitter Grabber cloth to pick up any glitter that is stuck to the stencil. This is very important so that you don’t get the colors of glitter mixing on your image.

Move the Post-it notes around a bit so that you can get glitter into all the areas for the first color. Repeat this step for all the different colors of glitter that you are using.

This is what your image will look like when you are done. You will have glitter on all the areas of tape that aren’t covered by the stencil.

Step 4:

Carefully remove the stencil from the tape. I found that peeling the cardstock off of the stencil worked better for me and I didn’t bend the stencil that way. This tape is really, really sticky so you do have to be careful not to damage your stencil when you are taking it off.

Step 5:

Now apply glitter to the background and rub it in to the tape really well.

Dump off the excess glitter and now you have a beautiful glittered image that is ready to use on your project.

To make this card I used my Spellbinders Deckled Rectangles to cut out the image and a mat from Studio K Shimmer Cardstock, applied a strip of tape and green glitter to my card front, a little ribbon and some droplets and I was done. Fun, easy and very sparkly!

Thanks for stopping by. I hope you enjoyed the Tutorial and are inspired to give this technique a try.

Have a wonderful day!

© Scrap ‘n Stamp Canada 2010

Tuesday Tutorial: Dreamweaver Stencils, Tape & Glitter Technique Read More »

Free Shipping Anywhere In Canada