Scratch-N-Stamp
Search

Checkout

Keep up with Sales, New Products and other events at Scrap `n Stamp. Sign up for our newsletter now!

What's New

Hot Deals


Heat Embossing

Adding Texture Adds Interest

Happy Friday, my friend! It’s Deb here, from the Design Team. I hope that your week went well, and you’re looking forward to the weekend. Maybe you’ll have time for some creating? Today’s post might be of interest to you, if you will be crafting. Adding texture to your cards adds interest. And adding interest usually equals adding a “wow”! Let’s have a look, shall we?

RANGER TEXTURE PASTE

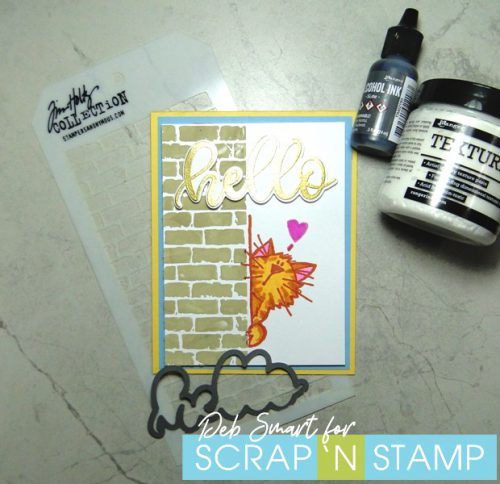
One way of adding texture is to add texture paste. You can either add it randomly, if you’re going for an unstructured look. Or, you can use it with a stencil, for a more defined shape. I chose to use the Ranger Texture Paste with the Tim Holtz Bricked stencil. Since the stencil is of bricks, I knew I wanted to colour the texture paste so it wasn’t the white it is in the tub. Did you know that you can use Ranger Alcohol Inks to colour your texture paste? Yes – you can!

Adding Texture Adds Interest

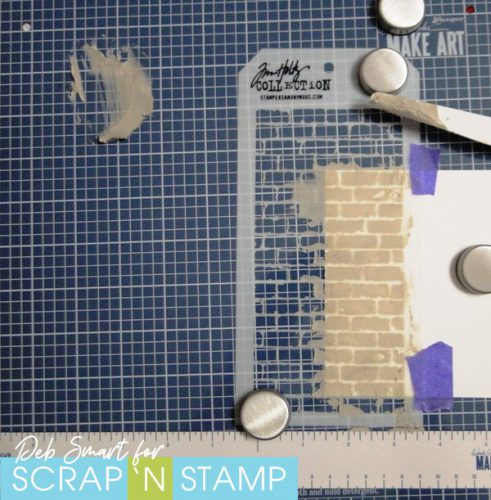
I love using my Wendy Vecchi Make Art Stay-tion for this technique! First, scoop out about a tablespoon of texture paste onto your mat. Next, add 2-3 drops of alcohol ink to the paste. Use your palette knife to mix the alcohol ink into the paste. If you want a darker colour, add more ink. (I used Ranger Pebble alcohol ink). When you’ve got the colour you want, apply the paste through the stencil, with your palette knife.  The Make Art Stay-tion comes with 4 magnets, so it’s easy to hold your cardstock and the stencil in place. (for backup, I used a couple of pieces of Purple Tape on the cardstock side).

When you’re finished applying the texture paste, lift off the stencil, and set aside the cardstock piece. Now, be sure to wipe off your Stay-tion and the stencil with a damp towel or paper towels, before the paste hardens.  As long as you clean it right away, it wipes off immediately!

CARD DETAILS

Another way to add texture is with embossing powder. First, stamp the ‘hello’ from the MFT Well, Hello stamp set in Versamark ink, onto white cardstock. Next, cover it with gold embossing powder, and then set with a heat tool. Now, use the coordinating Sweet Hello dies to die cut the sentiment.

The texture paste dries quite quickly, as long as you don’t apply it too thick. Set up this panel in your stamp platform, and line up the Impression Obsession Peek-aBoo Kitty with the side of the bricks.  Next, ink up the stamp, and then press firmly onto the panel.  I used the Gina K. Faded Brick ink for the kitty, and the Spectrum Noir Tri-Blend Bright Pink marker for the heart.

Adding Texture Adds Interest

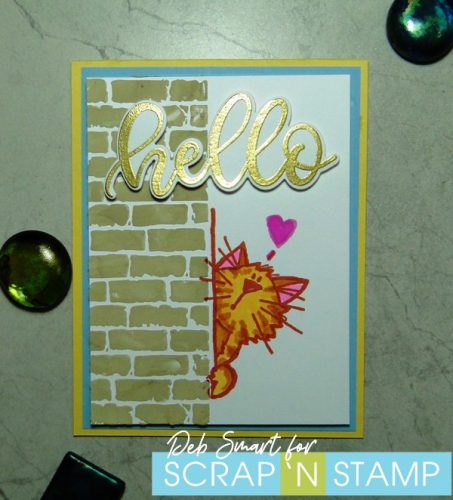
Colour in the kitty with your choice of colours. Next, attach the die cut ‘hello’ with foam squares or tape. Add the card front to a panel of light blue cardstock with foam tape. Finally, add the card front to a light yellow card base.

Adding Texture Adds Interest

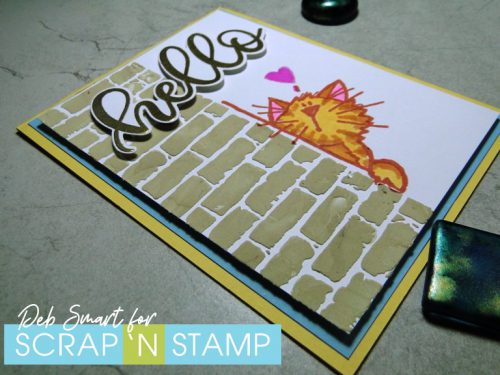
We’ve actually added texture 3 different ways to this card. First, with the texture paste; second with the heat embossing, and 3rd with the die cutting. So by adding texture, we’ve added a lot of interest to this card. Otherwise, it could have easily been a simple, one layer card.

SUPPLIES

Did you notice that my card today works for the Scrap ‘N Stamp Random Acts of Cardness Daily Challenge?! Yes, I planned it that way! I hope I’ve given you some ideas on how to add texture, and interest, to your project! Be sure to add your ‘texture’ project to the Scrap ‘N Stamp Facebook challenge page HERE, and use the hashtag #SNSCHALLENGE when adding it there, and when sharing on your other social media platforms.

Adding Texture Adds Interest

Affiliate links are used, at no cost to you. When you use my affiliate links, you help support me to purchase new products, & maintain my blog. Then I can continue sharing new projects with you!


Adding Texture Adds Interest Read More »

Slimline Card Using MFT Stamps!

Happy Saturday AND Happy First Day of Summer! I’m not sure where you live but if you are in Manitoba, it definitely has not felt very summery. Or Springy, for that matter! It is currently 7C here right now (it’s about 10:30pm) and we’ve had the heat on in the house. In fact, we haven’t yet turned it off for the season :(. I really hope for some improvement soon!

Anyway, today’s card is a slimline card which measures 8.5 X 3.5 inches and fits nicely into a regular business envelope. It’s also going to be a graduation card for my niece who is graduating tomorrow! They’ve put together a very interesting “drive-in” grad with social distancing rules in place. I’m interested yet can’t help but feel sad at the same time. These kids have been dealt a crappy hand this year. But they will no doubt make the best of things!

What’s really awesome about making this card size is that after you trim your 8.5X 11 piece of cardstock to make this card, you’re left with a piece that makes a great layer. I trimmed half an inch off this strip. This left a nice space to add some patterned paper. This particular paper came from my stash. I’ve had it for years and think I got it at Micheals.

On the layer, I used the Cloud Stencil from MFT along with a rainbow of Gina K inks! I worked my way down the panel which resulted in this super pretty background. The butterflies come from the newer stamp set, Brilliant Butterflies, also from MFT.  I used this set in a different way. It is a stamp layering set but I only used the detail layer along with silver embossing powder. I did use the co-ordinating dies but just trimmed the excess off.

Not using the solid layering stamps resulted in a much “lighter” butterfly. I didn’t want them to overtake or compete with the background. I did add a little bit of colour to the centres of each butterfly.  I foam mounted each butterfly. The sentiment comes from the a set called Essential Sentiments (MFT) which unfortunately isn’t available in the shop…so sorry!

I white embossed the sentiments onto strips of black cardstock and used foam adhesive to adhere them. I added a spattering of sequins to finish the card off!

Thanks for stopping by today. I hope you’re first day of summer is spectacular!

See you soon!

Laurie

Slimline Card Using MFT Stamps! Read More »

Penny Black – Copic Coloring and Heat Embossing

Hi crafty friends and welcome back.  Sandi MacIver here and today I have a New Video Penny Black – Copic Coloring and Heat Embossing to share with you, AND, a Shopping special to celebrate LEAP YEAR.  Check that out at the end of this post.

Copic Markers and heat Embossing

Many of us don’t like to use our Copic Markers on embossed images.  Embossing powder is made from shards of plastic and even though we heat emboss it to stick to our card stock, it’s still sharp, and can tear up the tips of our Markers.  I love the look though, so I have a fun and simple work around for you.

Copic Markers and heat Embossing

Brightly colored images look fabulous on darker colored card stock, but as you know, that is not possible to achieve with Copics, so this trick solves that problem too.

Copics used for today’s Project:  Pinks:  RV 10, 11, 13 and 34   Greens:  YG03 and 17 and the background color is BG13, as close as I could get to matching the Gina K Designs Turquoise Sea card stock I used for the project.  All items are linked below for your convenience.

Copic Markers and Heat Embossing

I think this card would make a fabulous Easter Card as well.  In my mind, these flowers are Magnolias that bloom around here in the spring.  When I was little I used to call them Tulip trees as they reminded me of tulips.  You could change out the sentiment to an Easter greeting and add a small gold cross, or a fuzzy white bunny. It would also make a great spring birthday card.

Here is the video walking you through the creation of the card, the technique and I also do a short lesson on the Copic Flicking Technique for the flowers.  You can watch it here or in HD over on my YouTube channel.

******************
https://youtu.be/Gim33wvoyps

Thanks so much for stopping in, and to celebrate LEAP YEAR, RAYA has a Shopping Special for you:

Save 29% all day today February 29th, 2020 on PENNY BLACK PRODUCTSSHOP SCRAP ‘N STAMP HERE

Thanks for stopping in, and until next time, Happy Stamping

Below are the products I used in Today’s Video:  Penny Black – Copic Coloring and Heat Embossing.  Clicking on the image will take you directly to the Scrap ‘N Stamp store so you can shop.


Penny Black – Copic Coloring and Heat Embossing Read More »

Free Shipping Anywhere In Canada