Scratch-N-Stamp
Search

Checkout

Keep up with Sales, New Products and other events at Scrap `n Stamp. Sign up for our newsletter now!

What's New

Hot Deals


Heat Embossing

My Favorite Things Thanksgiving Gatefold Card

Hello and Happy Wednesday my crafty friends. Nancy F on the blog today with a fun Thanksgiving-inspired card. Always a good time creating for Scrap’n Stamp Canada

For today’s cards, I am featuring the My Favorite Things Fall Friends stamp set, the Lawn Fawn Fall Fling pattern and my colouring medium of choice, Ranger Distress ink cubes.

Stamped the images from the Fall friends set on to Bristol cardstock  with versa Clair ink and heat embossed with clear powder colouring all the images in with distress inks and oxides

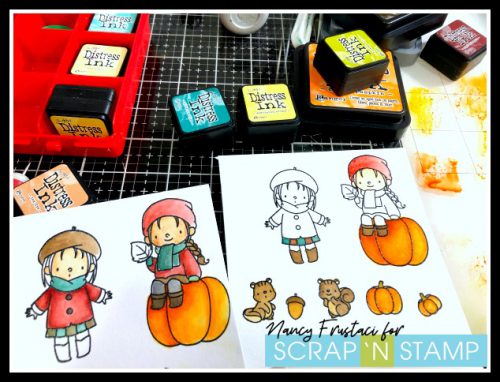
Being that our October challenge on the Scrap’n Stamp facebook page was to create using distress oxides, I decided to stretch it out a bit and use the regular inks along with one of the oxides. I thought this was the best way to colour in these adorable little images from My Favorite Things. I stamped them out using Versa Clair nocturn ink and heat set using some clear embossing powder and then went to town painting them in with the inks. I ended up mixing and layering colors to get the right shades and look.

The distress inks I chose to use were wild honey, rusty hinge, carved pumpkin, brushed corduroy, ground espresso, both in oxide and regular ink, as well as tea dye, pine needles, and aged mahogany.


Once I was finished painting all the images in, I fussy cut everything out as I did not have the coordinating dies. Good news for you, however, Scrap’n Stamp does carry the die set and I highly suggest purchasing the coordinating die if you get the set. Makes things a lot easier.

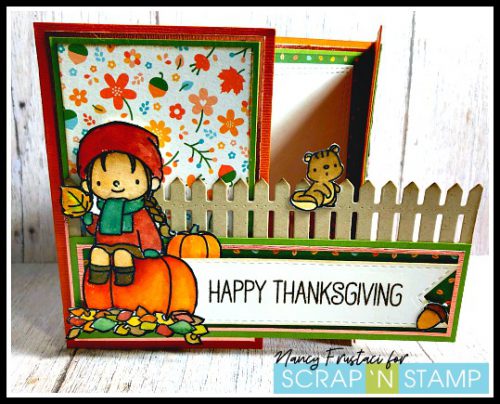
I decided it would be fun to create a little bit of a different card than my usual, as I felt a little bit stuck in a rut so I decided to create a gatefold card to really bring this scene to a whole other level.

To create the gatefold card I cut down a piece of 12 x 12 orange cardstock to 4 1/4 x 11 and scored each end at 2 3/4. I then need to figure out my layers and scene for the card. This took me a bit of time but I am really happy with the finished product.

I really wanted to play up the colours I used for the little girls and pumpkin and managed to find pattern paper that really worked well. I used the Lawn Fawn Fall Fling pattern paper as well as some green shimmer cardstock and metallic coooper cardstock.

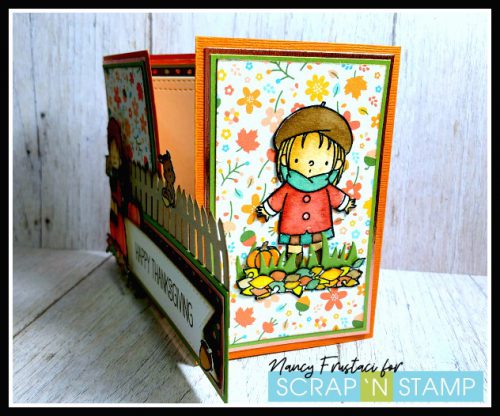
I cut down three layers for both the front panels and the inside just to add a little extra dimension, stability, and interest. The front panel measurements are as followed, Cooper panels (2) @ 2 1/2 x 4 Green shimmer (2) @ 2 3/8 x 3 7/8, layer 3-pattern paper (2) @ 2 1/4 x 3 3/4.

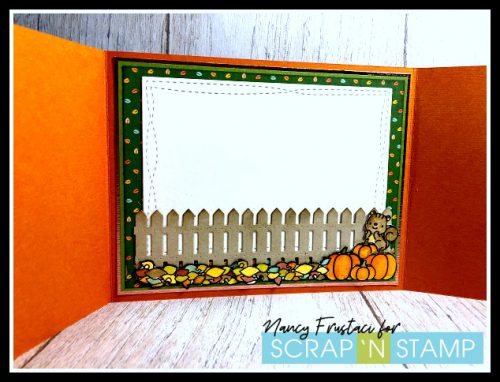
The inside panel measurements are as follows Copper 4 x 5 1/2, Green Shimmer 3 7/8 x 5 1/8 the Green leafy pattern paper is 3 3/4 x 4 15/16. I also added in a white panel which was die cut from the MFT wonky stitched rectangle dies. While I was die cutting I thought it would be fun to add a little more interest and create not only a scene on the outside of the card but also finish off the inside with a similar look. To accomplish this I die cut the picket fence from Kraft cardstock which I edged with some ground espresso distress ink.

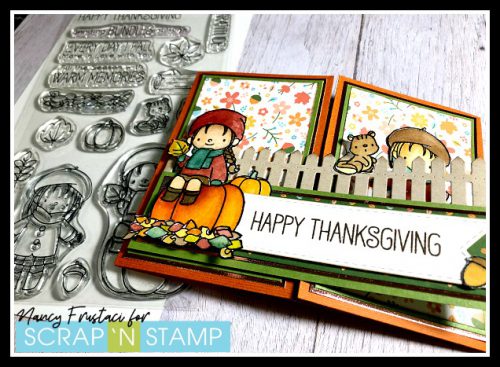
I repeated this on the outside of the card which was the anchor for the rest of my little scene. I cut green cardstock down to measure 1 1/2 x 5 1/8 and layered on a piece of copper 1 1/4 x 4 15/16 and then added a strip of that same pattern paper from the inside which measures 1 1/8 x 4 7/8 on top of the metallic paper. I die cut a white banner strip and stamped the sentiment once again using ground expresso. Before I attached everything to the front of the card I decided to add in that Behind Second die cut fence. this really pulled the scene together. I added each of the cute little girls to the flaps of the card. One in front of the fence, she was popped up with a bit of foam tape and the other girl behind the fence flat to the card. I added some leaves and pumpkins to both the flaps of the card as well as the inside with the little squirel.

I was really quite happy with the way this card turned out. I hope you enjoyed it and come over to the Scrap’n Stamp Challenge page to share with us some of your projects using distress oxides.

Have a wonderful week.

Nancy F.


My Favorite Things Thanksgiving Gatefold Card Read More »

Slimline Card with Gina K Elegant Asters

Hi, everyone! Welcome back to the SNS Blog! Laurie with you today to share a card made using Elegant Asters and other Gina K Designs goodies new to the Scrap ‘N Stamp Store!

My most used card size is an A2 size which is 4.25 X 5.5 inches. I’m not sure why I focus so much on this size as I absolutely LOVE making 4 Bar sized cards which are 3 1/2 X 4 7/8 inches…I always round up to 5 inches! Today, however, I’m going slightly out of my comfort zone by making a slimline card. This measures 3 X 9 inches and fits your standard business sized envelope! I have made only a couple of these as I find it daunting to “fill the space” :).

I started by stamping all the floral images from the Elegant Asters Stamp Set from Gina K Designs. This is a beautiful set and has been on my wishlist for so long. I’m so excited that SNS is now carrying Gina K’s line! I used Mixed Media paper because I love the whiteness of it as well as it’s not too textured. I also used Versamark Ink for the stamping.

I used Pale Rich Gold Embossing Powder from WOW to heat emboss the images. You’ve got to check out the tons of EP the shop is carrying! For the simple watercoloring, I used a couple of sets of Nuvo Aqua Pens, Autumn Woodland and Spring Meadow. These pens are so bright not to mention, easy to use!!

After using the co-ordinating Elegant Asters Dies to cut out my florals and leaves, it was time to make the card base. I used an Ivory cardstock. I think Ivory looks stunning with gold!

I used a very light shade of beige ink to stamp some of the flowers and leaves directly on the front of the card base. It’s really hard to see in the photos. I decided to add a gold strip of cardstock to break up all that ivory in the background. I smooshed my Versamark ink pad onto a scrap of cardstock, add the gold EP and heat set…instant gold cardstock!

The sentiment was heat embossed onto a die cut ivory circle, then layered onto a larger die cut kraft circle. I used foam adhesive to adhere it. After deciding on an arrangement, I used Nuvo Deluxe Adhesive to adhere all the flowers and leaves.

I’m happy with how this card turned out although, I had a hard time photographing it.

I hope you enjoyed my project and get some time to look at all the fab new products that are now available in the SNS store!!

Have a wonderful and see you soon!

Laurie

Slimline Card with Gina K Elegant Asters Read More »

Tuesday with Tara {take 175}

Happy Tuesday!

Last week I mentioned I had one more autumn card to share with you… but as I try to get my head switched into winter mode for holiday cards, I decided it would be fun to create a second card with similar techniques and layout to share with you!  First, here’s my autumn card:

I inked up a background stamp (this is an old retired one by Hero Arts) with a few shades of Distress Oxide Inks, misted them with water to activate the colors and stamped on a kraft card.  I wanted to try a card with the Embossing Technique Letter It Kit from Ranger, and selected ‘hello friend’ from the stamp set.  I love the bold design and how nicely it embossed in gold on my green cardstock.  I die cut some tattered leaves from some paper that I inked up with Distress Oxides and rubbed a bit of metallic Nuvo Mousse in Cosmic Brown– I find this color is a nice neutral that works great with both copper & gold tone accents!  I simply picked up color with my fingers and rubbed along the edges of the leaves… then I decided to add some to the corners of my base card as well.  I kept the card super simple, just finishing off with some freshly dyed 1/4″ crinkle ribbon!

As I mentioned… I took the same basic card layout for my winter card, just turned it sideways to work with the sentiment I chose.  I was working with the Concord & 9th Snowflakes Turnabout stamp set for both my background and the embossed sentiment.  This was my first time using a turnabout stamp, so I played around with my Tim Holtz Stamp Platform (or you could use your misti or any stamp positioner you happen to have!), watching some youtube tutorials and made a couple backgrounds.  (I have a prettier one coming up on a future card!) There was a bit of a learning curve, especially working with a standard size card instead of a square one, but I’m happy with it.  I did find myself lacking snowflake dies (Tim’s Paper Snowflakes are next on my wish list!) but used the small Movers & Shapers by Tim Holtz together with a pre-cut snowflake I found locally.  Not as fun as making my own, but it’ll do for now and was the size I was looking for to compliment my smaller snowflakes.

I added two colors of freshly dyed crinkle ribbon (because I couldn’t choose between them!) and a simple, rustic bow finishes it off.  I also added a couple gold toned Jingle Brads to my smaller snowflake for some fun details 🙂  The embossing & metallic accents were the same as for my first card, keeping things relatively simple!

I hope you like my transitions cards… this was a fun way for me to move into Christmas crafting, here’s hoping it got my mojo going and I can actually mail some out this year!  LOL

Unfortunately my indoor photo shoot didn’t capture all the variety of shimmer & glitter on my card… rainy days are not great for card photos!  I need to work on putting together a better indoor studio for that to use through the winter months!

Make a note on your calendar that we’ve got another BLOG HOP coming up this Friday, we’ll be introducing our November Challenge as well!  Tune in to our Challenge Facebook page to see some sneak peeks of what is coming up for you!

Inky hugs,

Tara

Tuesday with Tara {take 175} Read More »

Free Shipping Anywhere In Canada