Scratch-N-Stamp
Search

Checkout

Keep up with Sales, New Products and other events at Scrap `n Stamp. Sign up for our newsletter now!

What's New

Hot Deals


Hero Arts

No Line Pencil Colouring with Hero Arts & Pinkfresh Studio

Hello and welcome back! I hope everyone is playing it safe and staying at home!! I have been and actually enjoying every minute of it!! I’m a homebody at heart so staying in doesn’t bother me one bit. But if you’re the more social type, I give you strength :)!

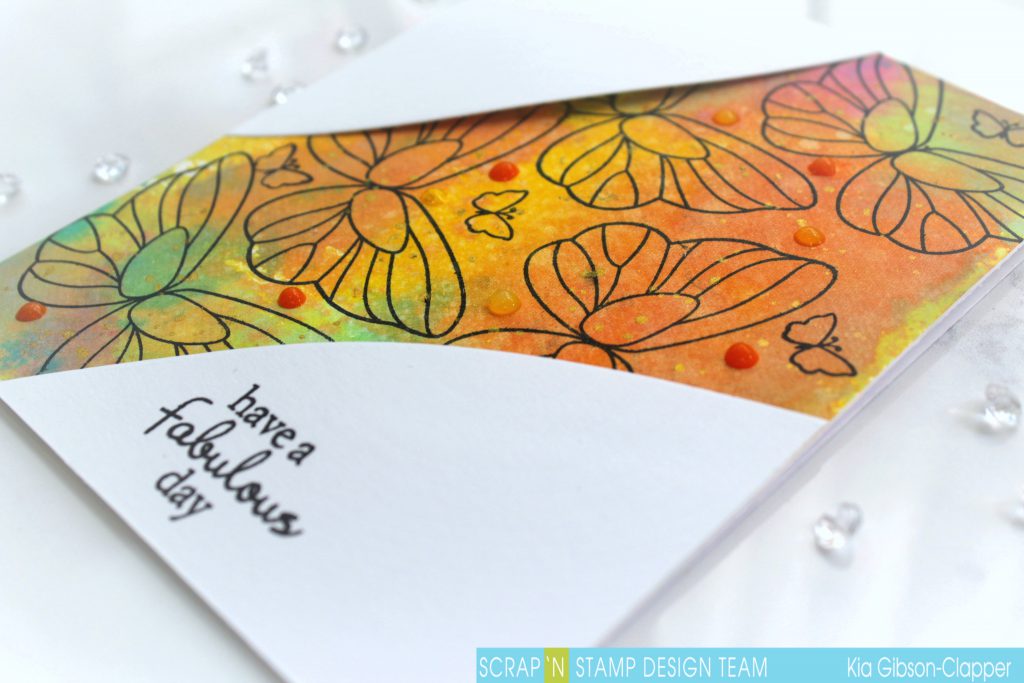
Today, I’m sharing a card featuring the Hero Arts and Pinkfresh Studio collaboration set, You Make A Difference. This is a large stamp set with a beautiful, sketchy background along with tons of awesome sentiments. I decided to do a bit of no-line colouring with my pencil crayons.

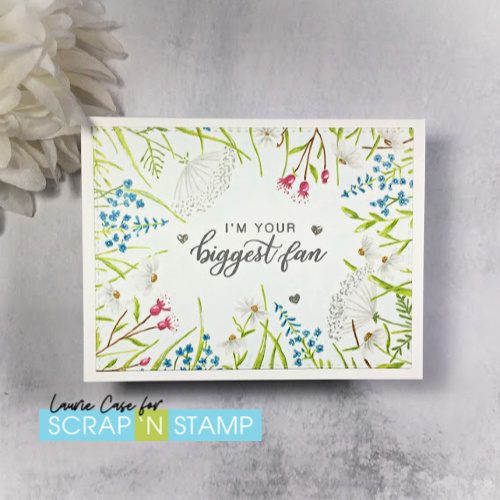
Because I wasn’t adding any water or blending solution to this card, it was safe to use any type of ink. As long as it was quite light in colour! Memento Desert Sand Ink is perfect for this technique! I used a two shade combination for each image. Starting with the light and adding some darker bits. This image is very sketchy and easy to colour!

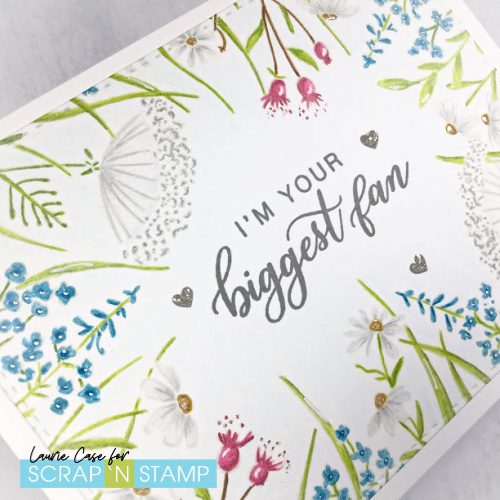
After it was all coloured, I took a very light blue pencil and went around the edges to create a bit of contrast. It’s very subtle and hard to see but it’s there!  I was so tempted to fussy cut the centre of the image out but didn’t want to wreck anything at this point. So, I stamped one of the sentiments from the set using a medium shade of grey ink. The hearts came from a set I had in my stash.

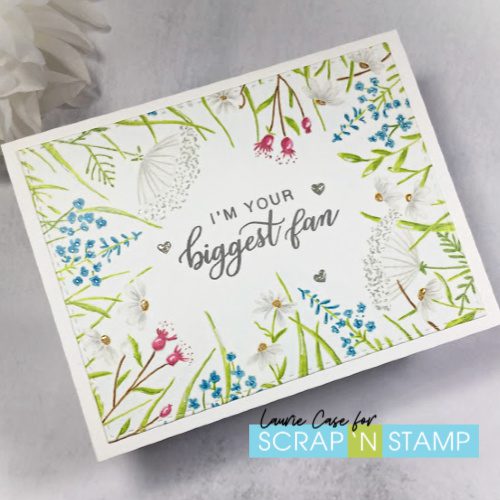
I put some finishing details like white gel pen and Nuvo Crystal Glaze to bits of the image. The panel was adhered directly to a white card base.

And that’s my finished card for today! I hope you enjoyed!

Thank you for dropping in. Stay home and stay healthy!

Laurie

No Line Pencil Colouring with Hero Arts & Pinkfresh Studio Read More »

White Christmas Theme Continues

Happy Monday, my friend! It’s Deb here today, one of the Scrap ‘N Stamp Design Team. Today’s card continues on with our White Christmas theme, for our recent Scrap ‘N Stamp Blog Hop. If you missed it, you’ll want to see all of the amazing projects! You can start at the Scrap ‘N Stamp post HERE with Tara. There’s 2 things you’ll want to do. First, leave a comment on each of the blog posts, as you hop along. You’ll be automatically entered to WIN a $50 Scrap ‘N Stamp Gift Card! Second, take advantage of the FREE GIFT available from Scrap ‘N Stamp! It’s a gorgeous Snowflake Die from Dee’s Distinctively. But it’s only while supplies last – so hurry! (shipping must be paid at time order placed). My card for the White Christmas blog hop wasn’t strictly white – I also included red & green, for that traditional look. So today, for my White Christmas theme continuing, I’ve only added gold.

WHITE CHRISTMAS THEME CONTINUES

I don’t have a stand-alone snowflake die, so I used the beautiful Hero Arts Snowflake Cluster die to replace the ‘O’ in Joy.

Hero Arts Snowflake Cluster

Isn’t this pretty? Sparkly paper, gold foil and brushed gold add add opulence to minimalist card.

CARD DETAILS

Use the Hero Arts Snowflake Cluster die, and die cut it twice; once from gold foil paper, and again from Lawn Fawn white sparkle paper. Next, use letter dies to die cut the J and Y twice each; once from white cardstock, and again from gold foil paper.  I used letter dies I have in my stash; the ones from MFT carried by Scrap ‘N Stamp are very similar. Layer the letters together with the gold on the bottom, slightly off-set. Repeat this with the snowflakes. Use the Sticky Dots for easy coverage of the intricate dies.  As I was about to attach these to my white layer, I decided that it needed more texture. So using a dots embossing folder from my stash, I ran it through my machine.

Create a white cardbase, and attach a panel of gold cardstock to it with glue, Next attach your white layer, with foam tape. Finally, attach your die cuts to the front, using foam dots. The last touch is to add some gold spots with the Nuvo Shimmer Pen in Midas Touch.

Hero Arts Snowflake Cluster

I propped a piece of the gold paper behind the card in the photo above, so you can see the lovely colour and texture of it.

ARE YOU HOPING FOR A WHITE CHRISTMAS?

I always love a white Christmas; especially when the celebrations are at my house! (then I don’t have to worry about driving in the snow). It rarely happens here in Vancouver, but once in a while, we do see the white stuff. I hope you’re inspired by today’s card, as well as those by the Design Team in our White Christmas blog hop. For supplies, I’ve included affiliate links below for your online shopping.

Hero Arts Snowflake Cluster

Affiliate links provided, at no cost to you.


White Christmas Theme Continues Read More »

Fabulous Butterflies

Hello all, Kia back with you today to share these fabulous butterflies. I knew I wanted to use this stamp set for today and thinking of that I had this background idea in my head, and it worked just as I had imagined it would.

Yes I know I did not use the body, I went without as I did not want the disruption in the wing area. These are mysterious butterlies – lol.

For my background I used Distress Oxide inks in Picked Raspberry, Spiced Marmalade, Twisted Citron, Mustard Seed and Peacock Feathers on Fabriano Hot Press water colour paper. On my craft mat I put down the colours in rows of 2 side by side. I then sprizted the inks with water and put my paper in it, twisting from right to left just a bit to meld the colours.

I do believe that using a heat gun on water coloured art pieces dulls the colour, so I always let my panels dry naturally. I have west facing windows over my desk, so I sit my pieces on the ledge in the sun.

Once the panel was dry I then wet it all over again by spritzing heavily with a mixture of Perfect Pearls. It was amazing how the pearls interacted with the oxide inks, and I love the look I ended up with. I again put it on the ledge.

In the mean time I die cut two card stock pieces for the front of my card when complete. On the dried piece I stamped the Butterflies using VersaFine Claire Ink in Nocturne. This ink is so easy to clean that it did not make it a tedious thing to move the butterfly stamp. I also stamped the smaller Butterflies.

To finish my card I attached the water coloured panel to my card base, then attached the two card stock pieces to opposite corners. I added a few both Nuvo Crystals and Nuvo Jewel drops, then stamped the sentiment using the Nocturne ink.

I hope you have enjoyed this card today. Following are the links to the store for the products I used today.

Fabulous Butterflies Read More »

Free Shipping Anywhere In Canada