Scratch-N-Stamp
Search

Checkout

Keep up with Sales, New Products and other events at Scrap `n Stamp. Sign up for our newsletter now!

What's New

Hot Deals


holiday cards

Winter is Coming

Despite the title, this post isn’t about Game of Thrones (for those of you who are fans). But yes, winter is coming!  It’s hard to believe that we still have almost a month until the start of winter. You may have read or seen on the news the devastating rain & flooding that we’ve had here in B.C., which is were I am, and the Scrap ‘N Stamp store.  I’m very thankful that the area in which I live is relatively unaffected. But I’m very sad for those who have been displaced, lost their homes, and all of the animals (pets, livestock and wild) that have suffered. Wherever you live, I hope that you’re safe!

ACTS OF CARDNESS PROMPT

Over on the Scrap ‘N Stamp Facebook page HERE, you’ll find the daily word prompts for the Random Acts of Cardness.  The idea behind the challenge is that it will get everyone making cards daily, but not just making them. Sending them!! Yes – you’re supposed to be giving or mailing your daily creations! At this time of year, it’s not that difficult. For today’s prompt I chose the word ‘winter’, so that you can make this as one of your holiday or Christmas cards.

I pulled out one of my favourite sets from last year, by Colorado Craft Company. It features the whimsical art of Anita Jeram, in a stamp called Kittens & Mittens.

Winter is Coming

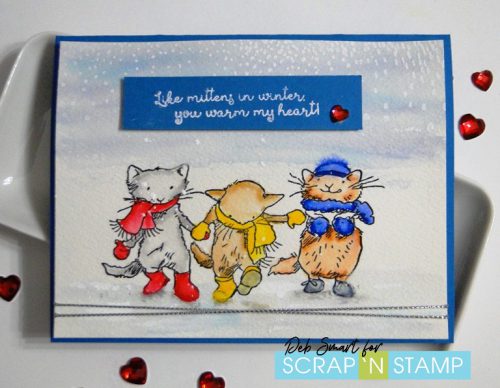
Aren’t those kittens adorable?! I can’t wait to get my hands on the latest release, coming soon to the Scrap ‘N Stamp store.

CARD DETAILS

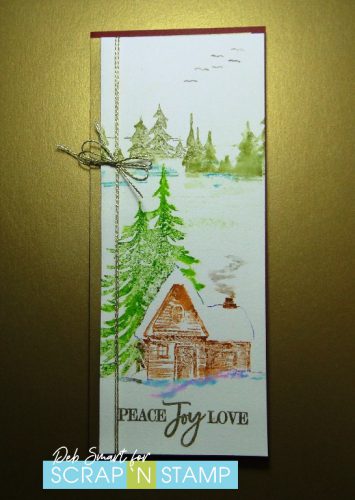
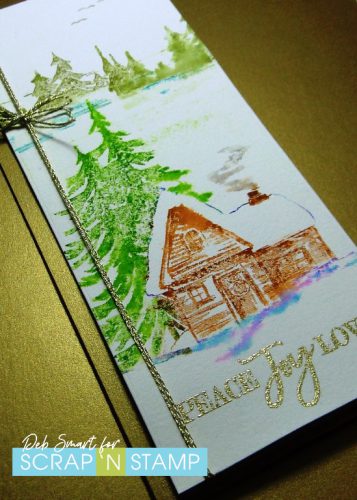
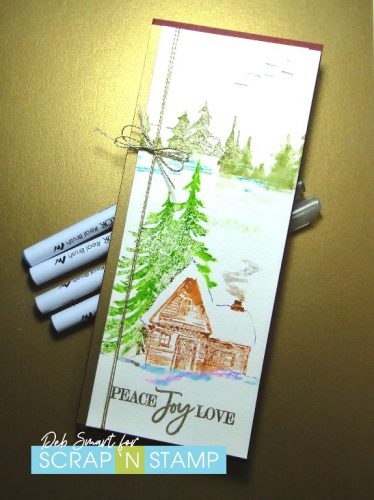
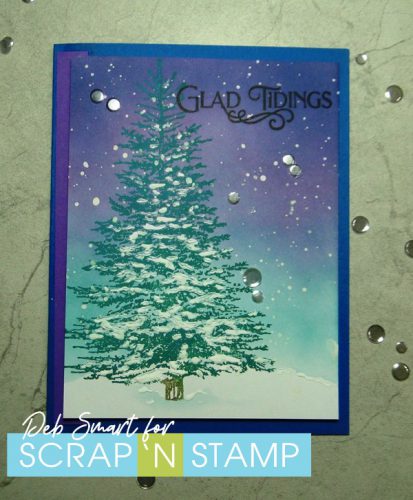
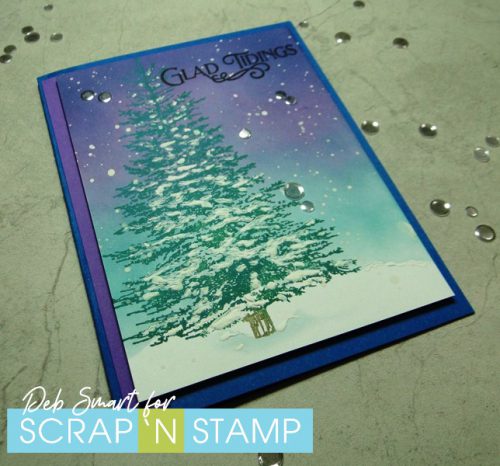
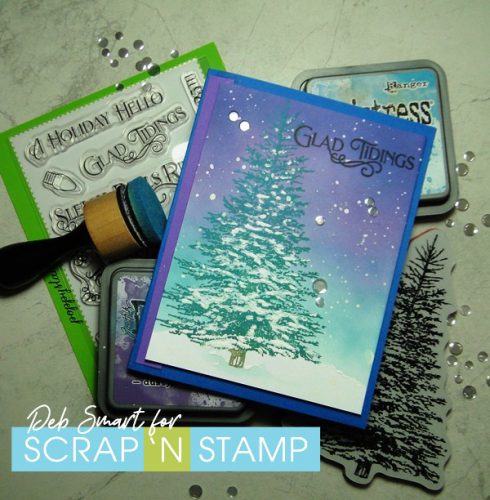
Start with a panel of watercolour paper. Wet the paper with either a spritzer or water brush. Smoosh the Faded Jeans Distress Oxide onto your craft mat, and then pick it up & apply it with a water brush. I did a heavier application on the top for the sky, and then lightly on the bottom. Sort of a reflection of the sky onto the snow. Allow the panel to dry, or speed it up with a heat tool.

Next, stamp the Kittens & Mittens in Nocturne ink. Choose your colours; I used my Zig Clean Color Real Brush Markers and a water brush to paint. The colours I chose are Light Gray, Carmine Red, Beige, Yellow, Brown, Blue and Blue Gray.  After colouring the kittens, add some shadows under their feet, using the Light Gray marker.  You can see on the blue hat that the area wasn’t quite dry – so I went with it, added more water, and made it a fuzzy hat!

Now, use the snowflake stamp with Versamark, and stamp it across the top. Cover it with white embossing powder, and heat set.  I felt like the snow wasn’t standing out as much as I wanted, so I added some splatters of watered down white gouache paint.  While this is drying, stamp the sentiment onto a piece of bright blue cardstock in Versamark, and again emboss with white embossing powder.  Attach the sentiment to the top of the card front, and then wrap some silver cording across the bottom.

Attach the card front to your bright blue card base using foam tape. Finish off the card by adding a small Nuvo Cherry Heart.

Winter is Coming

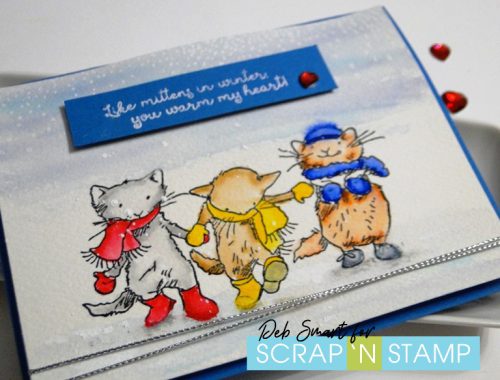
Anyone who receives this card is guaranteed to smile!

JOIN THE CHALLENGE

I hope you’ll play along with my prompt today. After all, winter is coming, so we may as well enjoy it! Be sure to share a photo of your project with the hashtag #snschallenge.  At the end of the month, one lucky participant is randomly chosen, and wins a $50 Gift Card to shop Scrap ‘N Stamp!

If you’d like to recreate my card or a version of it, I’ve included product links below. When you shop at Scrap ‘N Stamp, be sure to use my Designer Discount Code of 10DEB, for 10% OFF your total  purchase!

Affiliate links are provided, at no cost to you. When you choose to use my links, I receive a small commission, which helps me maintain my blog & keep creating. Thanks in advance!


Winter is Coming Read More »

Creating A Scene

By creating a scene, I mean in a good way – not a throw yourself on the floor type scene! Boy, that brings back memories… Not of me on the floor, but my eldest, when he was about 4 years old, in the middle of the grocery store! All I could do was try not to laugh – I felt like a meme come to life! Anyway, today’s project is a much nicer scene, with the Penny Black Cozy Cabin stamp set.

COZY CABIN

One of the things I like best about Penny Black stamps is that there are so many scenic stamps. Not only that, but you can combine them with other scenic stamps, or images from other sets.

Creating A Scene

For this card, I combined Cozy Cabin with the trees from the Quietude set, and sentiment from the Peaceful Season set.  Peaceful Season is a few years old, but if you can find it – grab it! I just love the holiday sentiments in this set.

CARD DETAILS

Start with a slimline panel of watercolour paper. Set up your paper and the Cozy Cabin stamp in your stamp platform. I chose to use my Zig Clean Color Real Brush Markers, for a watercolour look to my card. First, colour in the cabin with a brown marker. Before stamping, lightly spritz your card panel with water, and then stamp firmly. Repeat these steps with the trees beside the cabin, the snow outlines and chimney smoke.   Now, clean and remove the Cozy Cabin stamp, and line up the Quietude stamp. You’ll will colour and stamp one set of trees, then clean and reposition the stamp for the 2nd set of trees.   Add in the flying birds, by using a light gray marker to colour them.

Now, line up the sentiment stamp across the bottom of the panel, and stamp in Versamark ink. I suggest re-inking and stamping again, to ensure full ink coverage on the textured paper. Next, cover the ink with gold embossing powder, and heat set.

Creating A Scene

LAYER IT UP

On a dark red card base, I glued a piece of Gina K. gold cardstock to the front. Next, I wrapped some gold cord twice around the left side of the front panel, tying it off in a bow. Finally, attach the card front to the base, using either a piece of fun foam, or foam tape.

Creating A Scene

I think that this makes a lovely holiday card, or even just a seasonal card. Switch up the sentiment to suit your need!

DAILY CHALLENGE

Today’s word prompt for the Random Acts of Cardness/Daily Challenge is ‘scenic’. No coincidence there – I’m the one who chose the word! To play along with the challenge, first join the Scrap ‘N Stamp challenge group on Facebook, HERE. Next, create your card for one (or more) of the word prompts – play along as many days as you like! Then, share a photo of your project to the group & your other social media platforms, using the hashtag #snschallenge.  At the end of each month, one lucky person is randomly chosen, and WINS a $50 Gift Card to shop at Scrap ‘N Stamp!  Each month you’ll see a new list of prompts, so the fun never ends!

SUPPLIES

If you’d like to re-create my card, you’ll find the list of supplies below.

Affiliate links are provided. If you choose to use my links, you help support me in maintaining my blog, at no extra cost to you. Thanks in advance!


Creating A Scene Read More »

Winter Tree

Happy Friday, my friend! It’s Deb here, from the Design Team. If you’re playing along with the Scrap ‘N Stamp daily challenge on Facebook, then you’ll know that today’s word prompt is ‘trees’.  So I pulled out one of my  favourites by Penny Black called Winter Tree.  I just love this lone tree image, and I’ve definitely gotten a lot of use from this stamp.

WINTER TREE

The tree image lends itself to doing a blended background, so that’s what I did. I went with a twilight sky, with gently falling snow.

Winter Tree

CARD DETAILS

Start with a piece of Tonic Ultra Smooth white cardstock. Decide on your background colours; I used my Distress Oxide inks, as they blend beautifully. First, mask off a bottom portion of the cardstock – this will be your snow covered ground. Now, apply Broken China to the entire piece. Next, blend on Dusty Concord to the top half, so the light blue is partially covered. Finally, blend Chipped Sapphire ink just in the top third of the piece.

To stamp the tree, first set up your blended cardstock in your stamp platform, and align the Winter Tree stamp. Cover the stamp with Pine Needles Distress Oxide ink, and stamp. Reapply the ink, and stamp again, to ensure proper ink coverage.  Now, line up the sentiment from the Poppystamps Christmas Fun stamp set, in the top right corner. Cover the stamp with Nocturne ink, and stamp. Repeat this for a nice dark, crisp sentiment.

To add the snow to the tree and ground, I used white gouache paint and a small brush. You could use white texture paste, instead.  Next, add snowflakes by thinning some gouache with water, loading a small brush, and flicking it onto the card front.  Finish off the card by adding some Gina K. Clear Quartz Solid Sequins, and layering it on a dark blue card base, with a strip of purple on the left side.

Winter Tree

You can see in the photo that I applied the gouache heavily, to add dimension to the snow areas. Although it seems like a lot of steps, this card comes together quite quickly. It would great for sending out lots for the holidays!

JOIN THE DAILY CHALLENGE!

You don’t have to post a project daily – you can join in for as many days as you can. Join the Facebook challenge page HERE. You’ll see the list of daily prompts. Once you create your project, share a photo of it on the page, plus your other social media site. Use the hashtag #SNSchallenge so it will be seen!  At the end of the month, one lucky person will be randomly chosen to WIN A $50 GIFT CERTIFICATE to shop at Scrap ‘N Stamp!

SUPPLIES

To shop for the products I used to create my card, you can click on the affiliate links at the bottom of this post. Be sure to use my Designer Discount Code of 10DEB at checkout for 10% Off (only good on regular priced items, and can’t be combined with other offers).  If you choose to use my links, you help support me in maintaining my blog. Thanks in advance!

Winter Tree


Winter Tree Read More »

Free Shipping Anywhere In Canada