Scratch-N-Stamp
Search

Checkout

Keep up with Sales, New Products and other events at Scrap `n Stamp. Sign up for our newsletter now!

What's New

Hot Deals


ink blending

Daily Challenge Prompt is Moon

Welcome to a new week! It’s Deb here, from the Design Team. If you’re playing along with the Scrap ‘N Stamp Daily Challenge, today’s prompt is Moon. If you’re not playing along – why not? It’s easy to do, free – and you could win a prize! You do need a Facebook account, then join the Challenge page HERE. Play along with as many days as you like! Simply create a project with one of the prompt themes, then post it on the Challenge page. Be sure to use the hashtag #snschallenge there, and on other social media platforms. At the end of the month, one lucky participant is randomly drawn to WIN A PRIZE!

KEEPING THE FAITH

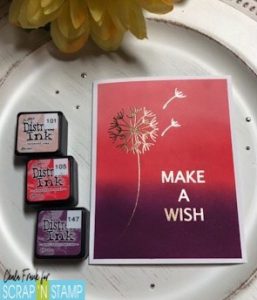
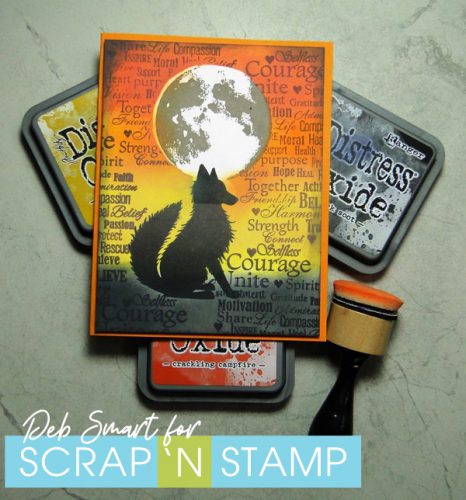
I admit – I chose this prompt of Moon so that I could play some more with my Lavinia stamps! I had so much fun that I created 2 cards to share with you today. This first one features the Moon stamp, as well as Fox 1 (Kernal).

Daily Challenge Prompt is Moon

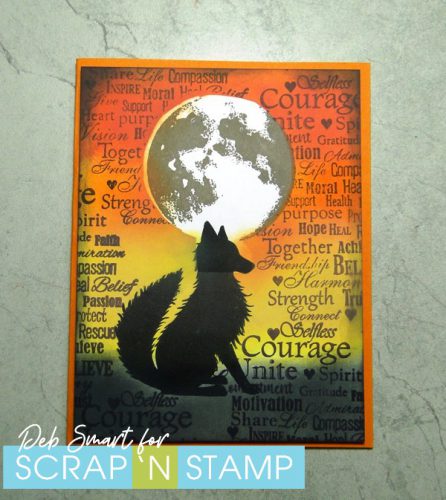
This also gave me the change to do some ink blending, using the new Tim Holtz Crackling Campfire Distress Oxide.

CARD DETAILS

Start with a  piece of smooth white cardstock. Mask off a circle about 1 3/4″ round, just below the top. About 1/3rd of the way up from the bottom, start blending on Fossilized Amber ink, and then Spiced Marmalade next. At the top, blend on the Crackling Campfire, and then go back & blend the transition areas between the colours. At the very bottom of the panel, blend on Black Soot Distress Oxide.

Now remove the mask,  and stamp the Moon image in dark gray ink. Next, stamp the Fox 1 (Kernal) image in Nocturne ink. See that black line in the neck area? That happened because I had also masked off the top portion of the Fox’s head before blending the background colours. Therefore, I ended up with a different ink saturation after removing the mask! Live and learn, my friend! Even inking & stamping a few times couldn’t fix that line!

Finally, I added to the background by randomly stamping the background sentiment stamp Keep the Faith in Versafine Imperial Purple ink, around the images. More Black Soot was added around all 4 edges of the panel.

Daily Challenge Prompt is Moom

FULL MOON

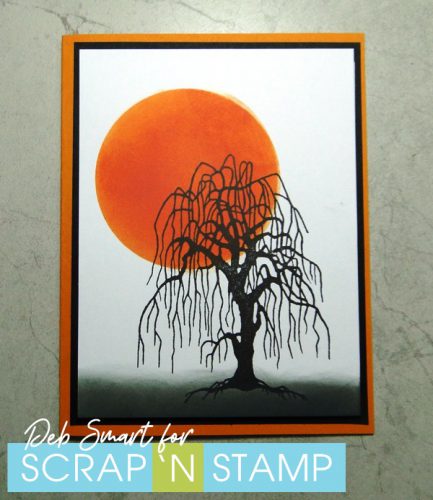
This second card is much quicker to make! I loved  how it looked, so I haven’t added any sentiment yet. That can be done once I decide who to send it to, and for what occasion.

Daily Challenge Prompt is Moon

CARD DETAILS

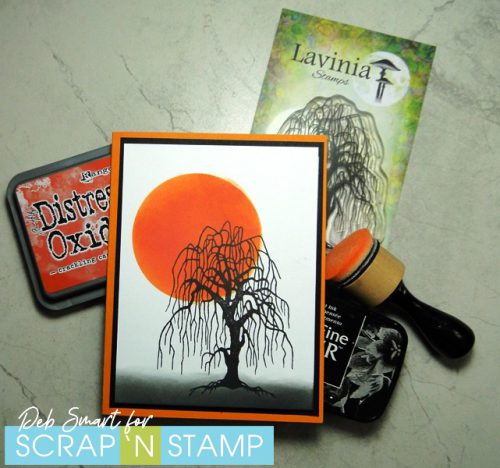
With a piece of copy or scrap paper, punch or  cut out a 2″ circle. Place this mask over the top of a piece of white cardstock. Now, use a blending tool to apply Crackling  Campfire distress oxide ink into the circle. Next, remove the mask, and stamp the Lavinia Weeping Willow image in Nocturne ink. Use a blending tool to apply Black Soot distress oxide along the bottom.

Layer the card front onto a piece of black cardstock, and then onto an orange card base. You could turn this into a ‘Hallowe’en’ card by adding some flying bats, or other ‘creepy’ features. For some reason, this reminds me of a Japanese theme, so you could add a crane bird image, or pagoda in the background.
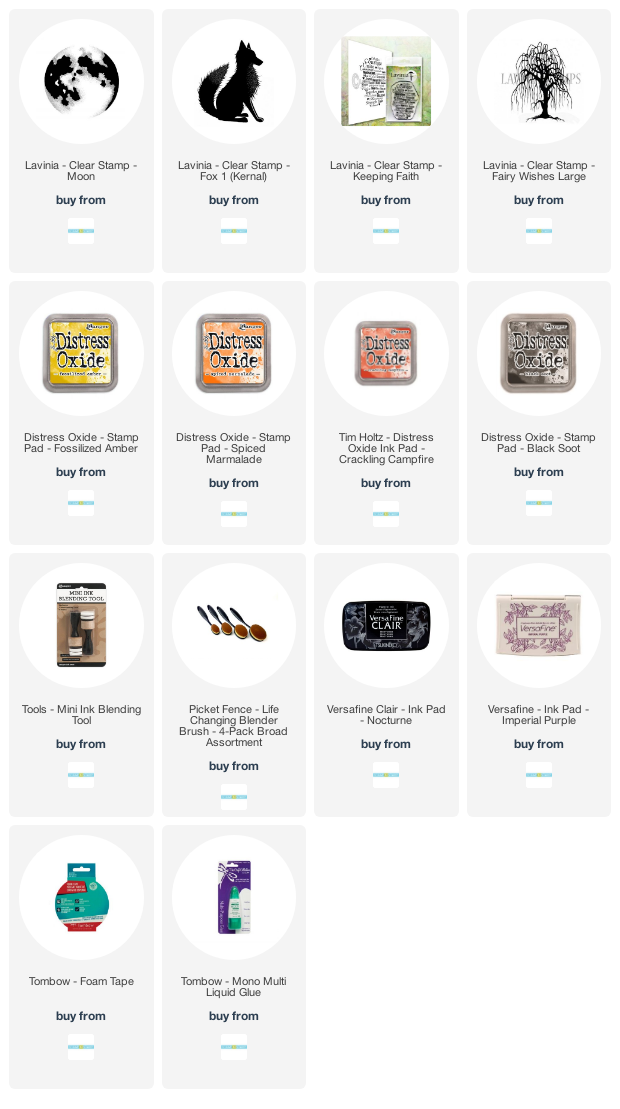
Daily Challenge Prompt is Moon

SUPPLIES

I hope that you’re inspired to join our Daily challenge! If you love Lavinia stamps like I do, be sure to check out all of them in the Scrap ‘N Stamp store – plus the NEW STENCILS from Lavinia! They’re new in stock, and already selling out quickly! (even I missed out on one of the ones I wanted – just click to be notified when it’s back in stock).  Be sure to use my Design Team Discount Code 10DEB at checkout, for 10% OFF regular priced items.

Affiliate links are used, at no cost to you. When you use my affiliate links, you help support me to purchase new products, & maintain my blog. Then I can continue sharing new projects with you!


Daily Challenge Prompt is Moon Read More »

I Can’t Help Foiling in Love!

Hey There!  Today’s card is embracing the Random Act of Cardness Facebook Challenge word “foil”!  I can’t help foiling in love with foil!  I have been enjoying the We R Memory Keepers Foil Quill so much that I wanted to share another card with you!

The Foil Quill can be used for a variety of different projects (not just cards) and it comes in a few different varieties.  There are the foil tip pens which you can buy in the bold, standard and fine tip as well as the calligraphy pen.  However, today I am going to be showing you the All in One Kit for an electronic die cutting machine like either the Silhouette or Cricut machine. I also have some FANTASTIC GIVEAWAY news!  One lucky blog follower will win their very own We R Memory Keepers All in One Foil Quill set for their electronic die cutting machine!  This is a prize value of $147.00 dollars!  WOW!  All you have to do is comment below and let us know what is the first thing you would make with the Foil Quill All in One set if you won!  The winner will be chosen randomly by the close of business on Friday, August 14, 2020 and will be announced over at the Facebook Challenge Page!

Now, let’s get to today’s card.  This one is fairly simple but has such an elegant look.  I will be using the Silhouette machine and Silhouette Design Studio (Business Edition) to create today’s card.  If you need a more detailed version of how this card was made I encourage you to head over to watch the YouTube video here:

https://youtu.be/6jycrOj3XHA

I started off ink blending a standard A2 size card panel with one of my favourite Distress Ink combinations:  Tattered Rose, Abandoned Coral and Seedless Preserves.  You can use either the regular Distress Inks like I did or the Distress Oxide inks.

I then chose and elegant dandelion image and created a custom sentiment that says “Make a Wish”.  The wonderful thing about the Silhouette Design Studio is you can totally create your own design or choose one from the Design Store.  There is always a free file of the week and the images are a fairly reasonable price point.

There is a bit of fine tuning that you need to do with the image.  You will have to select the images and change the setting from cut to sketch and then choose your sketch lines.  I recommend you watch the video as I show this process as well as link to my Beginner Video that I made going into greater detail of how best to choose your settings.

Once you have your settings selected you can then get your project ready to foil.  Now, I again I embraced a few “learning opportunities”  (aka: mistakes”) and I feel it is important to share them with you in hopes that it helps you with your project.

I am using the We R Memory Keepers Magnetic Mat and I have to say I really like it!  If you are just using the regular adhesive mat you have to put down some scrap paper then tape your project to the scrap paper and then tape your foil over top.  If you do not do this and simply apply the foil straight onto the adhesive mat you the foil will come off onto the mat and you will ruin it (This surprisingly was not the mistake I made).

Silhouette has also come out with a new version of their adhesive mat which I like much better than the old one.  They have smaller grid lines and have made the mat so that there are arrows on both the top and bottom of the mat allowing you to feed the mat in either way.  This will extend the life of your mat as well.

With that said, you will want to place the magnetic mat onto the adhesive mat.  The magnetic mat comes with 4 magnets.  Two short ones and two long ones.  I had originally planned to do a foil border around my card so I did not end up using them this time.  However, I think they will be very handy on future projects.

Once my magnetic mat was adhered to the adhesive mat I placed my panel down (this is where my mistake came in).  I place my project so that it was not lined up with the top left side.  Rather, I chose to place it one inch to the right and once in down.  I used a small amount of Thermo Web Purple Tape on the corners to hold it in place and then layer the foil over top.  Again, using a small amount of the purple tape I began adhering the edges of the foil down ensuring that it was laying tight and smooth.  Then I loaded the mats into the machine.

Now I can go back to my computer.  Here is my mistake.  On the design window of Silhouette Studio I forgot to move my project down one inch and over one inch.  So, when I sent my project to the machine it was not foiling in the correct area.  I quickly stopped it and removed it from the machine.  I could see that it was going to foil beautifully (YAY!).  However, I now could not use this panel (BOO!).  I will trim off the little bit of foiling and save this for another card (YAY!).  This means I had to redo my ink blending panel (BOO! sort of….I find ink blending therapeutic).

After I had the new panel completed I repeated the process of securing it to the magnetic mat (ensuring everything was smooth) and then I changed the position of the project within the program.  I double check my settings and sent it to the machine.  SUCESS!

The process took a while as I chose to have it do two passes just to be sure everything foiled nicely.  I was not disappointment.  Once the project was complete, I removed the mat from the machine and then removed the foil from the project.  Again, the outcome was stunning!!  As I said before, I originally planned to have a foil border around it, but I really liked it without it so opted not to send it through again (I could have done it all at once, but wanted to see what it looked like first – glad I did that!).

I trimmed 1/8″ off each side and then adhered the panel to a standard A2 size side folding white card base.  You could add gems or other embellishments if you want, but I really liked the simplicity of this card.

I really want to try doing this technique overtop of watercolour, as well as playing around to see if I can foil with alcohol inks and the Yupo Paper.  Stay tuned for a future post to see how this turned out!

I hope that you are inspired to add some foil to your cards!   If you don’t have an electronic die cutting machine you can always use the freestyle pens!  There are a ton of amazing foil colours to choose from and you can check out some of them here.

Remember to comment below for your chance to win the amazing We R Memory Keepers All in One Foil Quill  set for your electronic cutting machine!

Thanks for stopping by and have an amazing week!

~Chala

I Can’t Help Foiling in Love! Read More »

Inspiring Poppies

Hello there! It’s Deb here today to share some more projects made, keeping with our Scrap ‘N Stamp theme of poppies this month. I’m using the beautiful Gina K. Designs Inspiring Poppies stamp set. If you haven’t already, be sure to check out our Poignant Poppies Blog Hop. You can start here on the blog at Tara’s post, and go from there. Be sure to comment on each blog post, to be entered to win a $50 Gift Certificate to Scrap ‘N Stamp!

INSPIRING POPPIES

This is the same Gina K. Designs stamp set that I used for my 2 cards for the Blog Hop. For those cards, I did both in a Remembrance Day theme. Today’s cards could be used for ‘thank you’ or ‘thinking of you’ cards – or of course, just because!

Gina K. Inspiring Poppies

This is a simple card, but the ink blended background adds a big punch, don’t you think?

CARD DETAILS

Start with a panel of smooth white cardstock. Use a blending brush, apply Worn Lipstick Distress ink to the outer edges of the panel. Next, blend on Festive Berries Distress ink to the middle, blending outwards into the Worn Lipstick ink.  When you’re finished blending, stamp the poppies image in Nocturne ink in the middle. Cover with clear embossing powder, and heat set.

Cut a black cardstock base and panel to go behind the blended panel. Cut another white panel to go on top of the card base. Stamp the sentiment, also from the Inspiring Poppies stamp set, in Nocturne ink, and heat set with clear embossing powder.  Finally, layer the panels together, using foam tape for the black and stamped panels.

Gina K. Inspiring Poppies

POPPIES ON RED CARDSTOCK

If you don’t have the time for blending, you can stamp the poppies directly onto red cardstock.

Gina K. Inspiring Poppies

You still get the big ‘punch’ of colour, especially using a red & white scheme, with the black stamping.

CARD DETAILS

If possible, this card is even more simple to create than the first! All you have to do is start with a panel of red cardstock. Stamp the poppies image twice in Nocturne ink, and heat emboss with clear embossing powder. Stamp the 2 sentiments, also included in the Inspiring Poppies stamp set in Versamark ink. Cover with white embossing powder, and heat set.

Next, layer your stamped panel offset to the bottom left on a panel of white cardstock, using foam tape. Attach this to a red card base. Now, finish off your card front by adding some white  pearls in the lower left and upper right corners of the red panel.

Gina K. Designs Inspiring Poppies

This makes a lovely ‘thank you’ card, doesn’t it? No one has to know how quickly it comes together!

I hope that you’ve been inspired to do some creative stamping of your own, today! Scrap ‘N Stamp is also having a November challenge on the Facebook page – just create any project of your own, making sure to use a poppy theme. Add it to the Facebook challenge page HERE, and you’ll automatically be included for a random draw. At the end of the month, one lucky participant will win a $25 Gift Certificate to Scrap ‘N Stamp!

Links are included below for the products I’ve used to create my cards.


Inspiring Poppies Read More »

Free Shipping Anywhere In Canada