Scratch-N-Stamp
Search

Checkout

Keep up with Sales, New Products and other events at Scrap `n Stamp. Sign up for our newsletter now!

What's New

Hot Deals


Nuvo

Its Winter

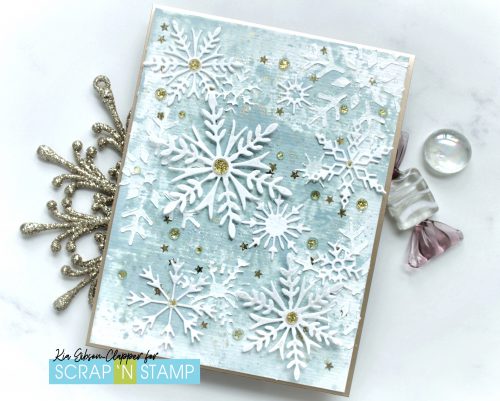
Hello all, Kia back with you today to share my card for Day 20 of the Random Act of Cardness challenges.

The challenge for today is “SNOW”. I have done a card full of snowflakes to celebrate snow. I love the winter time finding it such a refreshing time of year, especially when it snows. I tried to replicate that in this card.

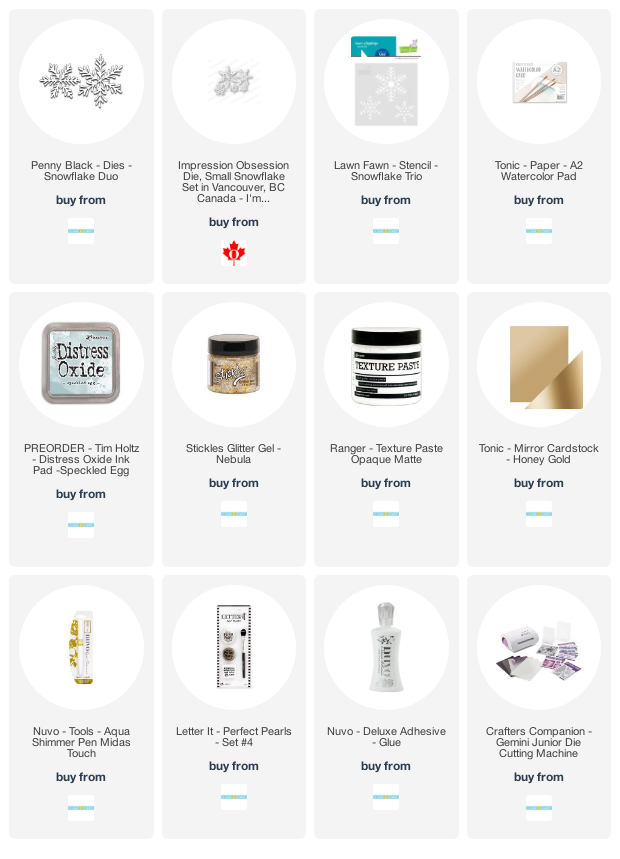
I finally used my Speckled Egg Distress Oxide ink, and it took this card to do it. Sorry to say, it is not exactly one of my favourite colours, but for this kind of card I find it perfect, its cold! I started this card by laying down some colour on my work surface and spritzing with water, then pounced my piece of Tonic watercolour card stock in the puddle I made, drying after each layer. I did several layers this way, then for the final layer I spritzed with a mixture of Perfect Pearls and water, applying a shimmering look to the card.

Once dry with my fingers I added Stickles Glitter Gel over the card front. If you look closely you will see the gold stars throughout. I used my finger for this as I find when using a palette knife the stars end up close together for some reason. With my finger I can get them to spread out.

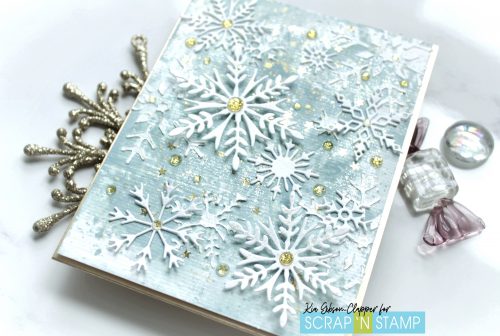
While waiting for the card to dry I die cut some snowflakes from a sheet of the Tonic watercolour card. Using the left over negative pieces from the die cutting card I applied texture paste with my fingers, which I used as I did not want to curl any of the delicate parts of the flake with a palette knife.

Once the paste was dry, using foam tape I attached my card panel to a mirror gold card base. It is gold on the front and white inside. I did this now as I would be using gems and foam dots from this point on.

I glued the die cut snowflakes in place around the card except for two which I attached with foam squares. I then painted the the two snowflakes with Nuvo Shimmering Pen in Midas Touch, then put some of the liquid on my work surface and splattered a lot all over the card with a paint brush. It is so beautiful in real life.

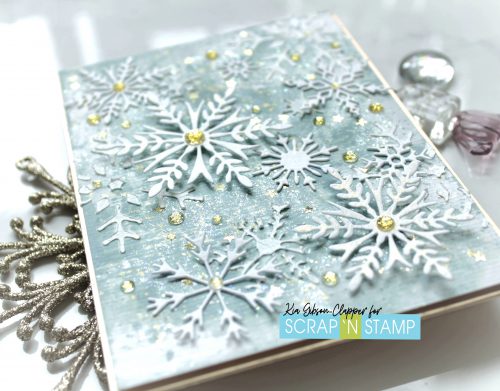
I finished by adding gold gems to a few of the snowflakes as well as randomly around the card. I did not really want a sentiment on the front, I have a nice one for the inside instead.

I really enjoyed making this card, and I hope you enjoy it as well. Following are Affiliate links to the store for the products that I have used for this card today, at no extra cost to you.

Its Winter Read More »

Shake Up Summer! SNS August 2020 Blog Hop

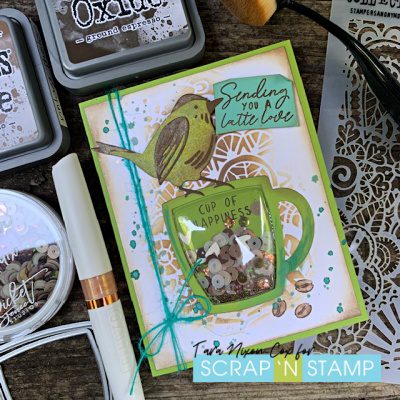
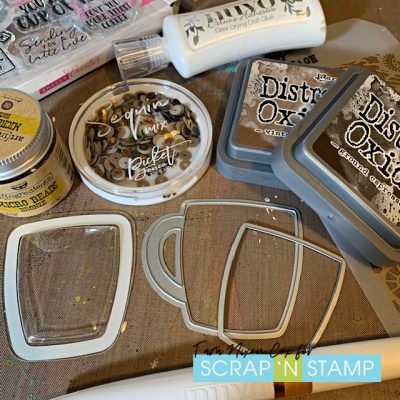
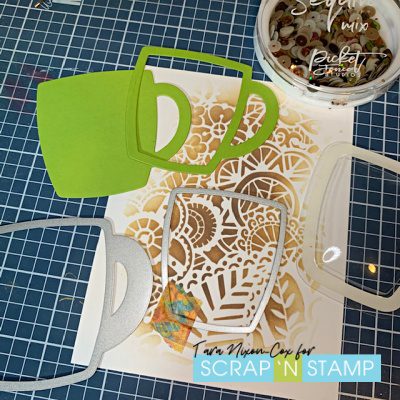
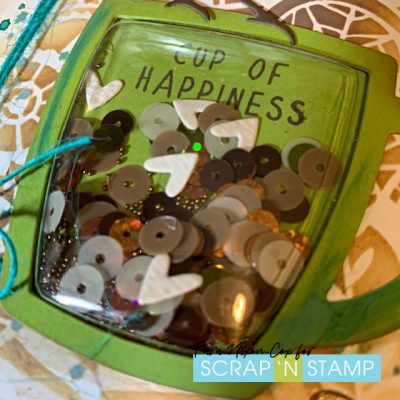
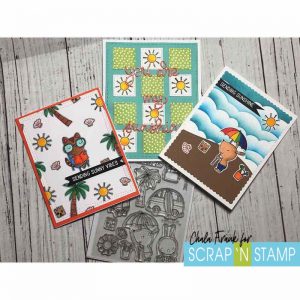
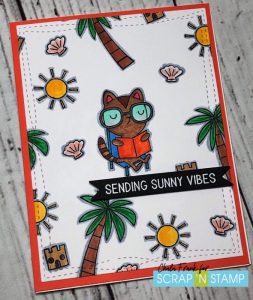
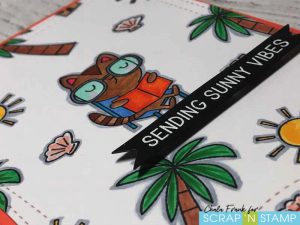
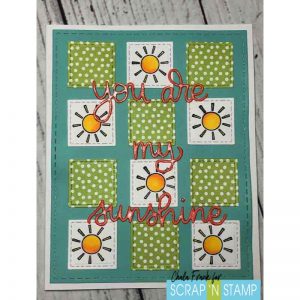
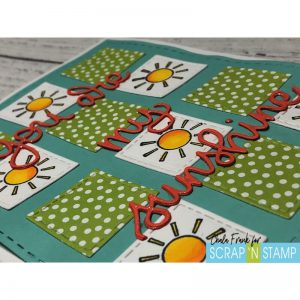
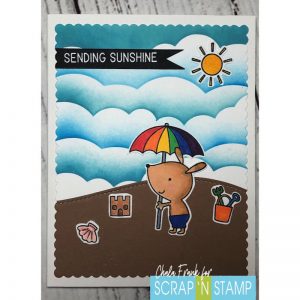
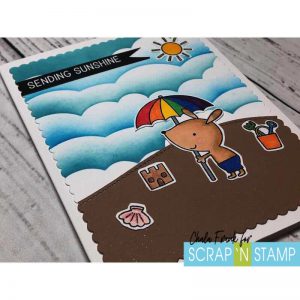
Happy Blog Hop Day!  The girls at Scrap ‘N Stamp are here to help you Shake Up Summer with some fun projects featuring Tonic Shaker Card kits!   We’ve got some great prizes and fun cards to share with you and I hope they inspire you to Shake Up your Summer!

Be sure to leave a comment along the way for chances to win one of 3 Tonic Shaker Prize Packages- and watch for chances to win on our Facebook & Instagram as well!  You can also have some fun shopping this weekend after you hop and save 20% OFF TONIC (including Nuvo) products this weekend, until midnight Aug.9th!  I suggest starting with your favorite Die & Shaker set, like the Coffee Mug one I’m using today!  They include the dies you need & adhesive backed shaker pouches to make it easy for you to make unique shaker cards, just add the fun filler!

Enough talk… I bet you’re ready to get hopping!  Here’s what I made:

Here’s a look at most of the products I used for my card.  I was kinda stumped on my layout, until I noticed a fun Tim Holtz Doodle Art Stencil I hadn’t inked up yet… so I decided to blend a background with a mix of Ground Espresso & Vintage Photo Distress Oxide, using a Life Changing Blender Brush by Picket Fence Studios.   You can see the Coffee Mug Die & Shaker pieces here, as well as the Moscow Mule Sequin Mix I used.  I also used Nuvo Deluxe Adhesive, Tonic Tea & Coffee Stamp Set and a Nuvo Aqua Shimmer Pen in Blush.  I also added one of my new fave dies (in case you hadn’t noticed yet, haha), Tim Holtz Feathered Friends.  Sometimes you just have to put a bird on it 🙂

The card is really very simple!  I inked up the stenciled background on a white layer and figured out the position for my cup, with room to place my bird on top.  I selected a lime green for the mug & base card, then decided I needed some color contrast as well for my stamped sentiment. I stamped it in the same Ground Espresso ink on some aqua card stock, which I cut deliberately crooked and curled my edges a bit.  I pulled out some Distress Oxide sprays to add some splatter with a mix of Evergreen Bough & Speckled Egg. (Then when everything was done I added some more speckles… which got a bit out of control, which is why there’s some blue shading on my mug!).  Shimmer on the bird, stamped coffee beans & under the mug add a little bit extra, as does my fave thin jute twine.

In case you are wondering how it all goes together, here’s a look at the pieces for the actual shaker.  I cut the opening as you see here, then the window was adhered from the back.  I filled with some fun (I always struggle with how much to add)! and glued the full mug cut out to the back and the open mug to the front.

Here’s a final close up to show you the mix of goodies in my ‘cup of happiness’ shaker.  I added a few mini die cut hearts and some micro beads for variety.  As you can see, I decided to stamp a small sentiment inside my shaker for a fun touch.

I hope my little card makes you smile!  Can’t wait to see what the rest of the girls have shaking for us!  Next up is the talented Chala– I caught a little peek of her card and already asked her to pour me a glass 🙂

Here’s the full set of hop links- have fun and don’t forget to comment for  your chance to win!

Inky hugs,

Tara

Shake Up Summer! SNS August 2020 Blog Hop Read More »

Summer Sunshine – Sunny Vibes

Happy Lazy Sunday!

MFT Sunny Vibes

Hey Crafty friends!  It’s Chala and I am here today to share some cardmaking inspiration with you!  If you are playing along with us on the Scrap’N Stamp Facebook Challenge page then you know that our word for the day is SUMMER!  I don’t know about you, but when I hear the word summer I automatically think of sunshine!  This is something I don’t feel like we have had a lot of here in Calgary….but here is hoping today’s card warm you up just the same!

I am loving MFT’s new Sunny Vibes stamp set and it is perfect to create a summer scene card.  I first played around by creating a custom one layer background piece.  I chose a few images and stamped them with Memento Black Tuxedo ink and did some simple Copic colouring.  I just love the little critter lounging with its book!   I added a grey shadow to each of the images to give the background piece a bit of depth.  I then used the larger MFT Wonky Stitched Rectangle Die and mounted that onto some orange cardstock and then adhered that to an A2 side folding card.  For the sentiment I chose to keep it simple with white heat embossing on black cardstock and then cut that into a banner and adhered it with foam adhesive to add dimension.

MFT Sunny Vibes MFT Sunny Vibes

For my second card I pulled out the Summer Sunshine 6″ x 6″ paper pad from Taylored Expressions.  This paper pad has some fun bright colours and patterns that will add the perfect pop of colour to any card.

My Mom has been doing some quilting and created a beautiful summer patch quilt picnic blanket for my kids.  This inspired my next card.  I used a small square stitched die and die cut 6 patterned pieces and 6 white squares.  Using my Stamp Perfect Tool I was able to quickly then stamped the sunshine onto the white squares and Copic coloured them.  I then arranged them onto some green cardstock similar to that of what you may find on a quilt.  For the sentiment, I die cut a “You are my Sunshine” sentiment several times and stacked them together using Gina K Connect Adhesive.  To make the sentiment pop I added some Nuvo Aqua Shimmer Pen.  I LOVE the sparkle that this pen gives!

For my final card I wanted to create a beach scene.  I used the MFT Cloud stencil and blended Distress Oxide inks in the colours Broken China and Salty Ocean with one of my smaller Picket Fence Blending Brushes.  I like to do my ink blending on the Wendy Vechhi Make Art Stay-tion as I can use the magnets to hold my project in place while blending.  I die cut some brown cardstock with the Lawn Fawn Hillside Stitched Borders.  I stamped,  Copic coloured and fussy cut out the sunshine, bucket, shell, sandcastle and the puppy holding the sun umbrella with my cutter bee scissors and then adhered them with some of the Gina K liquid adhesive.  This gave me time to wiggle the images into the perfect place.  I again used a simple black cardstock and white heat embossed sentiment cut into a banner.  I wanted to add some more interest to the scene and decided to use my wavy die cut rectangle to give the edge a fun look.  I then adhered this to an A2 size side folding card…and…you guessed it…I added some more sparkle  to the shell and the sunshine with the Nuvo Aqua Shimmer Pen.

MFT Sunny Vibes MFT Sunny Vibes

I really enjoyed how all three cards turned out and how different each one was.  I have a few more ideas for this set but ran out of time!

If you want to see these cards come together you can check out the YouTube video here:

https://youtu.be/hnxHvDr8j_I

Remember to share your Summer inspired cards over at the Scrap’N Stamp Facebook Challenge Page!

Enjoy the rest of your day!

~Chala

Summer Sunshine – Sunny Vibes Read More »

Free Shipping Anywhere In Canada