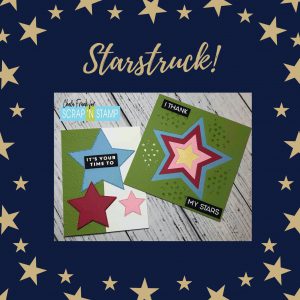
Scratch-N-Stamp
Search

Checkout

Keep up with Sales, New Products and other events at Scrap `n Stamp. Sign up for our newsletter now!

What's New

Hot Deals


p.s. i love you by Chala

Starstruck

Hello Again!  Chala here and I have two quick and fun cards to share with you to give you some inspiration for today’s Facebook Challenge Word – Stars.

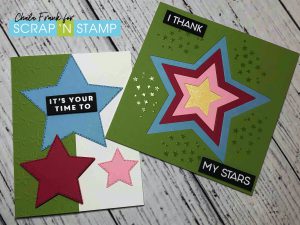
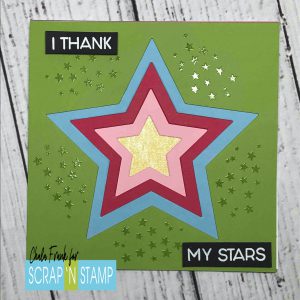
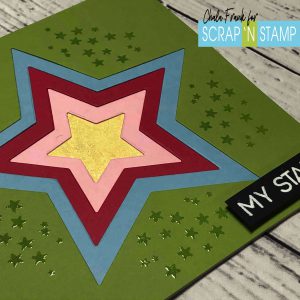
I have some nesting stitched star dies in my collection that I haven’t used in a while so I pulled them out along with the Concord and 9th Lucky stamp set.  I wanted a bright colourful card so I also pulled out a package of the Lawn Fawn Sherbert cardstock.  If you are looking from nice thick cardstock Lawn Fawn is absolutely perfect!  I love the quality of this paper and the colour selection is amazing!

I cut down four pieces of the cardstock into 6″ x 6″ squares to fit on a square card base in the colours Ballet Slippers, Cilantro, Moonstone and Raspberry and then die cut the different sizes of the stars in descending size. I will be using the negative space of these die cute.  I then cut a square piece of the colour Sticky Note just a bit larger than the smaller star die cut.

I want the yellow star to be where your eye is drawn to so and thought some sparkle would help achieve that.  I pulled out my Nuvo Aqua Flow Shimmer Pen and added a nice layer overtop.   If you like shimmer and sparkle this pen is for you!

I put a lot of shimmer on this piece so I wanted to make sure it was going to adhere it flat onto the back so I used some Scar-tape around the edges and adhered it to the backside of the smallest star.  I then just continue to layer the coloured pieces adhering them with a tape runner and then adhere all the layers onto the card base.

I thought the card needed a bit more interest to it so I pulled out the cluster of stars from the Concord and 9th Lucky stamp set and with my Stamp Perfect I stamp the stars with some Versamark sticky ink and heat emboss with clear embossing powder.  I think this adds just enough interest without being too distracting.

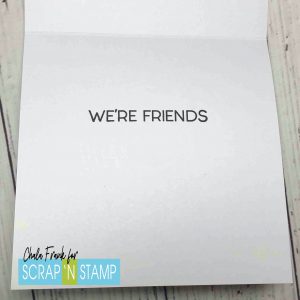
For the sentiment I used the same Concord and 9th Lucky stamp set.  I liked the “I thank my” and wanted it to say “stars”.  I didn’t like the layout so I performed some stamp surgery and cut the “my” off so that I could line it up with the “stars”.  I have a hard time cutting my stamps apart…but I know it will be fine and I can layer them back together like they originally were.  I stamped with Versamark ink onto Lawn Fawn Black Liquorice cardstock and heat embossed with white embossing powder.  I finished the sentiment by stamping “We’re Friends” on the inside with VersaFine Clair Nocturne Black Ink.


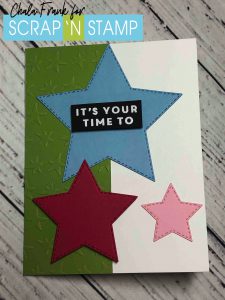
My next card I am making use of some of the stitched stars that were cut out of the 6″x 6″square pieces.  I can use the ones I don’t use on this card for another project.

Again, I wanted to add a bit more interest, this time I used the Sizzix Star Blanket embossing folder and I will emboss the Lawn Fawn Cilantro cardstock and trim it down to 2 1/8″ x 5 1/2″.  I adhere this to the lefthand side of an A2 size card.  I chose three of the stars to adhere onto.  I popped the red die cut star up with some foam squares to add some dimension.

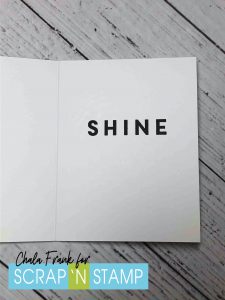
The sentiment I chose is from the Concord & 9th – Shine On stamp set.  I again split the sentiment where I embossed the from sentiment on Lawn Fawn Black Liquorice cardstock and heat embossed with white embossing powder and stamped the rest of the sentiment on the inside with VersaFine Clair Nocturne Black Ink.

You can check out how I put these two cards together by watching the video here.


Thanks so much for stopping by and checking out today’s blog!  I look forward to seeing your “Star” themed creations on the Scrap’n Stamp Facebook Challenge Page!


~Chala

Starstruck Read More »

Get Well Greeting….and Grief

Hey Friends!  It Chala and I just wanted to start off by saying I was so bummed that I was not able to participate in the Snarky New Year Blog Hop…so, I am sharing one now!

 Anyone who knows me knows that I LOVE the snark and sarcasm!  Unfortunately, my year started with the passing of several family members (3 in one week), one of which was my incredibly sweet (yet chaos envoking) Father-in Law who lived with us.   He was diagnosed with cancer in September and it has been a tough several months for our family as he was determined to stay at home as long as he could to celebrate Christmas with his grandkids.  Thankfully, he was able to fulfill this goal.  However, we sadly lost him the morning of January 1, 2020.  Now, I should note that we are a bit of an odd family.  Our days are filled with sarcasm and humour and we are often hard for “outsiders” to understand.  But,  it is with this sarcasm and much humour that we dealt with his diagnosis and this tremendous loss and ongoing grief.   So, please take today’s card with the humour it was intended to invoke to lighten the mood and I hope it makes you laugh as much as it made my family laugh.

Since so many of my friends and family have also been fighting off the flu, sniffles, colds and coughs, I thought it would be fun to make a “Get Well” card.

Hero Arts Snarky Mix and Match

I am using the “Get Well Soon” sentiment from the Snarky Mix & Match stamp set by Hero Arts. This has got to be one of my favourite snarky sentiment sets on the market!  I stamped the sentiment several times on an A2 size card base in with Distress Inks in the colours Wild Honey, Candied Apple, Broken China and Evergreen Bough.  Then die cut with a rectangle die.  The one I used is from Elizabeth craft designs.  However, a similar one is MFT A2 stitched rectangle stax  set 2 dies.


I picked through my rather large stash of patterned paper and picked out a rainbow stripe pattern.  I admit, I am not exactly sure where it came from…..but, the Taylored Expressions 6×6 – Hello Sunshine paper pack would coordinate beautifully with the Distress Ink colours that I chose. I trimmed the patterned paper down and adhered it to an A2 size side folding card base that I made from Lawn Fawn 8.5″ x 11″ – 80lb White Cardstock.

I loved the rainbow colours of the card….but, felt it needed a little something on the front. I saw the Tissue box from the Lawn Fawn – On the Mend stamp set and thought it would look really cute.  I like being able to mix and match several stamp sets/companies to stretch my use of them.  I stamped the tissue box with Memento Black Tuxedo Ink and coloured it with Copic Markers in the colours C2 – Cool Gray, BG13 – Mint Green and BG 15 – Aqua.  I fussy cut the image out and popped it up with a square foam adhesive.

For the inside sentiment, I stamped the “I’m grateful you’re not dead” with my favourite sentiment ink Versafine Claire Nocturne Ink. (I thought this was really funny….thankfully, so did my family!)

I know this card is very simple and I’m sorry I don’t have a coordinating video…but, I am still trying to get back into the creative groove!

Thank you for stopping by and letting me share a little personal side of my life!

Hoping you all enjoy your week!


In Memory of Robert Harrington Frank

“Don’t do it, it’s a trick!”

~Chala, xoxoxo

Get Well Greeting….and Grief Read More »

Texture Paste with a Twist

Texture Paste with a Twist

Hey Guys! I am so excited to be back sharing my next card that features texture paste with a twist!

Our Design Team absolutely rocked the White Christmas them and I was so inspired by them that I had to create one more to share!

You got a sneak peek a few weeks ago during my Foil Quill video of the Carta Bella/Echo Park Snowflake Fun Stencil. I was so excited to be able to use it for this card as it was perfect to show off the detail that texture paste can give you on a project.

The Technique…

I only have one texture paste and wanted to jazz it up a bit so I decided to mix my own custom paste. To do this I grabbed my Tim Holtz craft mat, palette knife and Ranger opaque matte texture paste and mixed in the Nuvo Glitter Drops in Silver Crystals until I got the amount of sparkle I liked.

The great thing about this technique is if you are short on craft space like me, you can still get the look of all the colours without having to own ALL the colours. I encourage you to try mixing difference mediums to see what custom creations you can come up with! Remember to share your White Christmas theme cards over at the Scrap’N Stamp Facebook Challenge Page!

Spread the texture paste in thin even layers. This will help with speeding up the drying time and keeping your textured image looking even.

Once my piece was dry, I die cut it with the MFT Wonky Stitched Rectangle dies (one of my favourites). I then mounted that onto a 5 1/2″ x 4 1/4″ card panel made from silver mirror cardstock. (Here is a link to a similar cardstock) and adhered that panel to the A2 card base.

Make it Sparkle!

I wanted to up the sparkle factor just a bit and decided to add some Studio Katia sliver crystals.

So as not to detract from all that bling, I kept my sentiment very simple. So, I layered grey cardstock on top of a small piece of shimmer cardstock that I had laying on my desk from the blog hop card I created. I heat embossed the sentiment with some tinsel embossing powder. However, in hindsight I would use an embossing powder like Wow Metallic Embossing Powder Super Fine as the tinsel embossing powder was just a bit too chunky for that small and detailed of a sentiment.

I still liked how it turned out and will be making more of these to give out to friends and family.

The Video Tutorial

Thanks so much for stopping by and I hope you liked today’s card! You can check out the video here.

https://youtu.be/_-noEzdmsuE


Giveaway Reminder!

Remember: if you have not participated in the hop, I encourage you to do so for your chance to win a $50 Scrap’N Stamp Gift Card! You also have until Saturday, December 14th, 2019 to comment, like and subscribe on my White Christmas Blog Hop video for your chance to win a set of Picket Fence Life Changing Blending Brushes. I will announce the winner of that prize on Sunday, December 15th, 2019 on my personal blog and YouTube channel.

Here are some photos of the finished card. Thanks for stopping by!


Texture Paste with a Twist


~Chala

Texture Paste with a Twist Read More »

Free Shipping Anywhere In Canada