Scratch-N-Stamp
Search

Checkout

Keep up with Sales, New Products and other events at Scrap `n Stamp. Sign up for our newsletter now!

What's New

Hot Deals


paper craft

Orange You So Awesome Encouragement Card

Orange You So Awesome Encouragement Card

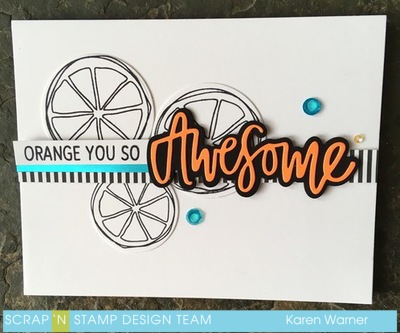
Hello Everyone. Thank you for stopping by. Todays  project is an encouragement card;  Orange You Awesome .

Concord & 9th’s stamps and die are unique. They steer away from cutesy , or  child like characters and  focus on different innovative designs.  They have won numerous  awards for their  designs.

I used   Orange You Sweet Stamp Set and Orange You  Sweet Dies to construct this delightful card.

Ink to Paper:

Memories Black Dye Ink Pad was used to  stamp all of the images.  Orange rims first  and   then pulp section  stamps  inside  the rim. Both sizes were stamped  and  multiples of each  on  white card stock. Black and orange card stock sheets  from Bazzill Premium Paper  (100 sheet)  Pack  were trimmed  a smidgeon larger than the two piece  Awesome die ( from my stash).  A few oranges in both sizes were  cut with Orange You Sweet Dies. A press of the button and the images were cut  with  Crafters Companion Gemini Die Cutting Machine.

Sentiment Strip:

“Orange You So”  was stamped with Memories Black Dye Ink Pad on the edge of white card stock and trimmed to a .25 ” x 5.5 ” strip. MFT’s Black & White Stripes 6×6 Pad  and Silky Sky  Tonic Mirror Card were also cut into .25 x 5.5 ” strips. The white sentiment strip was shortened to 2.5 “.

 Be Creative 3mm tape  was applied to the reverse side of “Orange You So”  strip and then attached  on top of  Silky Sky Tonic Mirror Card ( this was trimmed to 3″).  The die cut word “Awesome” had  Nuvo Deluxe Adhesive applied sparingly to the back and placed precisely over the black  word shadow die cut. Once dry this was applied   between the layered sentiment and the edge of  last remaining full size strip. (MFT’s  Black & White Stripe strip).

Card Assembly:

Three orange die cuts were formed  into a triangle on the left hand side of a  landscape card front  panel . Once I was happy with the placement they were adhered directly to the panel. “Orange You So Awesome” sentiment strip was applied centre horizontally to the front panel with 3 D Foam Squares  ( low profile).

The front panel was secured to a side fold landscape card with Nuvo Deluxe Adhesive. An inside card panel was trimmed to 4.15 x 5.5″.   MFT’s Black & White Stripes 6×6 Pad    piece of  stripped paper  was trimmed to .25 x 5.5 ” and adhered to the bottom edge of the inside panel. ” I Could Just Squeeze You ” was inked with Memories Black Dye Ink Pad and stamped a tad higher than centre. The inside card panel was attached to the inside card base with liquid adhesive.

Sequins to match Silky Sky  Tonic Mirror  was attached above and below “Awesome” and a small sequin attached above the “e” to form a triangle.

Orange You So Awesome Encouragement card is now complete. Until next time. xo Karen

Orange You So Awesome Encouragement Card Read More »

Sending Hugs – Hero Arts Color Layering Koala Bundle

Sending Hugs – Hero Arts Color Layering Koala Bundle

Hello Everyone. Thank you for stopping by. Todays project is a  Sending Hugs Card using  Hero Arts Color Layering Koala Bundle.

Each bundle  contains a  Color Layering Stamp Set,  co-ordinating dies and the necessary ink to layer the stamps with a successful outcome. In most cases four is the magic number. The four inks in this bundle  are  set AF381 Earth Neutrals Dye Ink  (Charcoal, Cup O’ Joe, Wet Cement and Pumpkin Pie). Green Hills from my stash was added , any green would work.


Hero Arts Color Layering Koala Stamp Set and co-ordinating dies are available to purchase separately too.   They are the same stamps and dies available in the combo pack. Hero Arts Color Layering Stamps have clear instructions on how to layer the stamps on the back of the stamp set  packaging . In addition there are photos of each step and the inks used to achieve each step.

Making the Card:

Starting with  the lightest ink and the  solid stamp, working toward  the darkest shade with  the less area to stamp.  The inks were used in this order:  Wet Cement,  Cup O’Joe and finally Charcoal.

The greenery was stamped starting with the branch with  Cup O’ Joe and the greenery in Green Hills. These two stamps were stamped  three times.

Once the ink was dry the images were cut out using the co-ordinating dies.

MFT Die-namics Stitched Tag-Corner Rectangle Stax  cut a frame with Green  Bazzill Premium Card Stock (counting from the smallest die, six and seven were used to make the frame).  Reserving the negative space (centre) for the card. A  1/4 x 5-1/2″ strip  was  also cut and set  aside  for the inside panel.

A white card stock panel was cut to 4 x 5-1/2 ” for the card front . MFT Die-namics Stitched Tag-Corner Rectangle Stax die number six was used to cut the centre of the panel. This will be used later.

Card Assembly:

A white Card Stock card base was cut  to form a side fold landscape card  11 x 4- 1/2 ” and  scored at 5-1/2 ” . Be Creative Tape 5 mm was applied to top and bottom of the card front. Nuvo Pure Sheen Glitter , Green Meadow was burnished into the tape. Removing any excess with a fine brush.

Onto  the card front panel. The  Tag-Corner frame  is adhered to  the outside of the  the die cut centre, essentially framing the centre  of the panel.  The white panel is attached with Be Creative Tape 3mm between the  Pure Sheen Glitter strips. Foam tape is applied to the white card stock centre and placed back  into the front panel. Liquid adhesive is used to  secure  Bazzil Tone on Tone Polkadot frame centre to the popped up centre of the front panel.

Next the images are added to the popped up centre portion. The larger Koala is added to the right hand side with foam tape for added dimension,   the smaller Koala is adhered with Nuvo Deluxe Adhesive  below the ear of the larger Koala. Greenery is tucked into the larger Koala’s Hand. Two Greenery sprigs are attached  to the bottom left hand side of the Bazzill Premium Card Stock.

Sentiment:

Hero Arts Color Layering Koala Stamp Set ” Sending Hugs”  stamp was  inked with VersaMark Watermark Ink and stamp  onto white card stock. Nuvo Embossing Powder, Hot Chocolate was sprinkled over and heat set.   The sentiment strip was trimmed and added just below the larger Koala’s foot (bottom right hand side of the popped up  green card stock centre )

Nuvo Deluxe Adhesive was applied to the bottom   edge of the inside panel. The Bazzill strip that was reserved for later was attached over the  liquid adhesive.  The inside panel was attached to the inside card base.

Finishing Touches:

Beads were added to the eyes of  both Koalas . Nuvo Prickly Pear  Sequins and Sparkling Crystals were layered onto the card front. Nuvo Glitter Gloss was applied to the greenery.

That completes this card. Until Next time – Karen xo


Sending Hugs – Hero Arts Color Layering Koala Bundle Read More »

Free Shipping Anywhere In Canada