Scratch-N-Stamp
Search

Checkout

Keep up with Sales, New Products and other events at Scrap `n Stamp. Sign up for our newsletter now!

What's New

Hot Deals


prismacolor pencils

FUN WITH WATERCOLOR PENCILS

Hi Everyone! It’s Susan and today I thought we’d play with watercolor pencils. I loved to color as a kid and that hasn’t changed and probably never will. I find it very relaxing and nowadays there’s so much more than my crayola pencils and wax crayons to play with that I had when I was a kid. I remember the first time I used watercolor pencils I was really intimidated but actually it’s not that hard. Now, let me be clear, I am NOT an expert but I am learning and thought I would share what I’ve learned with you. The card I’m sharing today was quite simple to make.

I started by stamping the floral image onto some watercolor paper. I recommend using a stamp positioning tool for this because you’ll probably need to stamp the image a few times as the watercolor paper is not smooth.  Plus it’s great for re-stamping your image after you’re done coloring which helps to crisp up the lines after you’ve colored.

Add a light layer of color with your pencil crayon to start. I used Prismacolor pencils and I love them. I know there are others on the market but this is what I have.

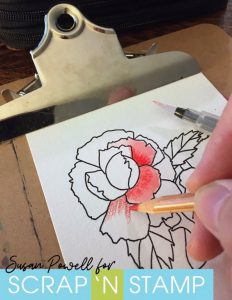
Use a paint brush or water brush to pull the color out to the rest of the petal. I used a water brush – it’s a paint brush with a barrel that you fill with water and squeeze gently while painting. I find them very easy to control, great for taking projects on the go and with out a container of water on my desk I’m less likely to knock it over.

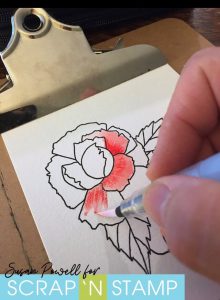
Here’s a look at a few of the petals with only one layer of color. After it dries I like to go back and add more layers – darkening it at the base of each petal for some dimension. I also leave a little white space at the tip of the petals for some highlights.

Next I added some color to the leaves in the same manner using a couple shades of green and one blue. I decided on purple for the other large flower and yellow for the bud.

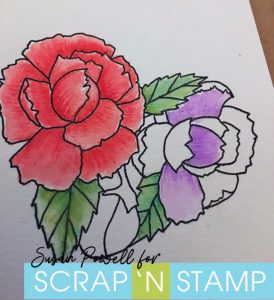
One way I like to finish off the coloring is to grab some color by taking the water brush directly to the pencil crayon. I do this to add in some darker shadows. For the purple flower I used some blue to add some depth and for the yellow bud I used an orange pencil.

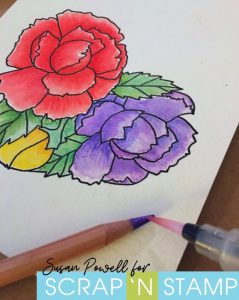
I used a grey pencil crayon to add most of the shadow around the flower. I got in close in a few spots with a black pencil crayon to add some more depth.

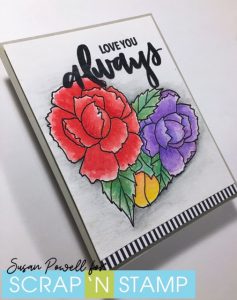
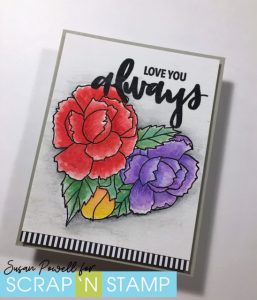
I finished the card with a sentiment, again using the stamp positioning tool so I could stamp it a few times and get solid coverage. I added a little strip of patterned paper for some fun and then added it to a card base with some craft foam.

If you’re new to water coloring I highly recommend florals. You can work on each petal individually which makes it less intimidating. I used the You Are Here stamp set from Concord & 9th but check your stash you may have a floral stamp set that will work.


Happy Stampin’
and thanks so much for visiting!
Stay safe everyone!!
Susan
Shopping list:
Below are links to all the goodies I used, just click on the icon to be taken to where you can purchase the product. If you use my affiliate links when shopping there is no additional cost to you, I want to say thank you and that I appreciate it and you very much.


FUN WITH WATERCOLOR PENCILS Read More »

UP, UP AND AWAY!

Good Morning and HAPPY EASTER!

It’s Susan here today sharing some fun cards – you’d think since it’s Easter that I would’ve made some Easter themed or bunny cards but I didn’t. I forgot it was Easter when I made these.

I recently received the Penny Black Birthday Balloons stamp set and I couldn’t wait to play with it. I grabbed my Copics and Prismacolor Pencils and set out to play.

The card above on the left is colored with copics. I didn’t do anything fancy – mostly because I don’t have a lot of colors and I’m still learning how to use them. I used a white paint pen to add some fun patterns to each of them.  The one on the right is colored with Prismacolor pencils. Here too I kept the coloring really simple using two shades of each color and the same white paint pen to add the highlight on each balloon. You could use a white gel pen for this as well.  I chose not to color the girl in bright colors because I wanted the balloons to be the focus.


This next card is a little more detailed. I used a 4 1/4 x 11″ piece of card stock and scored it on the 4 1/4″ side 2 3/4″ in from both ends.

The image on the right side of the card is stamped directly onto the card base but the balloons on the left were stamped onto scrap card stock, fussy cut out and added to the left side of the card base. The balloons furthers to the left were added with some craft foam. Here again the coloring was kept really simple. I used Pismacolor Pencils – 2 shades of each color and the white paint pen for highlight.

For my last card today I wanted to do something that would be considered a little more formal. Something for a 21st or 50th birthday or any special occasion. You could change out the sentiment to make it an Anniversary or Retirement card.

I used gold and silver Prismacolor Pencils for the balloons and then used a clear sparkle pen to add some shine to them. This time I colored the girl in using gold and black to coordinate with the balloons. A little fun strip of paper along the side and these cards are done.

I have an idea for another card with this set. I’ll get it made and share it over on the Scrap’n Stamp Facebook PageHave you seen the Random Acts of Cardness Challenge on the Facebook page yet? Be sure to check it out – there are all kinds of ideas to inspire you.


Happy Stampin’

and thanks so much for visiting!

Stay safe everyone!!

Susan

Shopping list:

Below are links to all the goodies I used, just click on the icon to be taken to where you can purchase the product. If you use my affiliate links when shopping there is no additional cost to you, I want to say thank you and that I appreciate it and you very much. 


UP, UP AND AWAY! Read More »

On Point

Dawn here from the little mennonite blog with a simple fun card for you today.

Directions:

To create this simple card, stamp the MFT cacti and sentiment above with Lawn Fawn’s Smitty’s ABCs.

Colour the cacti with pencil crayons and then colour over with felt marker for added depth and brighter colour.

Die cut the bow from Lawn Fawn’s Tiny Gift Box die. Assemble as shown.

Inspiration can hit at any time. I was inspired by an ad I saw for this card.

On Point Read More »

Free Shipping Anywhere In Canada