Scratch-N-Stamp
Search

Checkout

Keep up with Sales, New Products and other events at Scrap `n Stamp. Sign up for our newsletter now!

What's New

Hot Deals


Secret Santa

Santa’s On His Way!

Happy Holidays, my friend! I hope that however you celebrate, you have a safe and happy season.  Santa’s on his way for all the good girls and boys (and grown up’s, too – hey, if you don’t believe, you get socks!). So today’s card features the jolly old elf himself, Santa Claus. It’s also today’s word prompt for the Scrap ‘N Stamp challenge. I hope you’ll play along!
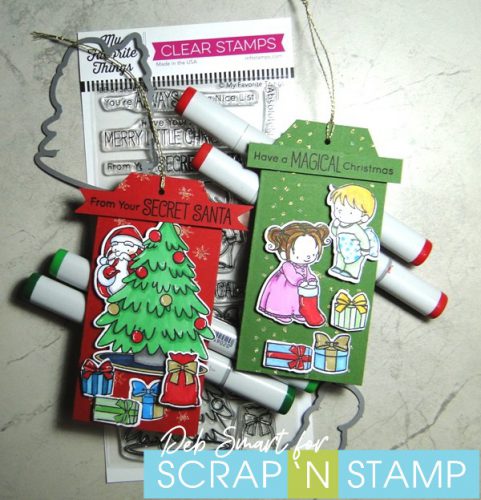
SECRET SANTA

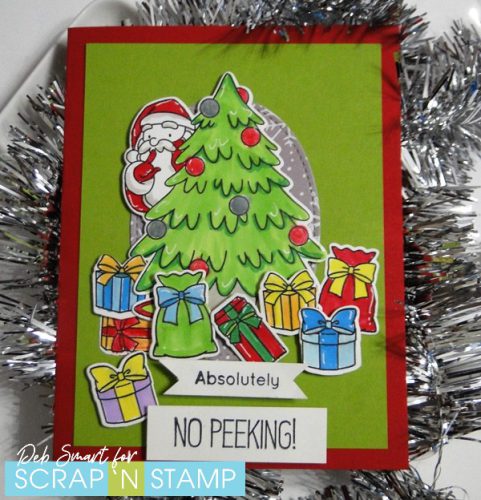
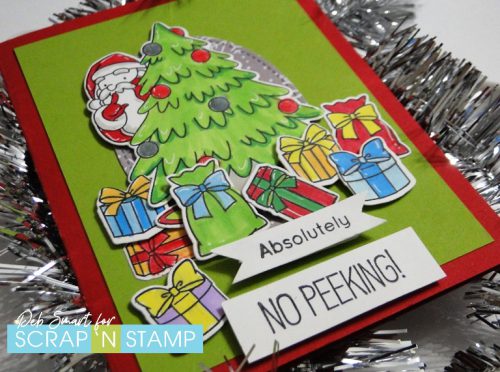
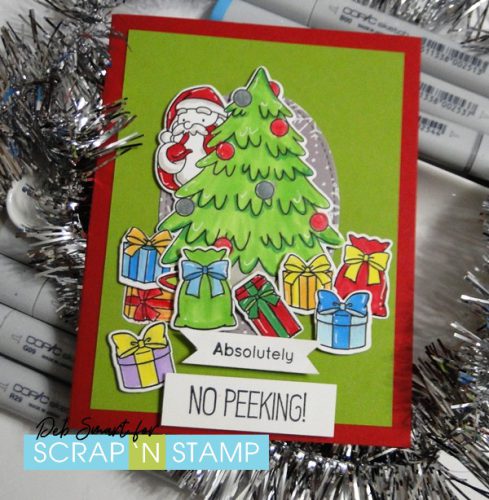
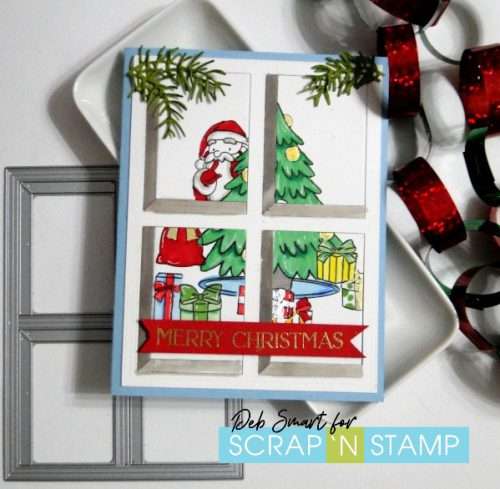
Of course, Santa likes to stay low key and kind of behind the scenes. That’s why he’s giving the “shhh” signal in this, one of my favourite sets. It’s called Secret Santa, from MFT.

Santa's On His Way!

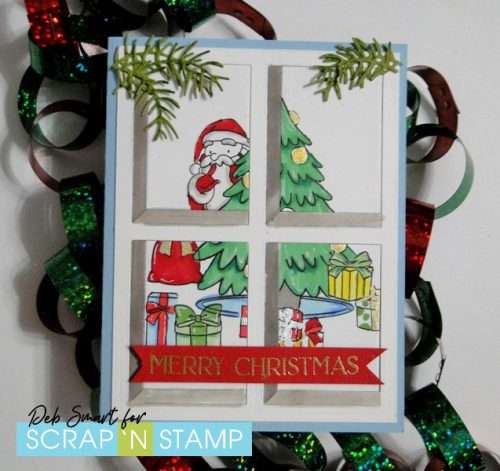
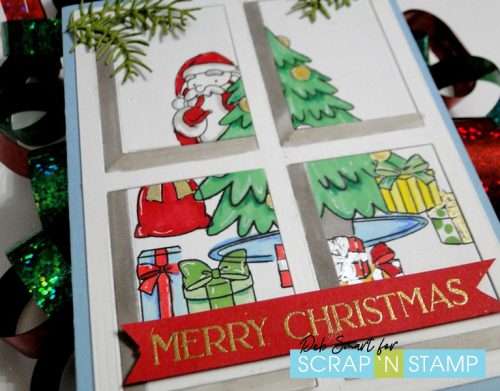
I also used the fabulous new die from Penny Black, called Viewpoint, for the window frame. More about this in the details, below.

CARD DETAILS

To achieve the presents being in front of the tree requires some masking. First, die cut the Santa/tree image from copy paper. Set up your 4.25″ x 5.5″ white cardstock in your stamp positioner. Now, lay the die cut image in the middle of the cardstock. Now, lay the present stamps over the die cut where you want them, surrounding the tree. Press the lid of the stamp positioner down, picking up the present stamps. Now, remove the die cut Santa/tree, and stamp the presents in Nocturne ink. Repeat this as many times as you want, to add more presents – you can also create die cut masks for the present shapes, as well.

Once you’ve stamped your presents, mask those off, and then stamp the Santa/tree image. Now you’re ready to colour with your favourite markers. I used my Copic markers, plus a Spectrum Noir Tri-Blend. You can see all of the markers in the shopping links, at the bottom of this post.

CREATE THE WINDOW FRAME

The great thing about this Viewpoint die is that you can use just the frame, or also use the inserts to create depth to your window. First, run the die cut through your Big Shot with white cardstock. You’ll notice that in each window pane, the bottom and left portion of the pane cuts an extra piece. To create the dimension, colour the bottom piece in a lighter shade of grey, and the left side in a slightly darker shade. I chose the Copic W3 Warm Grey and the Spectrum Noir Tri Blend Brown Grey.

Next, run your stamped & coloured image panel through the Big Shot with the Viewpoint die. This cuts your image into 4 panes.  Now, on a background panel, glue the frame, and then the frame inserts. Finally, glue in the 4 sections of your image – and voila!  Of course, you could also choose to leave your image uncut, and simply lay the frame & inserts (or just the window frame) over the whole piece.

Santa's On His Way!

FINISH IT OFF

To continue with the illusion of looking into the scene, die cut some of the pine branches in green cardstock using the Poppy Stamps Bird House Pop Up Easel set. Add texture & more colour by sponging on some Mowed Lawn distress ink, and then glue them into the top corners over the window frame.

Stamp the sentiment from the Poppy Stamps Christmas Fun set in Versamark ink onto a strip of red cardstock. Cover it with gold embossing powder, and heat set. Snip some banner tails on each end, and then pop it up with foam squares across the bottom of the window.

Santa's On His Way!

MERRY CHRISTMAS!

If you have time between your celebrations and wrapping of gifts, I hope that you’ll join us on the Scrap ‘N Stamp Facebook page, for the daily challenge. Simply share your project, using the hashtag #snschallenge, to join. At the end of the month, one participant is randomly chosen, and will WIN a $50 Gift Certificate to shop Scrap ‘N Stamp!

Until then, you can use my Designer Discount Code 10DEB at checkout, and receive 10% OFF your total order (regular priced items).

Affiliate links are provided, at no cost to you. When you choose to use my links, I receive a small commission, which helps me maintain my blog & keep creating. Thanks in advance!


Santa’s On His Way! Read More »

About the Gifts

Unless you’re a young child, you know that the holidays are not just about the gifts. (unless you’re really, really hoping for that pony you’ve wanted since you were a kid!). For today’s card though, it’s all about the gifts, since that is today’s word challenge! Hi there, it’s Deb here today, for the Design Team.

GIFTS WORD PROMPT

If you’re playing along with the Scrap ‘N Stamp daily challenge, then you’ll know that each day there’s a new word prompt. Since we’re getting close to Christmas, I chose ‘gifts’ as today’s word.  And if you’re not playing along – why not? It’s super easy, fun and free! Not only that, for every time you share your project to the challenge page on Facebook HERE, you’re automatically entered to WIN a $50 Gift Card to shop at Scrap ‘N Stamp!

I pulled out one of my favourite stamp & dies sets from 2 years ago – I thought it was from last year, yikes! Time flies! It’s called Secret Santa, by My Favorite Things.

About the Gifts

Since the prompt is gifts, I decided to really pile them on! It reminds me of when my boys were young, and everything seemed to come in big boxes, so under our tree extended half way through the living room.

CARD DETAILS

On smooth white cardstock, stamp Santa & tree once, and then stamp all of the presents twice, in Nocturne ink. Use your Copic markers (or other favourite brand) for colouring.  Add some highlights with a white gel pel, and then die cut all of the images with your Big Shot.

Using some basic masking, I separated the sentiment onto 2 strips of white cardstock, again in Nocturne ink.  Now, create your red card base, with a layer of green cardstock on top. Add a stitched oval die cut from patterned paper, glued on top.

Next, layer all of the die cut pieces, some glued directly to the card front, and some popped up using foam squares. Add the sentiment across the bottom – perfect admonition for the presents, right?

About the Gifts

I think that Santa is counting on you to keep the secret about what’s in the gifts!

PLAY ALONG!

I do hope that you’ll play along with the challenge, whether you choose today’s prompt, or any other. There’s no limit – you can play along with as many days as you want! At the end of the month, one lucky person is randomly chosen, and gets the $50 Shopping Spree at Scrap ‘N Stamp.

When you’re shopping, be sure to use my Designer Discount Code 10DEB, to get 10% OFF your total order (regular priced items).

Affiliate links are provided, at no cost to you. When you choose to use my links, I receive a small commission, which helps me maintain my blog & keep creating. Thanks in advance!


About the Gifts Read More »

Today’s Challenge Prompt is Santa!

Hello friend! Deb here, for the Design Team. Here we are, less than 5 months from Christmas! Isn’t that surreal? This whole year has felt like we’ve slipped into some weird, alternate dimension. But – we have our crafting to keep us busy, sane and on track, as far as seasons go! That’s why I chose Santa as today’s challenge prompt for the Scrap ‘N Stamp 31 Day Challenge. I hope that you’re playing along with us!  If you aren’t, you’re free to join in at any time during the month. Here’s how it works

31 DAY CHALLENGE

For each day of the month, there is a new prompt, or theme. You join however many days you want. Just create a project for the theme of a given day. Take a picture of your project, and share it HERE, on the Scrap ‘N Stamp Challenge page on Facebook. Enter for as many days as you like! Post your project with the day that you’re joining, and the hashtag #snschallenge. At the end of the month, 1 lucky person is randomly drawn from all entries, to WIN a $50 Gift Card to Scrap ‘N Stamp! You get to have fun, see loads of creative projects, and maybe win a prize, just for playing along. That’s a great deal, if you ask me!

TODAY’S PROMPT IS SANTA

I’m just a big kid at heart! I still put out Santa decorations at Christmas, even though my boys are no longer little. We also still watch all of the holiday specials, like Rudolph, How the Grinch Stole Christmas, and Frosty, to name a few. Of course, It’s a Wonderful Life is also a must watch! The stamp set I used for today’s projects is from last year’s MFT holiday release, but it’s still available, and still adorable! Instead of a card, I created two holiday tags.

Today's Challenge Prompt is Santa!

The stamp set is called Secret Santa, and there are also coordinating Secret Santa Dies. I ALWAYS buy the coordinating dies – I like making my life easier.

TAG DETAILS

To create the tag bases, start with 2 pieces of cardstock, each measuring 5″ x 5″. Score down the middle at 2 1/2″, and fold over. Snip each top corner off on an angle, and then use a small hole punch in the top middle, to add your ribbon or cord.

Now, add some texture and sparkle to your tags! Use Nuvo Glimmer Paste in Moonstone with the MFT Winter Stencil Strips. On the green tag, I use the dots stencil, moving it over once for 2 strips of dots. On the red tag, I use the snowflake stencil, again moving it over once, for 2 strips of snowflakes. Now, set these aside to dry, while you work on the images.

Stamp each of the images from the Secret Santa set on white cardstock, in Versafine Clair Nocturne ink. Make sure that the ink is completely dry, before  you start colouring. I used Copic and Spectrum Noir Tri-Blend markers for my images. I’ll put the links to each colour at the bottom of this post – I used a LOT of colours! To add some highlights, use a white gel pen and draw them onto the presents, ornaments, etc.  Next, use the coordinating Secret Santa dies, and die cut each image.  Now you can attach the images to the tags, using a combination of foam squares and liquid glue, for dimension.

The final step is the stamp the sentiments, also from  the Secret Santa stamp set, onto red & green cardstock strips, in the Nocturne ink. Snip banner tails on each end, and then attach them across the top of the tags.

SANTA TAG

Here’s a picture of the Santa tag – you can see the dimension of the layers.

Today's Challenge Prompt is Santa!

GIRL & BOY TAG

And here’s a closer look at the girl & boy tag.

Today's Challenge Prompt is Santa!

With having the tag base folded over, you can add a piece of white cardstock inside, for writing your ‘to/from’, and any other message.

COME JOIN THE CHALLENGE!

I hope that you’ll join in today’s challenge for the Santa prompt, or any other day! Use whatever supplies you have on hand, or have fun doing some shopping at the Scrap ‘N Stamp store. Be sure to use my exclusive Discount Code 10DEB at checkout, to get 10% OFF all regular-priced orders!

Today's Challenge Prompt is Santa

Affiliate links are used, at no cost to you. When you use my affiliate links, you help support me to purchase new products, & maintain my blog. Then I can continue sharing new projects with you!


Today’s Challenge Prompt is Santa! Read More »

Free Shipping Anywhere In Canada