Digital Basics – How to Download & Save Digital Files
Studio K Digital products like stamps, clip art and printables are so much fun to work with. They give you more options and flexibility than ever before and once you have downloaded them you can print and use them over and over again – whenever you need them.
If you are new to Digital products the whole thing can be a bit intimidating but once you learn the basics you are going to absolutely love using digis.
The first step is downloading and saving your digital files on your computer. How do you do this? It’s easy!!!
After you have purchased your Studio K Digital products you will receive an email with links to each of the items on your order. Your email will also give you complete download instructions so you can print them if you need to.
Note: You will receive a separate link for each item that you order and will need to follow these steps for each item.
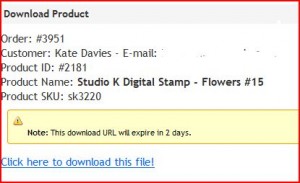
Step 1 – Click on the link and log into your account. Once you have logged in this is what you will see…
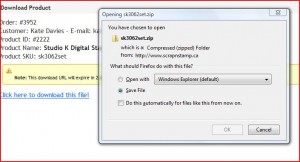
Step 2 – Click on the link at the bottom to download the file. You will receive your digital product as a zipped file that you need to save to your computer – usually under Downloads. Click OK to save the file.
Digital products are sent to you in a Zipped (or compressed) file because they are smaller and will download faster. Now that you have the Zipped file on your computer you need to ‘unzip’ or extract the items in the file so they will be put back to their original size.
Step 3 –
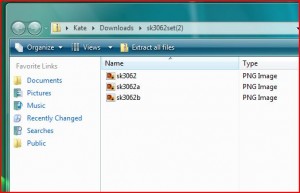
Locate the file folder on your computer, open it and then click on ‘Extract All’ (in the top menu bar)
You will be asked to select what folder you would like to save your images to. Select the folder and click ‘Extract’. Your digital products will now be saved in a folder on your computer and shown as separate files if there were several items in your download. Now your digis are ready for you to use.
HOT TIP: Make a new folder on your Desktop called Scrap ‘n Stamp Digis and save all your files there. It will make it easier for you to find and use them later.
Want to learn more? Check out our Tuesday Tutorials for step-by-step instructions that will show you how to use your Studio K Digital products.
IMPORTANT: Always back up your digital files to a disc or external drive so they are not lost if something happens to your computer.
* These instructions were written using a PC with a Windows Vista operating system. If you are using a MAC or a different Windows operating system you may find the procedure is slightly different.
Digital Basics – How to Download & Save Digital Files Read More »


