Scratch-N-Stamp
Search

Checkout

Keep up with Sales, New Products and other events at Scrap `n Stamp. Sign up for our newsletter now!

What's New

Hot Deals


technique

Tuesday with Tara {take 137}

Happy Tuesday!

For today’s card I was inspired to do two things… play with the color ORANGE and try a new background stamp technique with my Tim Holtz stamp platform.  I probably should have stopped a few steps before I did, but now that I’ve walked away from the project and am coming back to it, it’s growing on me.  Regardless, I had fun and did succeed with both those goals!  Hope you like the card, or can look past it and learn a fun technique 🙂

Let me first say that I saw this technique on a video shared by Unity Stamp Company… I looked for it so I could share the link, but haven’t been able to track it down.  If I find it, I’ll add the link here!  The stamp I chose may not be the best for this technique, but it was still fun!

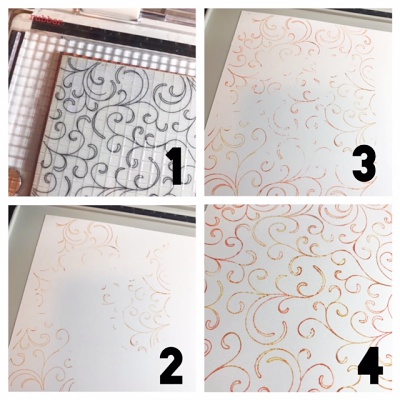
I used a cling mounted background stamp (this is an OLD one by Hero Arts) and three shades of yellow/orange Distress Ink.  After lining up my paper with the stamp and securing it with magnets, I started with the lightest color and randomly inked spots over the background.  I repeated this with two more colors, gradually filling in the entire card surface.  I went back with the middle color to fill in any gaps that were still there and created a fun, multi-toned background in just a few steps!  Because Distress Inks layer and blend so well, there were no harsh lines where the colors met or overlapped.  I used full size ink pads, but you could probably get even better results with the mini Distress Inks!

When I went to assemble my card, I found the background had too much white space for the rest of the ideas I had in my head, so I kept going… blending some Distress Ink over it, stamping another background stamp & eventually adding a large splatter of Distress Stain. It got pretty ugly before I (hopefully) redeemed it. LOL. but, I added a pretty die cut (another old fave by Memory Box), book print, a sentiment stamp (another oldie by Art Impressions) and some pretty orange ribbon… and came up with this:

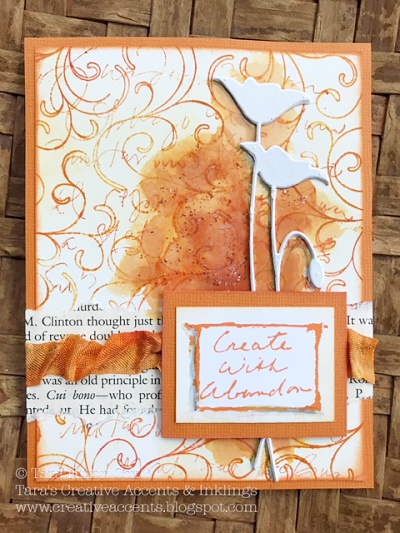
I finished it off with a light shadow with the black Stablio pencil and some glitter…

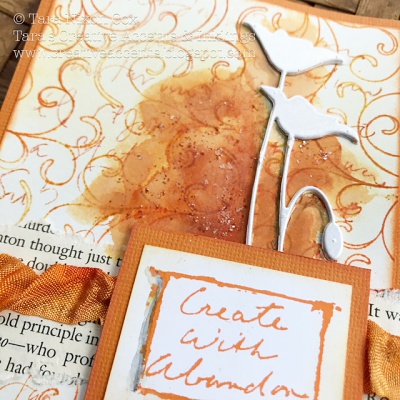
At the very least, I can say that I was indeed creating with abandon, as the sentiment says.  Maybe that’s not always the best advice… but it came out okay in the end 😉

I also have to say, apart from the Stamp Platform, I used a bunch of older supplies that hadn’t seen any love for a while to make this card. A new tool like the platform (and the new mini that is available for pre-order, which is awesome if the larger one is a bit over your budget!) can really give new life to the supplies you have already!

Hope you find time to be creative this week!  See you next Tuesday!

Inky hugs,

Tara


Materials Used:

Tim Holtz Stamp Platform

Distress Inks

Distress Stain

Cling mounted background stamp

White cardstock

Memory Box Poppy Die

Art Impressions Sentiment


Tuesday with Tara {take 137} Read More »

Tuesday Tutorial: Dreamweaver Stencils, Tape & Glitter Technique

Today I want to show you another great way that you can use Dreamweaver Stencils. I first saw this Tape & Glitter Technique when I was at a stamp show in Portland a few years ago. I had never thought of using my stencils this way and was amazed at how easy it was and excited because it gave me one more way to use them.

To get started you are going to need a few supplies:  a Dreamweaver stencil, a Studio K double-sided Adhesive sheet, cardstock, Studio K glitter (I used Forest Green & Burgundy Velvet Opaque and Crystal Rainbow Transparent), a Glitter Grabber cloth, a bar of soap & Post-it notes.

Step 1:

Cut a piece of cardstock and tape slightly larger than your stencil & apply the tape to the cardstock.

Step 2:

Apply a little bit of soap to the back of the stencil. This will help it release from the tape later. Remove the backing from the tape and place your stencil on the tape, soapy side down. Gently rub all over the stencil to make sure that it is stuck onto the tape.

Step 3:

Use Post-it notes to mask off the areas where you will be putting a different color of glitter. Pour glitter onto the open areas to completely cover them and then use your finger to rub the glitter into the tape. Dump the excess glitter onto a scrap piece of paper or a coffee filter when you have finished.

Use the Glitter Grabber cloth to pick up any glitter that is stuck to the stencil. This is very important so that you don’t get the colors of glitter mixing on your image.

Move the Post-it notes around a bit so that you can get glitter into all the areas for the first color. Repeat this step for all the different colors of glitter that you are using.

This is what your image will look like when you are done. You will have glitter on all the areas of tape that aren’t covered by the stencil.

Step 4:

Carefully remove the stencil from the tape. I found that peeling the cardstock off of the stencil worked better for me and I didn’t bend the stencil that way. This tape is really, really sticky so you do have to be careful not to damage your stencil when you are taking it off.

Step 5:

Now apply glitter to the background and rub it in to the tape really well.

Dump off the excess glitter and now you have a beautiful glittered image that is ready to use on your project.

To make this card I used my Spellbinders Deckled Rectangles to cut out the image and a mat from Studio K Shimmer Cardstock, applied a strip of tape and green glitter to my card front, a little ribbon and some droplets and I was done. Fun, easy and very sparkly!

Thanks for stopping by. I hope you enjoyed the Tutorial and are inspired to give this technique a try.

Have a wonderful day!

© Scrap ‘n Stamp Canada 2010

Tuesday Tutorial: Dreamweaver Stencils, Tape & Glitter Technique Read More »

Tuesday Tutorial: Glitter on Acetate Technique

Hi everyone! I’m back again with another glitter Tutorial. This technique is one that we featured last year and it is so popular that I wanted to show it again and also show more samples using not only stamping but Outline Stickers too. You follow exactly the same steps when you use Outline Stickers and they are a great option for beginners or anyone that isn’t into stamping but wants to create this awesome look.

There are a few things that I just love about the Glitter on Acetate technique. First, it creates a sort of stained glass effect. Very cool! Secondly, once the glue is dry the glitter never comes off. Yes, that’s right. No bits of glitter falling off your project. It’s stuck exactly where you put it and is on the back of the acetate so it can’t get rubbed off. Third, it’s very easy. Just like paint by numbers. If you can stay in the lines when you are coloring, you can do this!

Here are step-by-step instructions. Hope you give it a try.

Supplies you will need:

  • Acetate sheets
  • Outline stamp or Outline stickers
  • StazOn ink (if you are stamping)
  • Ranger Glossy Accents
  • Studio K Opaque Glitter
  • cardstock, double-sided adhesive & foam squares for frame

Step 1:

Stamp your image onto an acetate sheet using StazOn ink and let dry. Or, if you are using Outline stickers, peel the outline image you would like to use from the backing sheet and adhere to the acetate sheet. Make sure you leave a good border of acetate around your image as you will need this later to attach it to the frame. The reason you frame it is so that you can raise it up off your card base with foam dots later. This gives it more dimension and really does make it look more like stained glass.

Step 2:

Flip over your acetate sheet so that you are working from the back side. This is very IMPORTANT when you are working with the Outline stickers. If you work on the front you may get glue on the sticker outline and then you won’t get a crisp image. Apply Glossy Accents to all the areas that will be the same color of glitter. In this case, we started with the center first.

Step 3:

Sprinkle glitter over the Glossy Accents and then shake off excess.

Step 4:

Repeat steps 2 & 3 for each additional color until your image is completely covered. Set aside, with the glitter side facing up and let dry for several hours or overnight.

This is our finished image. As you can see each color of glitter stayed exactly where is what applied and there was no mixing of colors.

Step 5:

To use your image you will need to mount it in a frame as shown here and then apply it to your project. If you don’t raise it up off of your background it will still look pretty but it isn’t quite as effective.

Here’s the finished piece again and pics of some other designs using Outline stickers.

This card was made with the Elizabeth Craft outline stickers – Funky Cakes. This is a really cute sheet of stickers that has cakes for birthdays and weddings on it.

The next card was made with the Dazzles Stacked Poinsettias outline stickers.

There are lots of other Outline Sticker designs that would work for this technique, everything from flowers, cakes & birds to oriental themes and of course Christmas designs. Many of the stickers come in black, silver and gold and some of our seasonal ones are also available in white.

Thanks for dropping by.

Happy crafting!

Tuesday Tutorial: Glitter on Acetate Technique Read More »

Free Shipping Anywhere In Canada