Scratch-N-Stamp
Search

Checkout

Keep up with Sales, New Products and other events at Scrap `n Stamp. Sign up for our newsletter now!

What's New

Hot Deals


tonic

Tuesday with Tara {take 329} Trim the Tree

Happy Tuesday friends!

You’ve probably noticed, if you’ve been around for very many of my Tuesday posts over the years, that I’m a fan of Tim Holtz and his products.  I love to stretch their limits and combine them with products by other companies and lately I love to demonstrate their simple beauty!  Sometimes there’s a product release that is really great and I love the projects but I resist it because it just seems like *too much* for me right now.  The paper village has been one of those… and really, they do just keep getting more and more fabulous!  The projects are amazing and I seriously envy the time & the patience people have to create these little miniature masterpieces!

Recently, however, inspiration struck!  I got an idea for a way I could use the tiny cuteness of the paper village dies and keep it simple without it feeling unfinished.  It’s not perfect, but I think it turned out quite sweet.  I’ve made a tiny paper house ornament!

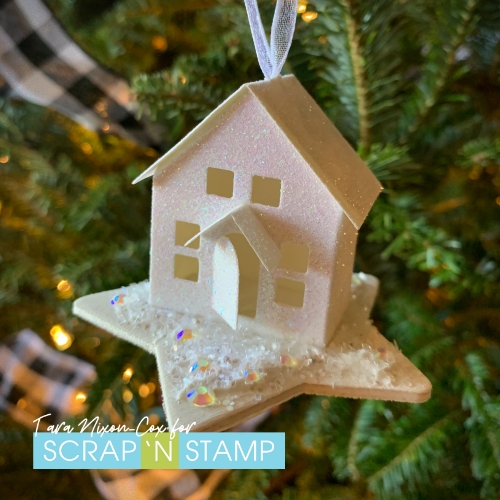
I purchased the original Paper Village Die Set (use whichever one you have or can get!) and cut the mid sized house from the set out of White Sugar Crystal Glitter Cardstock– which gives a fun sugar coated effect!  I tried a few different ways of adhering the pieces together (and learned I need to restock my glue supply) but found that wet adhesives worked best, although waiting on dry time was no fun.  I really wished I had some Ranger Matte Medium on hand, because it dries quickly and holds well- but I’ve used all mine up.  (If you know of another amazing product that works similarly, I’d love to hear about it since I’ll be shopping for more soon!)

Before adhering the roof to the base, I cut a slit in it and poked sheer ribbon through it.  A knot on the under side and a loop on top made a great hanger (oops-forgot to take a photo of that, I hope you can visualize it from my description!)

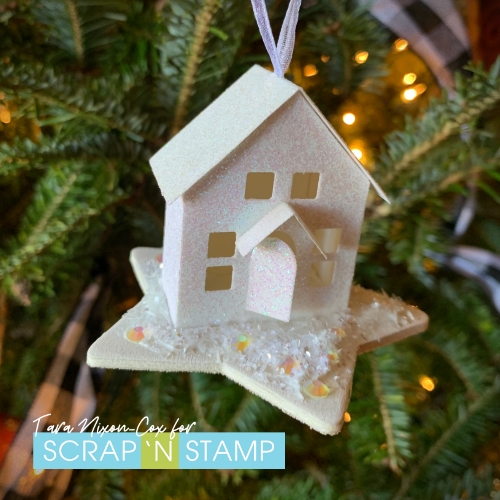
Once the house was dry, I mounted it on the base.  I had purchased a small wooden star from a craft star and painted the top white. I then used a palette knife to apply some texture paste to it thick enough to sink the house into.  I set the house in it, then added some bling!  I placed some jewels and assorted white and clear glitter around it to mimic sparkling snow.

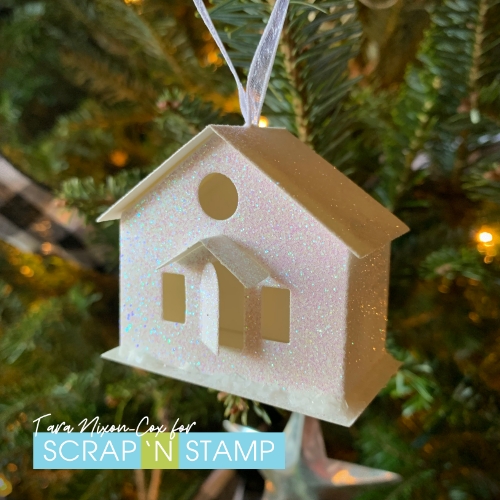
I had cut the larger house as well, but since it didn’t fit on the star base I cut a simple rectangular base just 1/4″ bigger than the house (this one is just 1×2″ in size and yes it is bigger than the other one!).  It’s very simple, but still pretty cute and sparkly!

Of course, I look at my little houses and notice all the little imperfections… but I’m sure I’ll sort them out as I make more of them!  I’ve got a few more that I need to make for gifts still this year (that’s me, ever the procrastinator!).

Inky (and glittery!) hugs,

Tara


Tuesday with Tara {take 329} Trim the Tree Read More »

Thinking of You Card – Concord & 9th Lily Stamp Set

Thinking of You Card – Concord & 9th Lily Stamp Set

Today’s card is a Thinking of You card  using Concord & 9ths Lily Stamp Set .  Nothing screams “Thinking of You” quite like Concord & 9th’s Lily Stamp Set.

The lily  stamp   has wonderful  line art,   thereby encouraging  this stamper to go wild (so-to-speak) with my own interpretation of the flower in terms of colour, shading and texture.

I  placed Concord & 9th  Lily Stamp on Tonic’s Tim Holtz Stamp Platform and inked the stamp with  Memories Black Dye Ink Pad.   Pressing the Stamp Platform  on to Strathmore Bristol Smooth Card Stock  for a crisp clear image.

Allow  the impression to  air dry completely before  using Zig Clean Color Real Brush Markers .

Colouring Technique:

I layered the  markers in stripes of colour. The  lightest shade around the petals edges working darker toward the centre of each petal. All five petals were coloured the same way, the only exception was when  a  section of a flower petal   fell behind  a petal that was in front. In order to add depth ,  a darker shade  was added  the the portion behind and a lighter shade to the area  in front. This makes  a cast shadow .

Where the colour stripes  were  side by side , the lighter of the two markers was used to blend the line. Making sure to clean the brush tip frequently. Once this was finished,  the solid image stamp and dotty pattern stamp  (both in the Lily Stamp Set) were inked with Zig Clean Color Real Brush Red Marker and stamped onto the freshly blended flower image.

The flower stem was coloured in the same fashion as the flower by adding stripes of colour , with the darker shades laid on the left hand side. The lighter,   on the right of the stem. The area  between each stripe was blended with the lighter shade of the two, making sure to clean the tip frequently.

The stamped image was outlined very lightly with Zig Clean Color Real Brush Marker in No.036 – Light Blue. This colour was pulled out farther with No. 302 Haze Blue. An aqua brush with a fine tip spread the ink out a smidgeon further , essentially fading the line.

This was set aside to  air dry.

Added Touches:

Once the ink was  dry “Thinking of ” and “You”   stamps were inked with VersaMark Watermark Ink Pad and stamped onto the front panel. Seth Apter Embossing Powder – Deep Sea was dusted over the freshly stamped words and melted with a heat tool. VersaMark Watermark Pen was applied to the flowers Stamens. Stampendous Embossing Powder – Topaz was applied to the flower Stamens  Anther and Nuvo Embossing Powder – Jet Black was applied to the Stamen Filament. A heat tool was used to melt the embossing powders .

A small bow was tied with ribbon from my stash. The ribbon closely matched  the melted  embossed sentiment  colour. The ribbons tails were trimmed and  attached to the stem, just below the flower with a Glue Dot.

Finishing the Card:

Tonic Craft Perfect Mirror Card in Silky Sky was cut to  (14 cm  x 10.8 cm)   5-1/2″ to 4-1/4″ and adhered to a side fold portrait card  front with Be Creative Tape 5mm

The Zig coloured  panel was  trimmed to (14 cm x 10.2 cm)  5 – 1/2″ x 4″ , ensuring   the image  stayed centred. Be Creative Tape 5mm  was applied to the back of the  panel  and  adhered to the mirror card layer on the card front.

A (14 cm x .6 cm  ) 1/4″ x  5 -1/2″  strip of  Tonic Craft Perfect Mirror Card in Silky Sky  was  attached to the  inside card base , vertically to the   right hand  side edge with liquid adhesive.   A white card stock  panel for the inside card base was cut to (14 cm x 10.2 cm)  5-1/2 x 4″ and stamped with Hero Arts Ink. This was  attached flush to the score mark  with Nuvo Deluxe Adhesive.

Zig Clean Color Real Brush Markers Used in Flower:

Petals ( light to dark):

No. 050 – Yellow, No. 052 – Bright Yellow, N0. 070 – Orange, No. 023 – Scarlet Red, No. 020 Red.

Stem (dark to light):

No.044 – Deep Green, No. 043 Olive Green, No. 046 Mid Green, Scant No. 051 – Lemon Yellow.

Shading:

No.036 – Light Blue, No. 302 Haze Blue

This card in now complete.

Here is a video of the colouring process:

https://youtu.be/pDKCcMnEBKQ

Thank you for stopping by. Until Next time – xo Karen

Thinking of You Card – Concord & 9th Lily Stamp Set Read More »

Free Shipping Anywhere In Canada