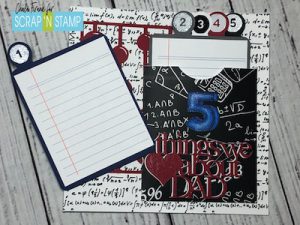
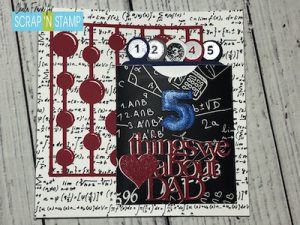
5 Things We Love about Dad
Happy Monday! I am here to share a fun “Dad” themed card with you today.
I am going to be doing things a little bit different… I really want to show you an idea of a card and see what products you guys have at home that you can use to create something similar.
My inspiration for today’s card was a digital cut file that I saw in the Silhouette Design Store. It is by Lori Whitlock and it is called “5 Things Pocket”. While I know not everyone has an electronic die cutting machine, you can still look through the cut files and get some really great ideas.
I really liked this pocket idea and wanted to incorporate into my card. I downloaded the file and was able to customize and alter the cut file to fit my needs. You can easily recreate a pocket like this with metal die cuts like using rectangle dies to create the little files and small circular ones for the tabs. There are also many free resources on the good ‘ol Inter web!
Since this card is for my husband, I really wanted to personalize it to suit him. He LOVES math, I mean LOVES. He can be found spending his leisurely time reading calculus books. and doing equations..for FUN!? He even spent our holiday last summer in Vegas poolside reading a math and physics book. People walked by and had a good laugh at him! It’s funny how we even got together as I am not good at math at all! None the less…he is MY nerd, so back off girls! LOL.
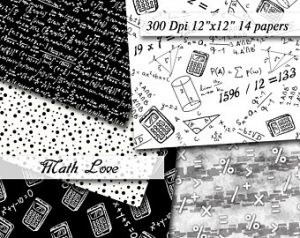
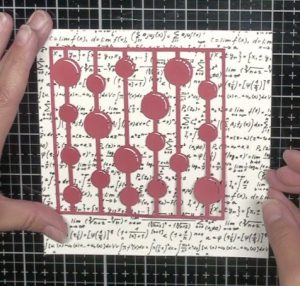
I headed to the internet and found some really great math papers that I could download (and I just know he is going to try to solve the calculations on them). I found this set on Etsy from KecheliPapers. They were perfect for my theme! I also found another digital cut file from the Silhouette Design Store that looked very similar to an abacus, so I die cut that from some red paper. Again, you can customize your papers and card to suit who you are making the card for and use background dies that you already have.
I cut one of the papers down to fit a 5 1/2″ square card base and adhered it to the card base with my tape runner and glued the abacus looking die cut closer to the top left hand side of the card.
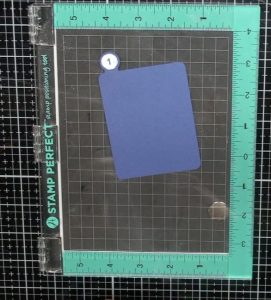
I used another of the papers to create the envelope and used Gina K Connect Glue as the adhesive. This is a very strong liquid adhesive and I know it will hold up to the pulling that will happen when the little files are removed and inserted back into it and it gives me wiggle room to ensure I have the edges lines up evenly. As that has time to set up I can then move onto the little files that will be inserted inside the envelope. My husband has a very small colour palette that he likes, red, black, blue white and gray, so those are the colours I chose. You can easily create these and the tabs with dies in your stash. The next thing to do is to stamp the numbers on the tabs. I pulled out all the number stamps in my collection and found some that were the perfect size. This is actually a stamp set that is used to create day-timers. for the red, blue, gray and white I will stamp with Versamark ink and use clear embossing powder and for the white one I will use Versamark Claire Nocturne Black ink and clear embossing powder. I suggest using a stamp platform like the stamp perfect so that you can stamp multiple times and get a good impression. I also notice these stamps developed air bubbles underneath which hindered the stamping, so to overcome this I used the Versamark marker to fill in any gaps. This is a useful tool to have around, especially because it has the bullet tip one end and the brush tip on the other.
I want to add some lined paper onto the file so that my kids can write what they love about their Dad. I used another Silhouette file, but you can easily just use white paper or even use lined paper from a small note book. I adhered this with my taper runner.
I need to work on my sentiment and used one of the big number 5 stamps I had and stamped that with Memento Black Tuxedo ink so I could Copic colour in complimentary blue colours (B24, B26 & B29). To get the exact sentiment I wanted I created a cut file in my Silhouette Design Studio and sized it to fit on the envelope. I changed the sentiment from saying “5 Things I Love About You” to “5 Things We Love About Dad”. You can easily create your own sentiments with stamps, alphabet stamps, alphabet die cuts or even your own printer! I die cut this twice once from red and once from white cardstock and then used the Gina K Connect Glue to adhere the two together just a little offset to help the sentiment pop off the black background.
It’s now time to finish adhering everything down to the card base. I used Be-Creative Scor Tape to adhere the envelope to the base. I chose this adhesive as it is a VERY strong adhesive and again, it will hold up to being pulled on. Check out my YouTube video to see my special trick on how I use Scar-Tape. I will then adhere the sentiment with the liquid adhesive to give myself time to wiggle it into the perfect position.
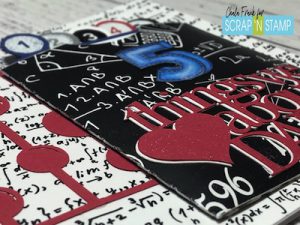
Of course, I could not resist adding a bit of sparkle to this card…even if it is for my husband! So I pulled out my Nuvo Aqua Shimmer Pen and sparkled that bad boy up!
You can watch the corresponding YouTube video here: https://youtu.be/toopBH8ki6s
I hope you enjoyed today’s blog post and that you feel inspired to create your own interactive envelope card. Make sure you head over to the Facebook Challenge Page and share your “Dad” inspired cards!
Enjoy the rest of your week!
~Chala
5 Things We Love about Dad Read More »