
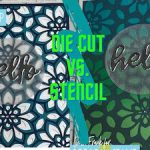
Die Cuts vs. Stencil – Compliment Cards
Hey, Hey! Chala here for your Sunday Funday blog post! Today I am sharing some compliment cards and I thought it would be fun to have a die cut vs. stencil smack down! Lol!
I recently purchased the Birch Press Design Viola Plate die set and I have to tell you I am in LOVE! So much so that I wanted to not only use it as the standard die cuts, but I also wanted to create a stencil out of it too! This set comes with 3 separate steel plate dies that you can use all together like I did today on my first two cards or individually, like I did to create a stencil for my second set of cards. Although this set has some price, it is well worth it for the versatility! A great investment piece for any card theme!
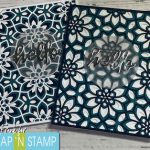
Let’s get started with the first two cards. I pulled out white, teal and navy blue cardstock and cut out two sets of each die plate. I couldn’t decide if I wanted the navy blue on top or the white cardstock, so I decided to do both. By using by Gemini Jr. die cutting machine the process went so quick and easy and I got a beautiful cut each time!
One the each layer was die cut I simply adhered them together with some liquid adhesive. I chose liquid adhesive because of the intricate design of the die cut and to allow me wiggle room to get them into proper position. I added some crystal gems to the centre of the flowers. I wanted a simple greeting on the front so I chose a “hello” die sentiment and cut it twice, once from regular white cardstock and one from silver cardstock and layer them together to add dimension. I then adhere that onto a piece of vellum cut with a stitched circle die and then ran this through my Xyron Creative Station Lite so that you can’t see any adhesive on the back and that with all the layers of cardstock I know that it won’t come off in the mail.
I wanted to send these cards to co-workers as random acts of compliments, so I used MFT’s Hello Beautiful and Anything But Basic – Encouragement stamp sets.
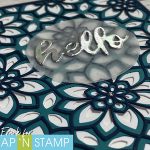
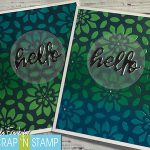
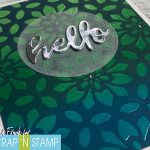
For the next cards I decided to use the B plate from the Birch Press Design Viola Plate die set to create a stencil. I simply die cut it from some thick 120lb Cardstock.
I began with some ink blending with Distress Oxide in Cracked Pistachio, Lucky Clover and Peacock Feathers and created three equal blended parts. I used my heat tool to speed up the drying process and with the stencil I created and dabbed on some Versamark Watermark ink. I then used clear embossing powder to seal in the Oxide inks. I then bring out Black Soot distress oxide and blended that over top. I buffed off the extra ink from onto of the embossing with a microfibre cloth. Although I liked the look of it, I wanted to deepen it with a bluer tone so I pulled out my Chipped Sapphire Distress ink and went overtop of the Black Soot to deepen the colour. I liked this look a lot better. For the next card I skipped the Black Soot and opted to just go overtop of the embossing with the Chipped Sapphire. I completed the cards in the same way as I did with the first two adding some crystal gems and finishing with the same hello die cut vellum sentiment. For the inside sentiments I again used a sentiment from the MFT Anything But Basic – Encouragement and a sentiment from the Picket Fence Here is Where I Work stamp set. Here’s a look at the finished cards.
Thanks for spending your Sunday with me! Leave a comment down below or over at the YouTube video with which one you think won the smack down – Die cut or Stencil?
Happy Crafting Friends!
~Chala, xoxo
Die Cuts vs. Stencil – Compliment Cards Read More »


