Scratch-N-Stamp
Search

Checkout

Keep up with Sales, New Products and other events at Scrap `n Stamp. Sign up for our newsletter now!

What's New

Hot Deals


Easter

TBT: Decorating Easter Eggs!

Hello!  I thought since Easter is literally right around the corner, it’d be fun to share some crafty Easter eggs with you!  Today I’m sharing a project from a couple of years ago… but check out the link that goes even farther than that for a fun tie die technique that you can do on real eggs as well if you’re feeling ambitious!

Hope you enjoy this ThrowBack Thursday:

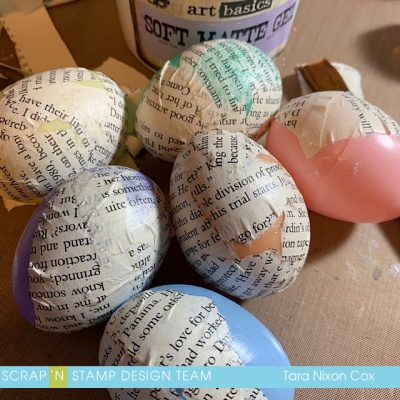
As I was reminded of a project I shared here back in 2017, decorating Easter Eggs with alcohol ink, I thought it would be fun to use my paper crafting/ art supplies in another way on eggs.  This time I decided to start with simple plastic eggs, available almost anywhere this time of year and to do some simple decoupage on them.  I started with a matte gel (mine was by Prima, but this one from Ranger, or any ‘matte medium’ will work just as well!) as my adhesive to adhere torn strips of book paper to my eggs.

I worked in two steps, first covering about half the eggs, then finishing it off once the first part was dry.  This gave me a dry spot to hang onto while I worked and kept me from getting quite as much stuck to my fingers 😉  The eggs dried fairly quickly, though I let them sit overnight before moving on to the next phase…

I decided to experiment with different coloring mediums, but primarily wanted to see how Distress Oxide sprays (you can save on the new set of 12 sprays here) & ink pads would work!

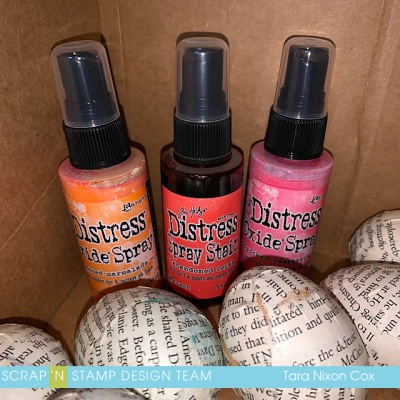
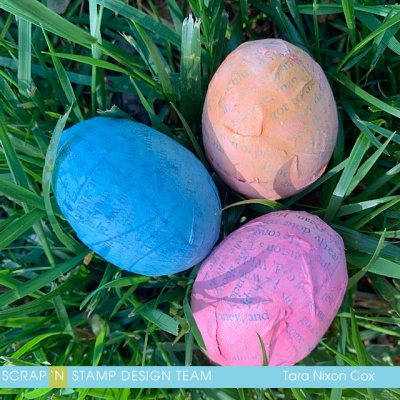
I started by spraying some of the original Distress Stain Spray onto a couple eggs, then quickly realized I would need to start with a coat of gesso to make it work best, so I wiped off my eggs with a cotton cloth and applied white gesso to all my eggs, misting with water to make it less opaque so I could still see the text.  This was also a great time to apply a bit of gesso thicker to a few spots where words I didn’t want on my eggs had snuck in… )note to self, maybe don’t use a murder mystery as your collage paper next time. lol).  I didn’t snap a photo of this stage so you’ll have to use your imagination!  I applied the Abandoned Coral to two eggs, then sprayed one with Spiced Marmalade Distress Oxide Spray and the other with Picked Raspberry.  I rolled them around in a box to capture all the angles, heat them with a heat tool, misted some water to get it to oxidize… and eventually finished them off by blotting again with a cotton rag.  I love the soft chalkiness of the color and the fun mix I got where the original spray shows through!  As a bonus, my fingers were nice and inky (though I did wash my hands between colors to keep my colors more pure).

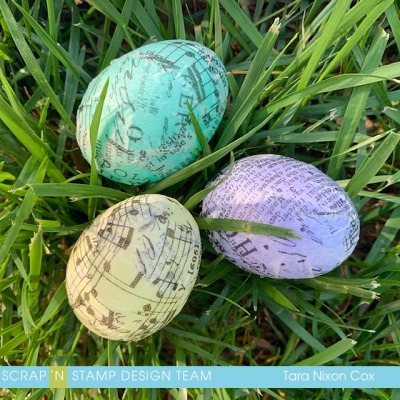
Next I decided to see how the Distress Oxide Ink pads would compare- so I used a foam blending tool and picked my colors.  For this, I just applied ink & blended, then misted with water, wiped dry and added another layer.  Both techniques worked fabulous!  This photo shows that the colors are just as intense, though the inking is more mottled and organic looking on the eggs that I sprayed.  Whatever you use, be sure to mist with water as this will help set the oxide ink and keep the color from spreading over the other eggs (and onto hands that pick them up to have a closer look!).

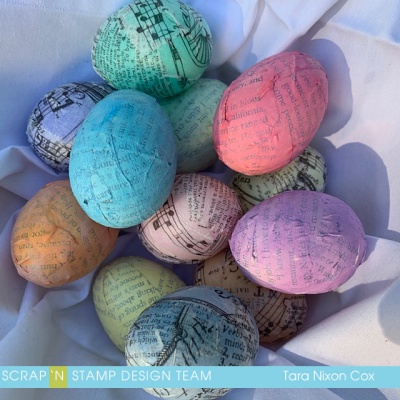
I had some collage tissue I wanted to try as well, so I did some simple decoupage of torn tissue onto my colored eggs.  I thought about adding more to these, but decided to leave them as is to let the design and color of the eggs show through!

The tissue technique was much faster since it only took one step, but the final look will depend what color your original plastic eggs are 🙂  here’s a peek at my little basket of eggs-

I hope this inspires you to pull out your supplies and have some mixed media fun for Easter!  The possibilities are endless…

Inky hugs,

Tara


TBT: Decorating Easter Eggs! Read More »

Lawn Fawn Interactive Easter Card

Hey Guys!  Chala here for today’s blog post.

Today I am using a bunch of Lawn Fawn products to create this fun little Easter card.

I am using the following stamps and dies from Lawn Fawn:

Stitched Hillside Boards, Meadow Borders (however you can also use the Grassy Hillside Borders or Simple Grassy Hillsides), Easter Party and the Let’s Toast Pull Tab die set.

I stamped out the images and coloured them with my comic markers then I layed out the elements I wanted to have in my card.

Now, this is not the exact way the card ended up…but it gave me an idea of where I wanted everything to be.

I use two different shades of green cardstock to die cut the hills this helps to add some visual interest to the card and the illusion that one hill is much closer than the other.   I also cut out some of the tulips from yellow and pink cardstock and the butterfly from some light blue cardstock.

I set these pieces aside and work on the sky background.  I use the amazing Picket Fence Blender Brushes and the Cloud stencil from My Favorite Things and Distress inks in Tumbled Glass and Broken China.  I create the clouds by alternating these colours and turning the stencil to give a layered cloud look.

The next step is to die cut the track of the slider portion….I seemed to have misplaced this part of my die set…😬….so, I ended up using one from the Slide on Over set from Lawn Fawn….  I cut the track in both the background cloud panel as well as the larger background hill.

I then adhere the larger background hill to the cloud panel ensuring the panel’s line up.  I insert the slider mechanism and adhere the little critter with some Scor Tape.  I decided I wanted the cute little bunny character to pop up from behind the grass instead of the little flower girl.

Now I add some foam tape to the grassy cardstock that I die cut earlier.  Making sure that it lines up on either side of the slider mechanism and doesn’t interfere with how the slider moves up and down.

Next I can add the other little critters to the front as well as the tulips and butterfly with some glossy accents.

I trimmed off the excess overhang from the grass and the pull mechanism, die cut the notch, added the decorative pull and stamped “pull here”.  I add some more foam tape to the back of and on either side of the slider mechanism and adhere it onto my card base.

My last step is to add the sentiment.  I did this by stamping the Happy Easter sentiment onto some purple cardstock with Versamark and heat embossed with white embossing powder and popped it up with foam tape.

I felt the sentiment lacked something…so I added some stitch lines with white gel pen and clear Wink of Stella to the petals on the little girl.  Here’s the finished card.

Due to some technical difficulties there is no video today.  Sorry about that guys!

Be sure to stop back here on Saturday to check out what Kia has in store for you!

Thanks so much from stopping by and I hope the Easter bunny is good to you all!

~Chala

Lawn Fawn Interactive Easter Card Read More »

Tuesday with Tara {take 142}

Happy Tuesday!

Did you check out the Side Order Blog Hop over the weekend?  If not, there’s still time to hop along with us… leave comments and maybe even WIN your own Sizzix Side Order set 🙂  Check it out HERE.

I have to say- the hop really got me inspired for some spring & Easter creating!  And since I was having so much fun with my Side Order, I decided to make a card with it as well… pretty impressed with myself that this project uses ALL the elements in the set, plus an extra egg I had leftover from my art journal page 🙂

I created a simple grid, starting with the pair of chicks on an embossed background.  I trimmed the card stock to size, then measured my next panel (the chocolate bunny) which I also wanted to emboss using the tiny embossing folder that came in the set.  I made sure my paper was slightly smaller than the embossing folder and then adhered the bunny to the background.  I die cut the bunny out of yellow card stock, since it was handy, and inked it up with a couple shades of brown Distress Oxide.  I love the creamy, chocolatey look it gave me!

Once I had two pieces to start with, I cut the other two grid elements to match the height & width of the others.  This would be an easy card to mass produce once you had all your measurements!  I tried a variety of backgrounds for my butterfly panel… but in the end I went with a classic book print (torn from a vintage book!).

My pair of chicks show what you can get by cutting the entire die from two different shades of yellow and adding a bit of marker… they make a cute little couple!  I cut the text from a scrap of book print left from that panel.

Lastly, I used a stamped egg.  This colorful cut out inspired the colors in the card and helped me to limit my palette 🙂  As you can see, my grid did not end up square.  Since I was mounting it to a square card I added a bit of lace to add balance.  For contrast, I layered it all on a piece of patterned paper (from my extensive 6×6 pad stash- love those things!).

And that’s my card!  I hope you can find some time for Easter creativity and maybe enjoy a chocolate bunny or decorating eggs… and hopefully you see a bit of sunshine as well!  Have a blessed Easter!

Inky hugs,

Tara


Materials Used:


Tuesday with Tara {take 142} Read More »

Free Shipping Anywhere In Canada