

Welcome to the Scrap ‘N Stamp SHAKE IT UP Summer Blog Hop! We are excited to have you here with us today and share with you each member of our team’s unique take on shaker cards! You’ll see a mix of takes on ‘old school’ shakers as well as projects using shaker window & die combos, like the ones you can WIN by leaving comments along the way and by sharing about the hop on social media! It should be a lot of fun, so let’s get started!
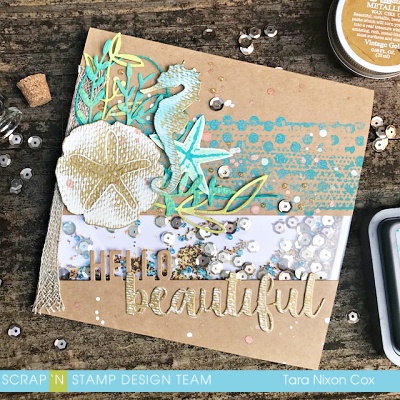
I decided to do a twist on an old school shaker, I wanted to find a way to create a shaker panel the full width of my card rather than a window in the center of the card. I started with ‘hello’ edge die (by MFT) and cut it at an angle along the bottom of the card, leaving room for the coordinating ‘beautiful’ word below it. I then used that angle as my guide to cut another panel the size that my shaker panel would be. I pieced it back together with some clear plastic (I used the packaging from a stencil I’d purchased!) glued at the top and bottom then trimmed it to size. Once my window was the right size, I had to figure out how to seal it off as a shaker- the clear edges kinda snuck up on me and I wasn’t sure how to tackle that. I decided to let the white foam tape show on one side, but to camouflage it a bit by backing my window with white card stock. Here’s a look at the hidden part of this panel so you can see how it went together. I added a random mix of foam tape along much of the solid parts to give the whole card a smooth look. The biggest part when assembling a shaker from scratch like this is to make sure there aren’t gaps in the foam tape around your window, you don’t want to leak any glitter 🙂
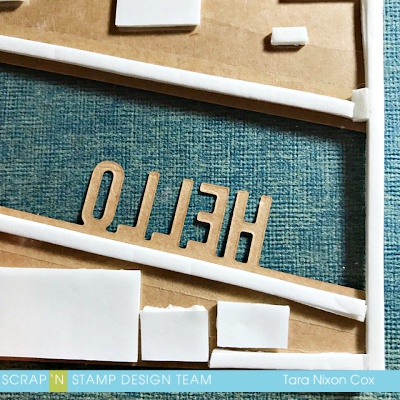
I cut my white panel to cover the inside (less about a 1/4″ at the top so it would fold flat), removed all the foam backing and then filled up my shaker window with a variety of sequins, glitter and beads/micro beads. I think everything but the sequins were from Prima 🙂
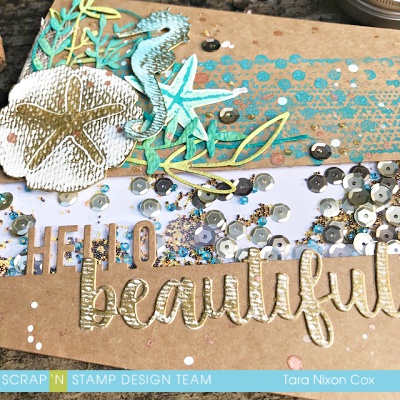
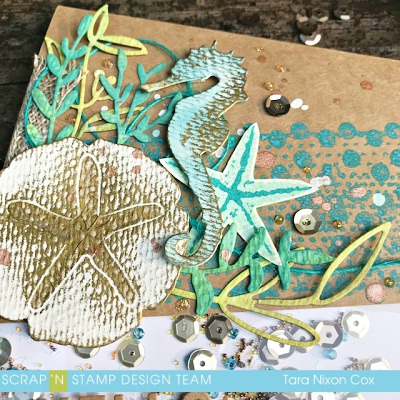
Because that panel was such a stark white, I cut the ‘beautiful’ word and the Tim Holtz sand dollar & sea horse from white textured cardstock. I love how the gold metallic wax picks up the texture! The sea horse was inked with Distress Ink before I added the gold details to it. I added a variety of greenery (aka seaweed) cut from Funky Flowers 2, all of which are watercolor paper painted with Distress Inks. I grabbed an old Tim Holtz border/texture stamp and inked it up with Mermaid Lagoon Distress Oxide to give some balance to the top of the card. After that, I just added bits of ribbon, twine, paint and sequins to complete the card.
I love glitter, but hate when it gets everywhere… I managed to avoid the mess with this card, and that’s something I like about shakers. It’s like contained chaos. 🙂
I’m excited for you (and me!) to see what the rest of the girls have to share with you today! Don’t forget to leave comments along the hop- and enjoy special savings on Shaker windows this week too!
Here’s who’s hopping with us this month:

Love the mix of products! Beautiful card…TFS
Great Shaker Tara! Love the colors you chose. Xx
Gorgeous shaker card. I Love all the elements and how unexpected the shaker was. Great Job
Love how you highlighted the paper texture with gold. Am glad you used the Oxide on that border stamp; it adds a lot to the design. Thanks for keeping it real by sharing the challenges along with the successes, Tara!
Love your shaker card! I have yet to make one!
I love the ‘full size’ shaker, rather than just a ‘window’. Great colouring, too!
This looks fabulous Tara. Beautiful details and I do like that full card shaker.
I’m learning a lot about shaker cards! Thanks for sharing!
Love shaker cards
and yours is lovely
with the inked
background and
seaweed.
Carla from Utah
Love the colors and textures on your beautiful card! Such pretty details! Love the diagonal shaker window you created with the ‘hello’ edge die! Fabulous job on your card!
Love shaker cards…I’m very old school….and the selection of shaker elements is so much fun these days. Great card with the marine theme!
What a fabulous beach shaker. Thanks for the hop and chance to win.
Waht a fun and pretty shaker card..love the diagonal elements.
This is beautiful!! I love the colours you used!
I love it! Contained chaos! Funny! I really love your card! I love your Sea Horse and the Sand dollar especially! Everything is really very lovely! And the colors that you chose are so perfect! It really looks like a colorful ocean theme!!
I wonder if you could add an additional strip of the gold foil paper underneath the top panel. Yes, I often am challenged with how to hid the adhesive too. 🙂
I love this take on a shaker. The diagonal window is so unique. Wonderful card.
Such a great shaker card. Love the fact you have it on an angle near the bottom of the card. A typical shaker with a twist. 🙂
Wow!! Love the colors and how all the elements incorporated stunningly with the shaker portion of the card. Really fantastic design!!!
Great card! Love the colors and the shaker portion is large so you can put lots in it. I like the sea horse and sand dollar too.