Scratch-N-Stamp
Search

Checkout

Keep up with Sales, New Products and other events at Scrap `n Stamp. Sign up for our newsletter now!

What's New

Hot Deals


Crafters Companion

Tuesday with Tara {take 403} Sunny Camper

Happy Tuesday!

Today I’m sharing a sweet & sunny little easel card that I made on Facebook Live last week!  If you joined me, thank you!  If you missed it and you want a little walk through on how to do make the card, you can catch the replay!

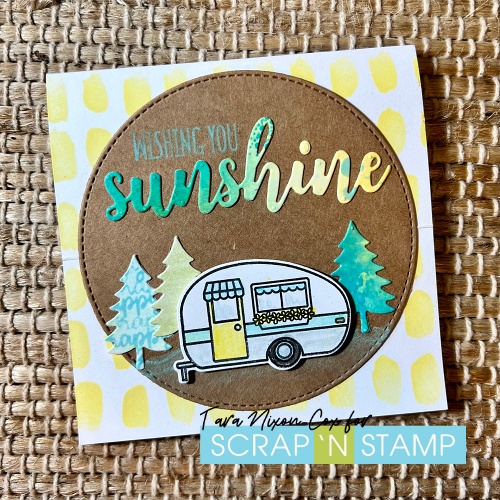
I just love this cute little Sunny Studio Camper stamp & coordinating die set!  I had the idea in my head to use it on an easel card but had to adapt my plan a bit when I realized how small the image is, soo…. I created a little scene on a circle I cut from Kraft card stock & paired it with a sunny sentiment.

I am not typically one who buys the matching stamp & die, but I love it when there’s sets like this that have a little bonus like the tree die!  For this card, I actually used another stamp & die set for the sentiment as well!  I used the Hello Sunshine set for the first time last year when we did our Sunflower blog hop, and it’s a really sweet little set with the die cut word and a variety of sentiments to mix & match with it.  It’s a really great price point (under $10!) and still available in the shop!

I colored up my image with Distress Watercolor Pencil Crayons (I know you’ve seen them a lot lately, but I’m working on learning how to best use these pretties!) and used Squeezed Lemonade Distress Ink stenciled on the background.

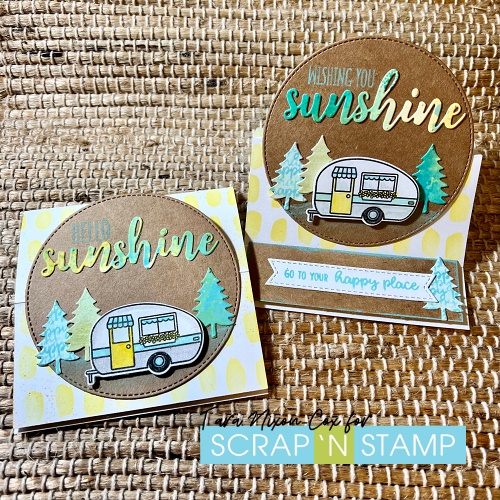
If you’ve never made an easel card before, I encourage you to watch the replay of my live class!  No hard feelings if you skip ahead to the assembly :). These little cuties are 4 1/4″ square and will fit in a standard A2 envelope.  I kept things really simple with 3D foam squares as my dimension to prop the easel up!

I hope you’re enjoying the summer sun & maybe some days away camping as well!  I look forward to seeing you back here on Friday for our August blog hop- it’s going to be fabulous!

Inky hugs,

Tara

Tuesday with Tara {take 403} Sunny Camper Read More »

Tuesday with Tara {take 392} Birthday Birds

Since I’m inspired by our Windows of Wonder Inspiration Hop theme, I thought I’d share another window themed card!  This is another mini slim- a gatefold card that measures 3.5×6″ and features frames from the Picket Fence Slimline System, together with Tim Holtz Silhouette birds.

As you can see, I actually have two cards to share… one of which was completed during my Facebook Crafty Live last Saturday!

I’ve used the stitched frame for the front (open left) panel and the bare tree/branches die for the middle (open right) panel.  Behind them both I’ve attached a slightly larger die cut square, which was inked to resemble the sunny sky.  A die cut bird is perched on the branch, colored up in bold red.

I die cut & scored the panels in advance, then completed the card on a Facebook live video, which I’ll link to below- I’d love to have you watch it!

Hopefully you were able to catch the replay of the live! If it doesn’t show up embedded in this post, please click here to see it on Facebook 🙂

I’ve included a few more photos of the open card on my personal blog, if you’d like a closer look!

Thanks for stopping by!

Inky hugs,

Tara

Tuesday with Tara {take 392} Birthday Birds Read More »

Tuesday with Tara {take 366} Vellum Sunflowers

Happy Tuesday!

Today I’m sharing a simple card I made using a piece of the stunning vellum from the Crafter’s Companion Sunflower collection!  I’ve paired it with a negative cut from one of Tim Holtz’s Bold Text dies.

The details on these sheets of vellum are so gorgeous, I really tried to keep the card simple to let them stand out.  I love the effect of the negative cuts with it, though as really shows off the delicate, sheer nature of the vellum.  As I mentioned, I kept this one super simple- just finished it off with a few sequins & beads and a piece of ribbon which I’d previously colored with Distress Inks.

For this card, after I measured and scored for the front piece I trimmed down the vellum so there was about 1″ overlapping on the back of the card, and I adhered it at the back of the score line.  Vellum can be tricky to adhere, but adding the ribbon to the front of the card meant I could avoid adhesive completely on the front of this card.

Hope this brightens your day and you are able to focus on the good!  I’ve got a couple other cards in the works I’ll be sharing on my personal blog and instagram through the week.


Inky hugs,

Tara


Tuesday with Tara {take 366} Vellum Sunflowers Read More »

Free Shipping Anywhere In Canada