
Hello again, Chala here for your Sunday Funday Post. Today I am Rocking Out with Alcohol Inks! I decided to stray from the typical card making to create some special additions to my daughter’s fairy garden.
I had seen a video awhile ago with someone who used alcohol inks on rocks and I thought that would be so much fun to do! It is also a really cool craft that you could do out doors with your kids as a last summer hoorah….and when the weather turns cool you can bring these beauties indoors to brighten up your living space!

There is a bit of prep time for this project. You will want to find some cool shaped rocks. I opted for the traditional rounder rocks. Two were smooth and one was more pitted/textured. You will want to wash and dry your rocks to ensure they are free of dirt and debris.
I used some blue Dawn dish soap on mine and left them on my deck in the hot sun for a couple of days. You can also bake them on a lined cookie sheet at 350 degrees Fahrenheit for 10 to 10 to 15 minutes. This will also ensure that after washing the rocks will be dry and if you plan on using them indoors or in a terrarium any bacteria will be killed.
I had just a few alcohol inks in my stash and was given the Alcohol Pearls to play with. I knew I wanted to do the rocks, and also didn’t want to waste any of the ink that would run off. So, I looked through my craft room (and kitchen) and decided I would put down a layer of tinfoil and some 8″ x 12″ Brea Reese Waterproof Paper that is supposed to be good for alcohol inks as well. I have never used this type of paper before and thought I would give a try and give you my honest opinion on it.
I chose the textured rock to start with and put it on the Brea Reese paper. I noted that this paper is thin and smooth and feels nothing like Yupo paper. I was really interested to see if it would work just as well, especially since it was cheaper than the Yupo and I liked the size of it. I have also used photo paper with alcohol inks…and while the results are definitely not as good as Yupo…it wasn’t bad.
I opened the Alcohol Pearl inks and could see that there was some setteling of the pigments on the bottom of the bottle. I shook them and heard that there is a little ball inside to help with the remixing of the pigments back into the alcohol ink. The sets I have are: Alcohol Pearls Kit #1 and Alcohol Pearls Kit #3. The names of these inks are fabulous!! Villanous, Enchanted, Envy, Deception, Splendor and Alchemy.
To save my skin from being dyed, I put on some gloves and began dripping the inks onto the rock and WOW! The shimmer was insane!! You could see the sparkle moving around within the ink, it was mesmerizing! The ink looked alive! I just kept dripping the ink in different areas and also dripped a few regular inks ( Amethyst, Aquamarine, Flamingo, Patina, Coral, Crimson, Dandelion, Pool, ) to see how the two interacted. A bit of the shimmer flowed into the regular inks and really made a unique look. One I liked the look of the colours and how they interacted with each other, stopped and put the rock aside to dry. I think it would be really cool if you did some painting on top of the inks with white paint – maybe some dots or flowers? I am still debating whether I should put sealing coat overtop. I guess that depends on if you will keep your creation inside or out.


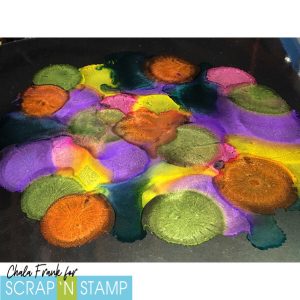
The rocks absorbed much more of the ink than I thought. So, there was not a lot of ink that ended up on the Brea Reese paper. I decided to drip each of the Pearl Inks onto the paper to see how they looked and moved as well as just a couple of the regular inks. The results were……underwhelming. I suggest you check out the YouTube video so that you can see the results and the entire process of these projects.
https://youtu.be/44OlePWMGp8
The inks did not flow or move like they do on Yupo. In fact, I found that photo paper moved the ink more. I also was really surprised by the way they dried on the paper and would say -you get what you pay for! With that said, I think it would work a lot better for Watercolours as that is the look the inks ended up having on this paper. It is absolutely worth spending the money on the Yupo paper to get the results that the inks are known for.
I then played around with dripping the inks onto some mirrored cardstock and the Alcohol Pearls reacted like tiny fireworks. It was so pretty!!

I also dripped them onto tinfoil and the results were not as amazing, but still pretty cool.


I didn’t get a chance to use these in cards like I had hoped…but, I think they would look really awesome as backgrounds with multi layered die cuts in white cardstock over top. Something like Memory Box’s Butterfly Heart Frame die or Poppystamps’ Majesty Background die would look really cool over top of an Alcohol Ink background.
I also tried putting the inks onto the plastic/glass of a lantern that I picked up at the dollar store. I need to play around with the layering and colour combinations of them a bit more to get the look I want – but was overall impressed with the outcome. You could also do this with jars and then put fairy lights inside.

Again, I encourage you to check out my YouTube video to see the process. I hope I have inspired you to look at your craft supplies for use in other projects, not just creating cards!
Hoping you enjoy your day and take care!
~Chala
SCRAP’N STAMP DEALS FOR THIS PROJECT:
Alcohol Ink – 15 New Colours for 2020
