Hey guys, I am back to share two “No Cha-Ching Bling” Christmas cards with you.
What is that you ask? Well, I wanted to share a card that had bling without you having to spend any money or break the bank if you need to . Most of the supplies I am sharing you likely already have in your stash!

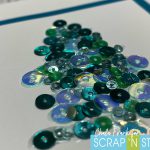
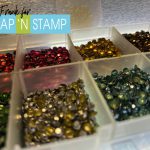
For my first card I KNOW that we all have sequins in our supplies. We have all taken that fateful trip to the dollar store and purchased sequins because we knew they would make great embellishments and you bought every colour and now they are sitting there all lonely wondering when it will be there turn to be used on a card! Here is your chance to use them. Oh – I should probably let you know that the inspiration for my cards today was brought on by two other crafts – cross-stitch and diamond painting. So if you don’t like either…..well, I hope this changes your mind! Let’s start with the first card!
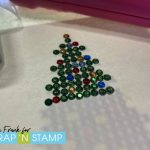
Pull out your sequins, find yourself a fun cross-stitch pattern for inspiration, or free-hand a design you like. My inspiration today is a Christmas Tree cross-stitch pattern I found on Pinterest. I printed the picture out and will actually use it as reference for both my cards today.
I closed my eyes stuck my hand in my sequin drawer (yes, I have an entire drawer for sequins – don’t judge me) and pulled out the Spiked Ocean Water Sequins from Picket Fence Studios.
The next step is very difficult….find your favourite clear drying glue. I say it is difficult because I actually have a few….Glossy Accents and Gina K Connect Glue are my favourite. Gina K won this time as she was the closest at hand.
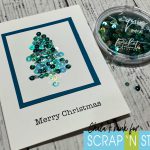
I then just added glue in the shape of the tree and began adhering the sequins keeping in mind which colours and sizes I was laying down to help it look pleasing to the eye. This is made a lot easier by using reverse tweezers, a Jewel Picker and the Tim Holtz Craft Pick. You could be even more particular and follow the cross-stitch patter and match up the colours with the sequins, but because of the ones I picked I didn’t have a large variation in colours…so mine is more monochromatic. Once I was done adhering them down I set that aside to dry very well.
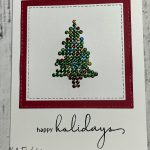
When I was sure everything was dry, I used my Fiskars sure cut paper trimmer and trimmed down the image and backed it onto some coordinating cardstock and adhered to my card leaving enough room to stamp a sentiment underneath with Versafine Claire Nocturne Ink
For the sentiment you can really use any one you like that you think works well with the style of card. I am sure we all have a ton of Christmas sentiments that we can choose from! And that finishes card number one! Pretty quick and simple except for the glue part – LET IT DRY!!!
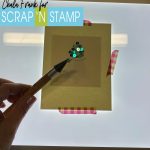
Card two!! This one is more of a diamond dot painting type card…so, it took a bit more patience but was worth it! If you are a girl from the 80s/90s I know you have some hot fix crystals somewhere! lol! Or you can even use jewel embellishments.
I had some hot fix crystals that I pulled out and used my hot tool to adhere them to the cardstock. This time I followed the cross-stitch pattern a little more carefully…but not 100% Again, if you are using embellishment jewels you can just adhere them with your favourite clear drying glue.
I used a two of the Small Stitched Square Stackable dies from Lawn Fawn and used the smaller of the two to die cut the hot fix crystal tree. I ran it through my Gemini Jr. and was pleasantly surprised to see that all the crystals remained in tact. I adhered that onto the large stitched square that I die cut from some red cardstock and again adhered to a card base and stamped a simple sentiment with the Versafine Claire Nocturne Ink.

I hope that you enjoyed today’s simple yet beautiful bling cards! Leave me a comment to let me know which card you liked the best the Sequin card or the Crystal Card.
Remember to play along with the Scrap’N Stamp Random Acts of Cardness Facebook Challenge for your chance to win some great prizes!!
Enjoy the rest of your weekend!
Chala xoxo
Images not showing? Head over to my blog by clicking HERE to check them out!