Scratch-N-Stamp
Search

Checkout

Keep up with Sales, New Products and other events at Scrap `n Stamp. Sign up for our newsletter now!

What's New

Hot Deals


mft die-namics

Tuesday with Tara {take 265} Woodgrain Wishes

Happy Tuesday!

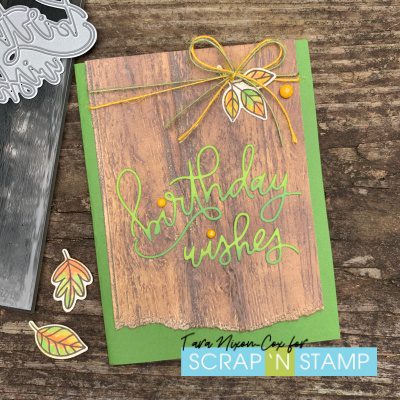
Today’s challenge word over on the SNS Challenge page on FB is ‘Woodgrain’ so it was the perfect chance for me to use the Lumber 3D embossing folder by Tim Holtz!  I’ve been trying to increase my stash of birthday cards, so I decided to keep things pretty simple and pair it with this gorgeous Birthday Wishes die by MFT.  Together, I think they make a fab little card that can be used for almost anyone!

For the embossed background, I started with some ivory card stock and Ground Espresso Distress Oxide, which I applied directly to the front side of the embossing folder so it would add color to the recessed portions of the design.  Here’s how it came out directly from the embossing folder.

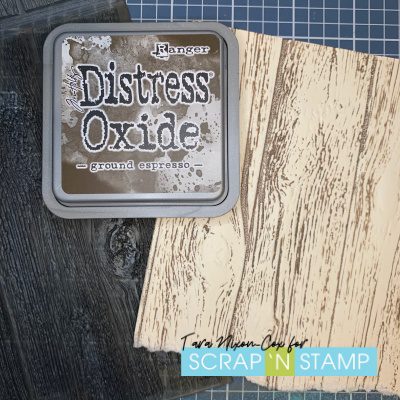
I then used a blending tool to apply the same ink lightly over the entire background and misted it lightly with water.  I left the water splotches as they were for added texture, but also warmed things up a bit with Vintage Photo Distress Oxide in the lighter areas.

I die cut the sentiment out of a cilantro green card stock that was a few shades lighter than my card base, then inked part of it with Mowed Lawn Distress Oxide Ink to give a subtle ombre effect.  I used Sticky Dots Adhesive Sheets to adhere it to the woodgrain panel, since it’s one of the easiest ways to adhere detailed die cuts like this one.

I decided to add just a small autumn touch to the card with a single leaf from the new MFT Autumn Blessings Stamp & Die set, which I stamped in Archival Ink & watercolored with Distress Inks. (In my experimenting I was reminded that regular Distress Ink is much better than Distress Oxide for vibrant watercolor.) In the die cutting process I somehow lost the dots from my i’s, so I pulled it all together with a bit of yellow bling and some yellow & green thin twine.

I hope you like my little card, and the little peek at the autumn leaves… you’ll be seeing more of them next week 😉

Inky hugs,

Tara


Tuesday with Tara {take 265} Woodgrain Wishes Read More »

Strong and Beautiful

Yes You Are!

My card today is in honor of International Women’s Day and all the Strong and Beautiful women in my life.


I chose to use the Picket Fence Studios Jill  stamp and MFT’s Beautiful Blessings 2 for the sentiment.

I’ll be honest with you. I didn’t know it was International Women’s Day until I woke up this morning and saw it on a post. I was instantly inspired to make a card to celebrate. What I had originally planned for today I’ll share later in the month.

I stamped the image using my stamp positioning tool. Not because it didn’t stamp well but because I knew I was going to use my Prismacolor pencils and they tend to dull the stamped lines. I stamp the image, leave the stamp in place, color the image, put it back into the stamp positioning tool and re stamp the image. It sharpens the image up. I should’ve taken a pic to show you the before and after.

I used the Lawn Fawn Stitched Rectangle dies to cut a panel and then stamped the sentiment using Versafine Nocturne ink.  I adhered the panel to a white card base using craft foam.


Happy Stampin’
and thanks so much for visiting!!
Susan
Shopping list:
Below are links to all the goodies I used, just click on the icon to be taken to where you can purchase the product. If you use my affiliate links when shopping there is no additional cost to you, I want to say thank you and that I appreciate it and you very much. 


Strong and Beautiful Read More »

Have a ROARING Good Christmas

Hi Everyone!

It’s Susan and I’ve got a fun card to share with you today. While I was trying to come up with an idea for today’s post I saw a card that Kristina Werner recently made using a fox, a bunny and an owl and it was soooo cute. It got me to thinking about how I could use non Christmas themed stamps to make a Christmas card and how non Christmasy can you get than dinosaurs!

I used the Delightful Dinosaurs from MFT and their coordinating dies to make this cute Christmas card. I used the Santa hat from Tim Holtz Crazy Things Stamp Set and Christmas is from the Tim Holtz Crazy Talk Stamp Set. The trees are from an older die set I keep in my stash because I LOVE it but there are so many tree dies on the market that I know if you were going to make this card you could find something you like that would work.

I started by stamping the dinosaurs using my MISTI and some Nocturne ink from Versafine. You don’t need a stamp positioning tool but if you have one it’s great for redefining the black lines of the stamped images after you color them in. Just leave the stamps in your stamp positioning tool (I linked to one in the store for you) and when you’re done coloring put your paper back in and re stamp it. It really does finish it off.

To color the dinosaurs in I used my Copics. Now coloring with Copics is really new to me – this may be the first card I’ve made and shared that uses Copics. There’s a learning curve with these but I really like them! I only have a few but I think I may need to get a few more. I used Coral (R35) and Lipstick Red (R29) for the reds. For the greens I used Willow (G24) and Veronese Green (G09). The light colored dinosaur is colored with Barely Beige (E11) and Dark Suntan (E15).

I used the lighter shade of each pair and put down a base color. I used the darker color to add some shading near the edges and to add dots on two of the dinosaurs. I also used Cool Gray (C3) for shading on the white parts and a darker Cool Gray (C7) to add some more shading to the dinosaurs. Therese Calvird from Lost in Paper shared that tip – to use grays for shading – it’s a great way to stretch your markers when you’re starting out and can’t or don’t want to buy them all.

The sentiment is from the Delightful Dinosaurs stamp set – it says ‘Have a Roaring Good Time but I masked off the Time, inked up the rest of the stamp with Versamark ink and stamped it onto black card stock and then heat set it with WOW White Embossing Powder. I did the same for Christmas.

I’m wishing I sponged the edges of the trees to give them some depth – oh well. I layered everything onto a panel of white card stock that I cut with the Lawn Fawn Stitched Stackable Rectangle Dies. Two of the dinosaurs were popped up with craft foam and the panel was also popped up with craft foam and then added to a white card base.

Thanks so much for hanging out with me today. I hope you’re inspired to look at your non-Christmas stamps and make a Christmas card with them.

Happy Stampin’

Susan

Shopping list:


Have a ROARING Good Christmas Read More »

Free Shipping Anywhere In Canada