Scratch-N-Stamp
Search

Checkout

Keep up with Sales, New Products and other events at Scrap `n Stamp. Sign up for our newsletter now!

What's New

Hot Deals


Festive Open House

Scrap ‘n Stamp Festive Open House – #4

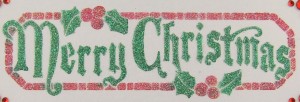
When I saw this Dreamweaver stencil ( Merry Christmas with Holly LL557) I knew exactly what I wanted to use it for – a gift certificate or money holder.

To get the glittered effect and different colors on the image I first stenciled the words and holly leaves with Evergreen Versacolor pigment ink and then used Cardinal Versacolor pigment ink for the frame and berries. After the ink had dried a little I added a layer of Dreamweaver Translucent embossing paste and while it was still wet I sprinkled Studio K Crystal Green glitter onto all the green areas and Studio K Crystal Rainbow onto the red frame and berries.

You might wonder why I used different colors of transparent glitter. Well, the really cool thing about our Studio K transparent glitters is that they are one color when you apply them to a white surface and reflect a totally different color when you put them on top of a dark color. So by putting theCrystal Green glitter on top of the green it makes that green color more intense but still keeps it really sparkly. It’s a totally different look than when you put opaque glitter onto something because you still get that transparent, watercolored look. By putting the Crystal Rainbow glitter onto the red it made it sparkle with all different colors. The overall look is frosted and shimmery. Our  glitters are so versatile because you get more than one color from them.

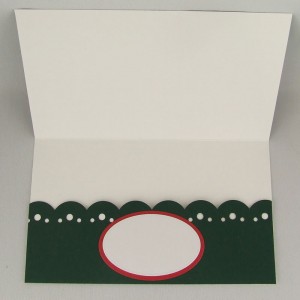
On the inside of the holder I created a little pocket to put in the money or gift certificate and made a decorative edge with Spellbinders Classic Scallop Edgeabilities E8-001. This was my first time using these new dies and I am totally hooked. They were so easy to line up and there are so many possible combinations when you team them up with the other Edgeabilities giving you endless design possibilities. If you are looking for an alternative to border punches they definitely offer you lots and lots of options.

Well, that’s it for this post. There’s lots more to come so be sure to check back every hour for our latest samples.

HOW TO WIN SOME BLOG CANDY:

MAIN DRAW – Enter to Win 1 of five $10 Scrap ‘n Stamp Gift Certificates

It’s easy. Just write a review about any product on our website that you have used and tell us why you like it and how you use it. Keep a list of the products that you review and then comment at the bottom of any Festive Open House post and tell us what products you have reviewed. You will receive one entry for every product that you review. A random draw for the main Blog Candy prizes will be made from all the entries received from 9am – 6pm PST today. The names of all the winners will be announced in a blog post the following day along with details about how to receive their prize. Only one prize will be awarded per person.

Scrap ‘n Stamp Festive Open House – #4 Read More »

Scrap ‘n Stamp – Festive Open House #3

Yippee! It’s time to show you our first Festive Open House Make ‘n Take. It’s a really cute ornament made with Spellbinders 2011 Heirloom Ornaments S4-334, some patterned paper and a little bling.

Isn’t it adorable? And…as part of our Festive Open House everyone that places an order online today will receive one of these all precut and ready to be assembled as an extra bonus.

They are super quick and easy to make. Let me show you how…

Step 1: Cut 6 pieces of patterned paper using the middle (3rd) Spellbinders die. This makes an ornament that is about 2 1/2″ wide. Of course you can make larger or smaller ornaments just by using different sizes of dies but you may want to add more pieces if you are making it larger.

Step 2:Fold all the pieces in half.

Step 3: Glue the pieces together to create a fan, leaving the last two sections open. I used Scotch Quick Dry Adhesive but you could use any glue that dries fairly quickly.

Step 4: Put a line of glue down the center and place a looped piece of cording down the middle and then glue the last two sections together.

Step 5: Add rhinestones to the top and bottom with glue dots, trim off the excess cording on the bottom and you are done! Just think of all the different possibilities. You could personalize it with someone’s name, make it with mirror cardstock, emboss it. They are so much fun to make I’ll bet you can’t stop at just one. LOL!!!

Are you feeling all festive yet? We sure are and there’s lots more coming your way to inspire you for that HO HO HO time of year.

HOW TO WIN SOME BLOG CANDY:

MAIN DRAW – Enter to Win 1 of five $10 Scrap ‘n Stamp Gift Certificates

It’s easy. Just write a review about any product on our website that you have used and tell us why you like it and how you use it. Keep a list of the products that you review and then comment at the bottom of any Festive Open House post and tell us what products you have reviewed. You will receive one entry for every product that you review. A random draw for the main Blog Candy prizes will be made from all the entries received from 9am – 6pm PST today. The names of all the winners will be announced in a blog post the following day along with details about how to receive their prize. Only one prize will be awarded per person.

BONUS DRAW

Comment on this post and tell us what your favorite colors of Studio K Opaque or Transparent Glitter are and your name will be entered in a random draw to win a $5 Scrap ‘n Stamp Gift Certificate.

Scrap ‘n Stamp – Festive Open House #3 Read More »

Scrap ‘n Stamp – Festive Open House #2

I have some really cute cards to share with you that Shellie made using one of the Popcorn the Bear – Trimming the Tree 3D sheets. These sheets are so easy to use because everything is pre-cut so you just pop out the pieces and layer them with the ultra thin Joy Craft foam squares in the order shown on the sheet and you have a gorgeous dimensional image in no time.

Shellie used the colors in the image as the inspiration for her card and added layers, punched accents, Studio K droplets and a little bow as finishing touches. The red punched ribbon that goes across the center of the card is made with the EK Success Chinese Knot Chain punch and as you can see it creates a beautiful strip design that you could use on cards or scrapbook pages. And our very creative design team member, Kim has come up with a really cute ornament that you can make with it so be sure to check the blog later today as we will be showing you how to make them right here on our blog.

And here’s another cutie from the same 3D sheet. I love how Shellie highlighted parts of the images on each of the cards with a little Studio K Crystal Rainbow glitter. It just wouldn’t be a Christmas card without a little glitter on it. Right?

Well…there’s lots more to come and lots of chances to win some awesome blog candy here are all the details.

HOW TO WIN SOME BLOG CANDY:

MAIN DRAW – Enter to Win 1 of five $10 Scrap ‘n Stamp Gift Certificates

It’s easy. Just write a review about any product on our website that you have used and tell us why you like it and how you use it. Keep a list of the products that you review and then comment at the bottom of any Festive Open House post and tell us what products you have reviewed. You will receive one entry for every product that you review. A random draw for the main Blog Candy prizes will be made from all the entries received from 9am – 6pm PST today. The names of all the winners will be announced in a blog post the following day along with details about how to receive their prize. Only one prize will be awarded per person.


Scrap ‘n Stamp – Festive Open House #2 Read More »

Categories: Cards, Events
Free Shipping Anywhere In Canada