Scratch-N-Stamp
Search

Checkout

Keep up with Sales, New Products and other events at Scrap `n Stamp. Sign up for our newsletter now!

What's New

Hot Deals


Sizzix

Sizzix

Tuesday with Tara {take 54}

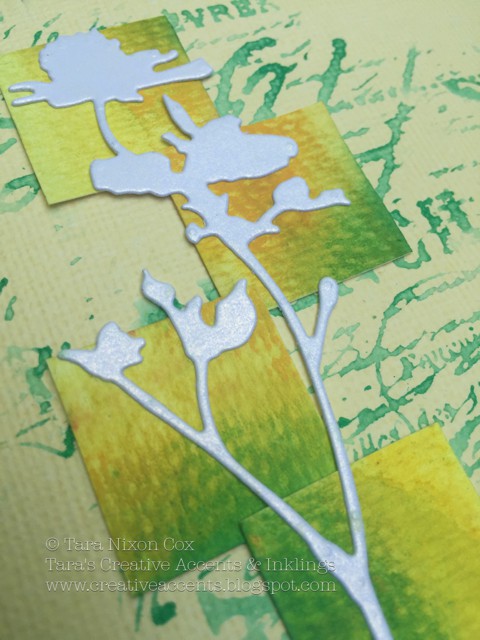
Happy Tuesday!  Hope you’ve had a great week and found some time to create- I’ve been a bit short on creative time lately, but am taking time today to work on creative projects which I hope to share with y’all over the next few weeks!  Today I was inspired by a card I saw on Pinterest again, this one featured a stack of colored blocks behind a floral die cut.  My card doesn’t really resemble the one I saw there beyond that basic concept, but that’s half the fun of inspiration- seeing where it takes your projects 🙂wildflower blocks (2)

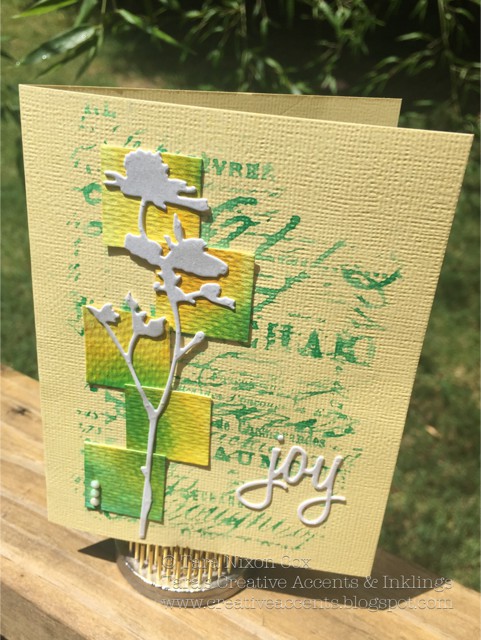
I had a one inch strip of watercolor paper with a bit of color on it from trimming something else, so I decided to add bits of yellow and green (a combination of Color Burst, Distress Crayons & Distress Ink!) and trim it into 1″ squares.  I cut several wildflower dies out of a pearly white cardstock and selected the largest one to go on this standard A2 sized card.  I played around with the placement of the squares until I was happy with them, then snapped a photo with my iphone so I could refer to it once I removed the flower & was ready for glue!  I decided on a pale yellow background and added a lightly inked (Lucky Clover Distress Ink) background stamp by Tim Holtz to give it a bit of texture.  Once it was all dry, I pulled out the glue and adhered my blocks and my flower over them (I used multi matte medium for this tiny detailed image & the sentiment).  A white word and a bit of bling finished off my card.

wildflower blocks (3)

wildflower blocks (4)

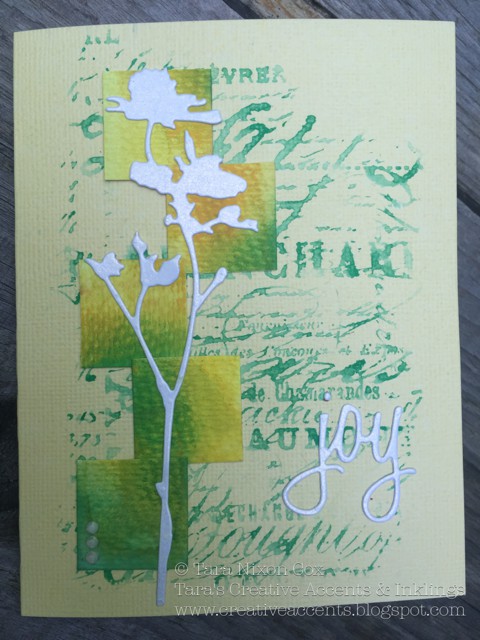
I had a few extra pieces left so I put together a little tag with them- it gives a more modern, crisp look on a simple kraft background.

wildflower blocks (1)

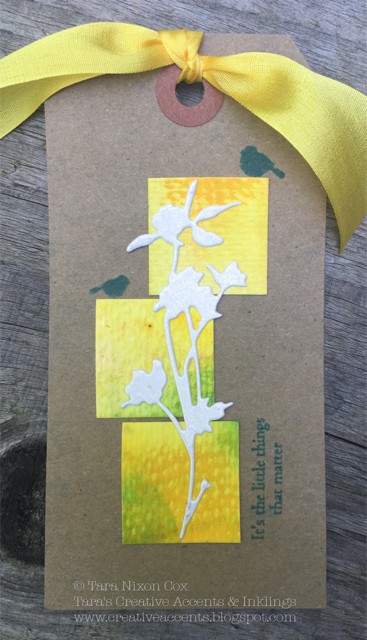
It’s always nice to have a bonus project that takes less than 5 minutes to finish up 🙂

Hope the week ahead is filled with JOY for you… and peace for our world.  We could use some of both right now!

Inky hugs,

Tara

Tuesday with Tara {take 54} Read More »

Tuesday with Tara {take 53}

Happy Tuesday!  I hope you enjoyed the holiday weekend and whatever celebrations you took part of for Canada Day or the 4th of July!

thankyou kitty (2)

I had a request for thank you card ideas, so when I saw one on Pinterest that inspired me to make this week’s card, I knew I could turn it into a lovely thank you 🙂  The card itself is very simple, featuring one of the gorgeous Sizzix thinlits dies by Tim Holtz over a pretty watercolor background I created with Color Burst.  The same background design paper is cut into a strip, which gives a strong visual to the front of the card and draws the eye to the three main elements- the lace pattern, the sentiment and the cat!

thankyou kitty (3)

The sentiment is from my new fave Avery Elle “Oh Happy Day” set.  It’s such a pretty script and a really nice mix of sentiments too 🙂

thankyou kitty (4)

I tied a small bouquet to the crazy cat’s tail (the cat crazy stamps by Tim Holtz are just as fun as the birds!) to help him/her show appreciation.  I picked up some color on my craft sheet to add to the flowers since the original white color blended into my cream card base a bit too much.

Here’s another look at the card, the sun is shining bright so it was tricky getting photos without shadows, but I wanted you to see the pretty colors in the full light!

thankyou kitty (1)

This would be a simple card to reproduce multiples of (if I was someone who did that!) and play with a variety of colors, sentiments, cat & bird images…

Hope you have a creative day and that your summer is off to an amazing start!  Thanks to all of you who left kind words on my last post- I’m glad my ‘something different’ inspired you!

Inky hugs,

Tara

Tuesday with Tara {take 53} Read More »

Tuesday with Tara {take 51}

Happy Tuesday!  I realize that the Father’s Day holiday got ahead of me and I didn’t share a masculine card with you in time to help ya out with some inspiration… but I am a firm believer in ‘better late than never’ so here is a simple Father’s Day card idea for you- it’s a versatile one because it shows a simple gift card holder concept that you can use with any edge/border die on a card front!FathersDay

I used a double sided patterned paper (one side was solid black) as the base layer on my card, but you could use cardstock and stamp a design on one side of it to get a similar look.  Select your edge/border die (I used a Tim Holtz On the Edge die) and cut it from a piece that has already been trimmed to the width you want (I tend to leave a 1/4″ edge around my layer, so would trim it 1/2″ narrower than my card is). If you have a sentiment you want to include below the edge, be sure to leave space enough before scoring a fold in your paper.  When you fold this piece forward, you can seal it on both edges to create a pocket.  I used Tim’s Tiny Attatcher here.  Trim your pocket panel to size if needed, and adhere to a card base.  Add a simple stamped image and embellishments to complete the design.  You can see the pocket in action, holding a gift card, in the next photo!

iphone 136

The stamped images are a combo by Tim Holtz & Stampendous.  Hope you can take some inspiration from this card 🙂  Have a creative week!

Inky hugs,

Tara

Tuesday with Tara {take 51} Read More »

Free Shipping Anywhere In Canada