I must admit this post is a sad one for me as it is my last post as a Scrap’N Stamp Design Team member. I am going to miss being a part of this fabulous group of ladies and creating with them each month. I also cannot thank you enough for all your comments and support over the last several years You guys have been a huge inspiration to me!! I am not leaving the crafting world, just taking a step back in the commitments I have made.
You will still be able to find me over on my YouTube Channel Crafting Through the Chaos of Life. In fact, that is where this blog post will take you as my final Design Team submission is a bit of an involved one and easiest to watch on video than to describe.
Some of the items I will be using today are older sets and may not be available, so it gives us a good reason to reach into our stash, blow off the dust and reimagine them for a new use! I will also be using several digital prints in today’s card booklet.
I hope this blog post finds you well! Today I want to share with you my Lawn Fawn Swish & Pop with a Twist card.
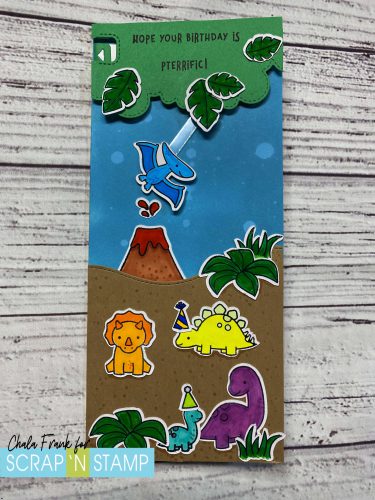
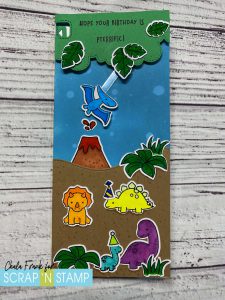
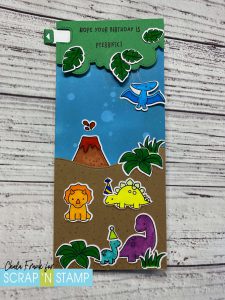
I love this new interactive Swish & Pop die from Lawn Fawn and wanted to see how I could use it with some older stamp sets. As I was flipping through my Lawn Fawn stash I came across the Rawrsome stamp set. I thought these cute little dinos would make an awesome card for a special boy’s birthday that we are celebrating this weekend.
As there are several steps (although they are easy) you may want to watch the video here:
I started by creating a background piece by ink blending on an A2 size card panel with Broken China Distress Oxide Ink and an ink blending brush. I like to do the blending on my Waffle Flower Mini Media Mat as it helps keep my project in place. I then added some water droplets to reactivate the ink and give the background a bit of interest.
Next, I die cut the slider portion from some 120lb cardstock and the interactive arm with some clear acetate. I will then use the “L” shape die. Instead of using this by lining it up in the traditional way on the bottom of the card I will turn it upside down and line it up with the upper left-hand side of the card panel. Once the panel is cut there should be four small holes in your card panel.
I will turn the interactive arm so that the tall portion is on the left and the portion with the two holes is on the right. I will place a brad through the hole in the slider portion and then through the bottom hole of the interactive slider arm and secure the back of the brad. I will then take the second brad and place it through the top hole of the interactive arm and through the second hole in the distress-inked panel attaching the two pieces together (Again, if this all sounds confusing, I encourage you to watch the video linked above). Now rotate the pieces so that the clear acetate arm is pointing down and the pull tab is at the top either to the left or right, whichever way you want it to pull from depending on the element you are attaching to the acetate arm. My image is facing to the right, so I want my pull tab to be on the left-hand side.
At this point, I want to adhere the inked panel to my card base. I decided it would be fun to do a slimline card and adhered it with a tape runner and trimmed the excess. I will then add some foam squares as stoppers around the acetate piece so that the arm can only swing a certain distance across my card.
Now for the little critters! I stamped out the dinosaur images from the Rawrsome stamp set and a few leaf and grass images from the Critters in the Jungle with Memento Tuxedo Black Ink and cut them out with my Brother Scan’N Cut. I kept the colouring simple with my Copic Markers. Next, I adhered the pterodactyl with some Glue dots and then trimmed the acetate arm.
To create the tree canopy I used the Stitched Rolling Clouds Edges from My Favorite Things I die cut a piece of green cardstock that would fit over the interactive mechanism. I also thought that you could use the Falling from the Clouds die frame and trim it to fit. I then used the notch piece for the pull tab and die cut that on the left-hand side of the canopy piece. For the sand portion, I used the Slimline Stitched Hillside Borders from Lawn Fawn and die-cut some craft cardstock.
Before we begin assembling, we need to decide if we want our sentiment to be stamped on the canopy portion of the sand. I decided I like it best on the canopy, thus giving me more room to add lots of dino critters on the bottom. I stamped the sentiment “Hope Your Birthday is Pterrific” in VersaFine Claire Nocturne Ink. I then add further foam squares to the back making sure I don’t add them where they can interfere with the swinging element and secure that to the card base.
It’s time to decorate! My favourite part is creating the scene with the images. I adhered to the sand portion with a tape runner and the rest of the images with Gina K Connect Glue. I think the little party hats are adorable!
The last step is to die cut the little arrow for the pull tab. I pushed the pull tab all the way into the right and trimmed it and then die cut that tab arrow in the same green cardstock and again adhered that with Gina K Connect Glue.
Now it is time to play with it!
I hope you enjoyed today’s card and that it helps you to look at how you can use new and old products together!
Hey guys! I am so glad to be back and today I am channeling Jennifer McGuire!
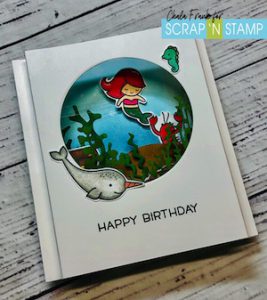
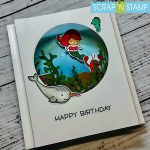
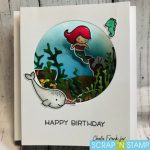
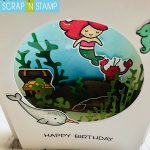
I have been searching through some of my favourite card videos on YouTube for inspiration and I came across Jennifer McGuire’s video on shadow box cards and it look easy enough to make so I thought it would be fun to try for my niece’s birthday. Honestly, I was just hoping that it wouldn’t turn out as one of those epic Pinterest fails!
After searching through my stamp inventory I pulled out several older stamp sets from Lawn Fawn. Mermaid for You, Fintastic Friends and You are Sublime. I love that Lawn Fawn’s stamp sets can be combined to create so many different scenes.
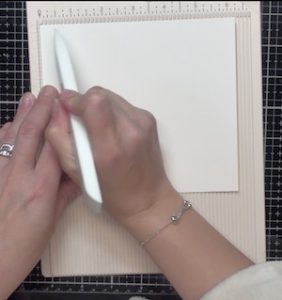
To create the shadow box I used Lawn Fawn’s 80lb White cardstock cut down to 6 1/4″ x 5 1/2″. You will need to cut two of these, one for the front and one for the back. Next it is time to score the cardstock. Laying the piece so that the longest side is horizontal on your scoreboard you will score each side at the 1/2″ mark and at the 1″ mark. Do this to both sides and for both pieces of cardstock (see video below to see how this is done).
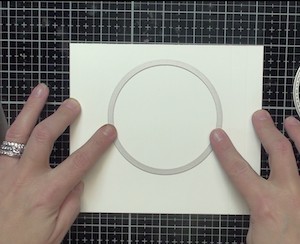
For the window of the shadow box you can use any shaped die you have on hand. I think the next one I make I might try a star…However, this time I stuck to something simple and used the MFT stitched circle dies. I centered the die in the upper portion of the card to leave room for a stamped sentiment underneath. I then ran this through my Gemini Jr. die cut machine. This will be the front of your shadow card.
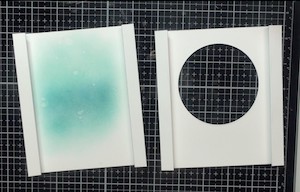
Now moving on to the back of the shadow box. I want this portion to be where the scene is built. To create the underwater feel I will doing some distress ink blending with my Picket Fence Life changing Blender Brushes in the colours Faded Jeans, Salty Ocean and Mermaid Lagoon. To give a more “underwater” water feel I spritzed and sprinkled water onto the Distress Ink blending and then blotted with a microfibre cloth. This left an under water bubble feel to the piece.
I also created a sand hill in brown cardstock with the Lawn Fawn Stitched Hillside Borders die and I added the look of further dimension by ink blending the edges with Ground Espresso. I also found some seaweed dies (I am not sure where I got these from…) and die cut from two different colours of cardstock and also did some Distress Ink blending on those as well.
Now it is time to fold the edges of the cards. For the back of the card you will fold in at the innermost score lines and then back down. For the front you will do the opposite so that the pieces will fit together. It is probably best to see how I did the on the video below.
The next step is to stamp out your character and scene building images. I did this with Memento Black Tuxedo ink so that I could colour them in with my Copic markers and then I fussy cut them out. Now it’s time to build the scene. Laying out the scene I popped the sand hill up with some square adhesives, and with the help of some reverse tweezers I glued the other elements down with some Tombow Multi Glue. To add to the 3D feel of the card I cut down a thin strip of acetate and adhered the mermaid image onto it with Be Creative Tape and I will suspend this in between the two pieces of cardstock to look like she is floating. I will adhere the two pieces together with more Be Creative Tape and that will finish the card. You can adhere this whole piece onto an A2 card base if you like – but if you are planning to send it in the mail it will add a lot of bulk and you will want to add extra postage! I decide to just write my message on the back.
I hope this card inspires you to create some 3D scenes. Here is the video of how I created today’s card.