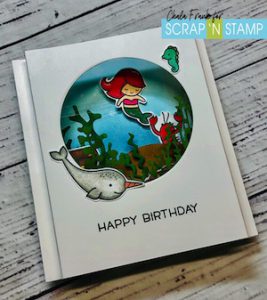
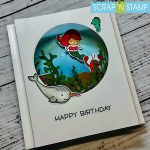
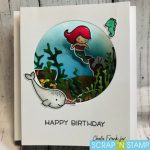
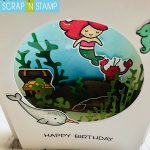
Scratch-N-Stamp
Search

Checkout

Keep up with Sales, New Products and other events at Scrap `n Stamp. Sign up for our newsletter now!

What's New

Hot Deals


3D

I Made a Box…


It’s my first January post here on the Scrap ‘n Stamp blog, so happy 2022! I’ve actually been taking a bit of a crafting break to deal with some other *stuff*, and to get back into the groove, I spent some time making something totally different from the usual – I made a Graphic 45 chipboard box!


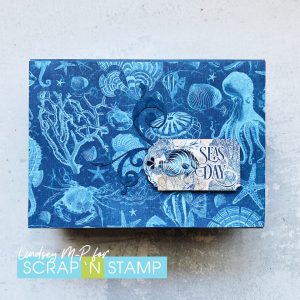
Scrap ‘n Stamp offers a number of different Graphic 45 kits, and I picked the Ocean Blue Kit, which has everything you need to make this box, as well as a mini-album and decorative matchboxes, with lots of paper and ephemera left over.  The full-colour instructions are detailed and easy to follow. Of course, I had to add my own spin, and switched the papers around so that I could have a blue box with a tan interior, rather than the reverse. I did this both because I prefer blues to neutrals, and so it would fit with the January Random Acts of Cardness prompt, BLUE! 😉

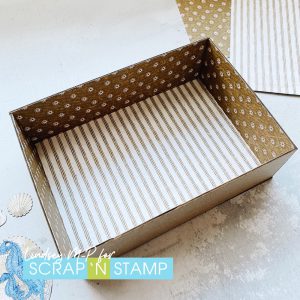
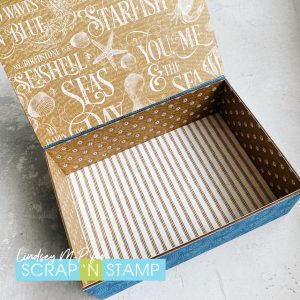
To start, I covered the bottom inside pieces of the box with my chosen papers and adhered them together. I think adhesive choice is important with a project like this, so for paper-to-chipboard I used Nuvo Deluxe Adhesive, and for chipboard-to-chipboard, I used Ranger multi medium matte for extra strength. Here’s the box base:


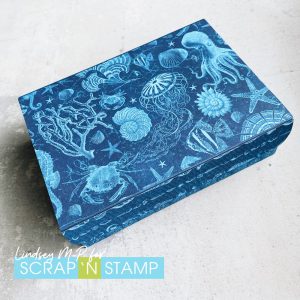
The box lid comes next, with paper on both sides before adhering it to the bottom using a paper hinge. The lid flap is also attached with a hinge. Extra long strips of paper are adhered around the the box to strengthen the sides. At this point, my box was essentially done apart from a few embellishments:


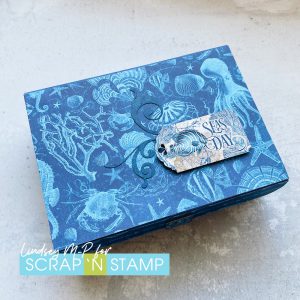
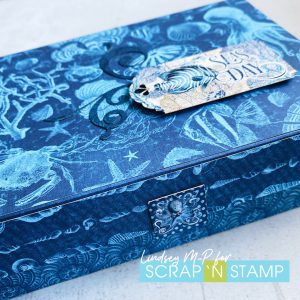
In keeping with my usual style, I kept my embellishments clean and simple, with a few die cuts on the lid, and a reinforced sticker element as a lid clasp. Here’s another view of my finished project, along with a close up of the lid:


This project was quite the departure for me, but it turned out to be a lot of fun to make! Next up, I plan to make some cards using the kit elements to add to my box. I’m thinking one of the matchboxes would be a perfect addition for holding postage stamps! Thanks for checking in today, and I hope you’re playing along with the Random Acts of Cardness Challenge for your chance to win a $50 gift code to the Scrap ‘n Stamp store!


I Made a Box… Read More »

Pop Up Shadow Box Mermaid Card

Hey guys!  I am so glad to be back and today I am channeling Jennifer McGuire!


I have been searching through some of my favourite card videos on YouTube for inspiration and I came across Jennifer McGuire’s video on shadow box cards and it look easy enough to make so I thought it would be fun to try for my niece’s birthday.  Honestly, I was just hoping that it wouldn’t turn out as one of those epic Pinterest fails!

After searching through my stamp inventory I pulled out several older stamp sets from Lawn Fawn.  Mermaid for You, Fintastic Friends and You are Sublime.  I love that Lawn Fawn’s stamp sets can be combined to create so many different scenes.

To create the shadow box I used Lawn Fawn’s 80lb White cardstock cut down to  6 1/4″ x 5 1/2″.  You will need to cut two of these, one for the front and one for the back.   Next it is time to score the cardstock.  Laying the piece so that the longest side is horizontal on your scoreboard you will score each side at the 1/2″ mark and at the 1″ mark.  Do this to both sides and for both pieces of cardstock  (see video below to see how this is done).

For the window of the shadow box you can use any shaped die you have on hand.  I think the next one I make I might try a star…However, this time I stuck to something simple and used the MFT stitched circle dies.  I centered the die in the upper portion of the card to leave room for a stamped sentiment underneath.  I then ran this through my Gemini Jr. die cut machine.  This will be the front of your shadow card.

Now moving on to the back of the shadow box.  I want this portion to be where the scene is built.  To create the underwater feel I will doing some distress ink blending with my Picket Fence Life changing Blender Brushes in the colours Faded Jeans, Salty Ocean and Mermaid Lagoon.  To give a more “underwater” water feel I spritzed and sprinkled water onto the Distress Ink blending and then blotted with a microfibre cloth.  This left an under water bubble feel to the piece.

I also created a sand hill in brown cardstock with the Lawn Fawn Stitched Hillside Borders die and I added the look of further dimension by ink blending the edges with Ground Espresso.  I also found some seaweed dies (I am not sure where I got these from…) and die cut from two different colours of cardstock and also did some Distress Ink blending on those as well.

Moving on to the front of the card, I stamped the sentiment “Happy Birthday” from the Lawn Fawn – Hay There set on the front of the card with Versaclaire Nocturne Ink.

Now it is time to fold the edges of the cards.  For the back of the card you will fold in at the innermost score lines and then back down. For the front you will do the opposite so that the pieces will fit together.  It is probably best to see how I did the on the video below.

The next step is to stamp out your character and scene building images.  I did this with Memento Black Tuxedo ink so that I could colour them in with my Copic markers and then I fussy cut them out.  Now it’s time to build the scene.  Laying out the scene I popped the sand hill up with some square adhesives, and with the help of some reverse tweezers I glued the other elements down with some Tombow Multi Glue.  To add to the 3D feel of the card I cut down a thin strip of acetate and adhered the mermaid image onto it with Be Creative Tape and I will suspend this in between the two pieces of cardstock to look like she is floating.  I will adhere the two pieces together with more Be Creative Tape and that will finish the card.  You can adhere this whole piece onto an A2 card base if you like – but if you are planning to send it in the mail it will add a lot of bulk and you will want to add extra postage!  I decide to just write my message on the back.

I hope this card inspires you to create some 3D scenes.  Here is the video of how I created today’s card.

https://youtu.be/wSxyQ0vW4ps


Pop Up Shadow Box Mermaid Card Read More »

Lawn Fawn & Chibitronics Light up Card

Welcome back to the blog! I cannot believe how fast summer has come and gone! I wanted to hang on to that “Ooooh oh…those summer nights” (Insert your best Olivia Newton John and Jon Travolta voices here) feeling by creating a fun light up card using the Lawn Fawn Butterfly Kisses and Little Fireflies stamps as well as showing you how you can add a new dimension to your cards with Chibitronic lights!

There is a lot going on in this card and I just can’t show you the cool light feature in pictures very well….so I am going to direct you to watch it all come together on the YouTube video below. I will have a list of materials and links on where you can find them at the end of this blog.

https://youtu.be/usfpKPRF4TU

If you liked today’s card please remember to leave a comment here on the blog or on my YouTube channel to let me know! We love to hear your comments and if you have any questions about the techniques we show we would love you help you as well!

Lawn Fawn Butterfly Kisses
Lawn Fawn Interactive Chibitronics Light Up Card

Remember to share your creations over at our Scrap’N Stamp Challenge Page! We love to see what you create!!

Enjoy these last summer days!

Chala, xoxoxo

Lawn Fawn & Chibitronics Light up Card Read More »

Free Shipping Anywhere In Canada