Scratch-N-Stamp
Search

Checkout

Keep up with Sales, New Products and other events at Scrap `n Stamp. Sign up for our newsletter now!

What's New

Hot Deals


SNS Facebook Challenge

Got the Blues?

… or the greens or the reds? Hi, it’s Lindsey here with you on this last day of May, with an inspiration card for today’s Random Acts of Cardness prompt: Monochromatic! As you can guess, I chose to work with blues, and created a little underwater scene:

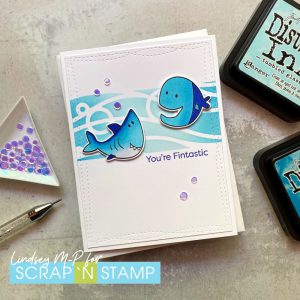
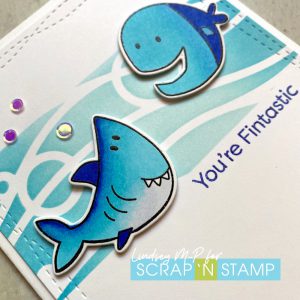
The background is made using the Bubble Wave stencil from Heffy Doodle. I masked and held the stencil in place with Heffy Doodle memo tape ( a great low-tack tape for masking) and blended tumbled glass and mermaid lagoon distress ink for an underwater panel. After die cutting it with a wonky stitched rectangle die, I set it aside while I stamped, heat embossed, coloured and die cut the two critters from My Favorite Things’ Beach Buds set. I also stamped and embossed the sentiment from the same set. After popping up the fishies with foam tape, I added a few bling bubbles and called it done!

Are you playing along with the Random Acts of Cardness challenge? Share your projects to the Scrap n Stamp Challenge page on Facebook, and don’t forget to label your creations with #snschallenge on the social media of your choosing! A lucky random winner each month will receive a $50 gift certificate to the store! Thanks for checking in today, and enjoy your week!

Got the Blues? Read More »

Hero Arts – Color Layering Hummingbird

Welcome to day 22 of May!  The month is flying by!  Speaking of flying….today’s word prompt is birds!  I will be using the beautiful Color Layering Hummingbird stamp from Hero Arts.

I think the hummingbird is one of my favourite birds and I am often excited to find them flitting about my flowers.  Here is a fun fact, did you know they have no sense of smell?!  They do however, have excellent colour vision!  I thought it would be fun to show you two different card looks – one with no colour and one using the layering stamps to play up how you can add the look of dimension to your image with different colours.

For the first card I simply use the first (or base layer) of each stamp image and stamp with Versafine Claire Nocturne ink.  I created masks for the hibiscus flowers.  You can use the Gina K Masking Magic sheets.  I unfortunately ran out so I used  Avery Removable Full Sheet labels.  To help remove the backing of the masking paper I like to use my Tim Holtz Retractable Craft Pick.  Once I had everything stamped out I then used the My Favorite Things Rectangle Wonky Stitch Die and secured the die onto the cardstock with some Thermo-web purple tape and ran it through my Gemini Jr. Die Cutting machine.  To finish off this first card I back it onto some Hero Hues Premium Cardstock – Pitch Black and then adhere it all onto an A2 side folding card base made from 120lb white cardstock with Art Glitter Glue.  I love the look of this simple black and white card.  If this is not your thing, you can colour the image in with Copics, watercolour or even coloured pencils.  However, this layering stamp has made it super simple for us to add beautiful colour and dimension, so that is what I have done for the next card.

The second card I stamped the exact same way as the first card but then stamped each layering image by following the easy to follow instructions on the back of the packaging.  The Distress Ink colours I used are Broken China, Mermaid Lagoon, Peeled Paint, Forest Moss, Abandoned Coral, Fired Brick and Ripe Persimmon. These inks are available in full size and in the minis. When I first started stamping I wanted ALL the colours, so I found it most economical to invest in the mini “First 36″ Bundle. This also is a huge space saver in the craft room!  I have only had to buy re-inkers for two of the cubes and I have had this set for 3 years!

I used the same My Favorite Things Rectangle Wonky Stitch Die and Hero Hues Premium Cardstock – Pitch Black cardstock.  The finishing touch for this card was adding Zig A Wink of Stella – Clear overtop of the hibiscus flowers to give them some sparkle.

You can check out the quick video tutorial by clicking here: https://youtu.be/IXuB4nUNHYE

Thanks for stopping by and enjoy the rest of your day!

~Chala


Hero Arts – Color Layering Hummingbird Read More »

Let’s Foil

TGIF! Not just any Friday, but the Friday of the long weekend and the unofficial start of SUMMER here in Canada, yay! Lindsey here on the blog today with a card for today’s Random Act of Cardness prompt: FOIL. I do have the Gemini FoilPress, and love the combination of foiling and letterpress effect that it gives, but I also enjoy foiling with a stencil and my die cut machine! So easy to do, and adds yet another way of using my stencils. And since it’s the Friday of a long weekend, here’s my card!


Rainbow martinis, yes please! I’m using a Martini Glasses stencil from Picket Fence – it’s out of stock at the moment, but more are on the way! I started by masking off the middle of my card panel, then applied some transfer gel duo through the stencil using this little squeegee (best deal ever!), then left it to dry for an hour or so while I cleaned off the stencil and worked on another card. (Sure, I could have done housework or something, but why? :D) Once the gel had dried and turned clear, I cut a couple of pieces of rainbow shattered glass foil to fit my stencilled image, and ran it through my die cutting machine. And pow, shiny foiled martini glasses! I added the sentiment and embossed it with glitter embossing powder. (I know, I’ve used this sentiment before, but it’s my current favourite!)


Have you tried foiling? I’d love to hear in the comments, or see your foiled creations on the Scrap N Stamp Challenge Facebook page! Don’t forget to tag your posts with #snschallenge on IG and other social media. Have a great weekend!


Let’s Foil Read More »

Free Shipping Anywhere In Canada