Scratch-N-Stamp
Search

Checkout

Keep up with Sales, New Products and other events at Scrap `n Stamp. Sign up for our newsletter now!

What's New

Hot Deals


Memory Box

Tuesday with Tara {take 115}

Happy Tuesday!

I hope you enjoyed our blog hop on Friday, weren’t there some fabulous projects with that postage strip die?  Once I got started with it, I kept going and today I have a little Pumpkin Spice Latte card to share with you…

I’m having some technical difficulties getting my photos to load here on the blog, so if you enjoy the peek at my card, please visit my ‘regular’ (neglected) blog to see more details!


Inky hugs,

Tara


Materials Used:

Tuesday with Tara {take 115} Read More »

STAMPtember Blog Hop!

Welcome to our STAMPTEMBER blog hop!  We’re glad you have joined us and I hope you’ll enjoy the fresh inspiration from the ladies who are participating today!

We were each give a fun postage strip die set by Memory Box to create with- it includes a border die and a strip that cuts out 5 identical postage stamps.  This die is on sale right now for 25% and as you’ll see in the hop, it’s very versatile and a lot of fun!

I decided to make a tri-fold card and use the border die along the right cut edge.  I used my Scor-Buddy tool to measure the first fold (based around the layers I wanted to create behind my tag, it was 3.5″) then marked the second scoring line based on a standard 4.25″ card width. Once the border was cut, I was left with a center panel that is 4.25″ and two side panels that are 3.25″ each.  It’s a tricky fold to photograph… but here’s a look at my ‘closed’ card:

I stamped a small sentiment onto a postage stamp die and adhered it to my right panel, which I inked up with Distress Ink and misted with water for some subtle texture.

My tag features a Distress Oxide background on a kraft tag.  I die cut some words from Tim Holtz/Sizzix and paired them with a paper doll die cut.

The finishing touches on my tag are some yummy brown crinkle ribbon (dyed with the two colors of Distress Ink I used to ink the side panel on my card), a vintage key charm and a mini safety pin which I added a few seed beads to as a fun throwback to my childhood (tell me I’m not the only one who loved making ‘friendship pins’ and trading them)!  The layer of olive corrugated paper adds more fantastic texture, which is always an important element on my projects!

I hope you like my project… and I’m so excited for you to see what everyone else has done!  I love product based challenges like this because it’s so fun to see the variety that comes from working with a single item!  Happy hopping, and happy shopping!  There’s a lot of great product on sale in the store right now and tons that is fun & new!


Now.. check out the other great projects in today’s Blog Hop!  If you find any bad links or get lost along the way, please stop back here, all the links are listed below!

  1. Tara Nixon Cox  (that’s me and you are HERE)               
  2. Karla Yungwirth                  
  3. Amber Trubiak                                  
  4. Nancy Frustaci                                      
  5. Julia Chupik                        
  6. Karen Warner  
Inky hugs,
Tara
Materials Used:

STAMPtember Blog Hop! Read More »

Tuesday with Tara {take 107}

Happy Tuesday!

If you follow us on facebook or have been browsing the online store lately, you may have noticed Scrap n’ Stamp is celebrating Christmas in July with a variety of Christmas goodies on sale all month long!  I decided to join in the fun and pull out a few Christmas supplies (bought in after Christmas sales!) that had not yet seen any love… I’m featuring a stamp by Impression Obsession, dies by Tim Holtz/ Sizzix and watercolor painting  with Colorburst.

I stamped the ornament collage image in black Archival ink on watercolor cardstock, then misted water onto my craft sheet and squeezed a small amount of ColorBurst into the puddle. I mixed and painted with a brush, gradually adding more water and color to get the desired look. I’ve used two different shades of blue, plus a touch of green and a mix of sepia (brown) and cooper (metallic).

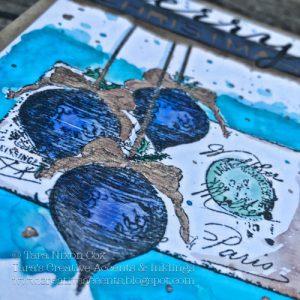
I wanted to add something extra to the ornaments, so decided to try painting on some transparent texture paste.  It’s a unique look, with very visible brush strokes.  Kinda cool… but I think I’ll stick to good ole Glossy Accents next time 🙂  I do love that copper shimmer in the bows, though!  And it looks fabulous in my splatter spots as well!

The title is a combo of a positive cut of the ‘merry’ die by Memory Box and a negative cut out of ‘Christmas’ by Tim Holtz/Sizzix.  I love these together, and added some torn kraft glassine paper behind them to add some extra dimension.

My card is on a 5×7 kraft card base, which framed this larger stamped image & the die cut words quite nicely.  I don’t normally do larger cards like this, but sometimes it’s best for the design 🙂  I hope you like it and I hope you are checking out all the specials on Christmas goodies in the online store!

Next Tuesday we are hoping to be back with another BLOG HOP for you to check out with more fun Christmas inspiration!  Hope to see you then!

Inky hugs,

Tara


Materials Used:

Holiday Words 2 dies by Tim Holtz/Sizzix

Merry script die by Memory Box

Ornament Collage stamp by Impression Obsession

Black Archival Ink

Watercolor Cardstock

Colorburst (shades of blue & brown/copper from brights & earth tones sets)

Kraft Glassine by Tim Holtz

Transparent Texture Paste

Assorted card stock

Tuesday with Tara {take 107} Read More »

Free Shipping Anywhere In Canada