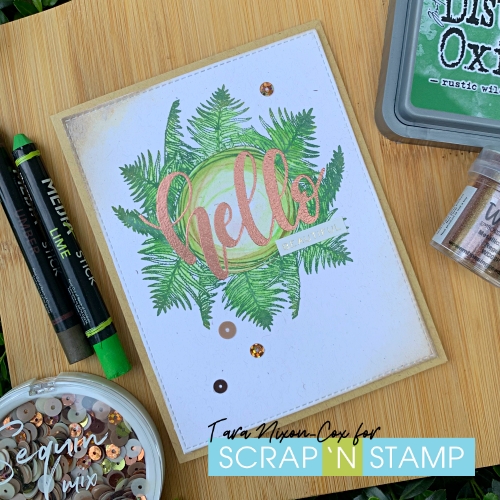
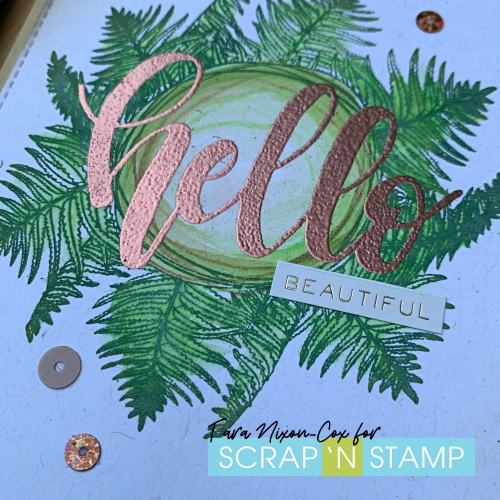
Hello! Today I’m sharing a card with some simple heat embossing using a sentiment from the Letter It Embossing Kit by Ranger together with a pretty Fern Frame by Picket Fence Studios.
I originally planned on a super simple one-layer card, but after stamping the ferns in Rustic Wilderness Distress Oxide Ink, I decided to add a bit of watercolor with some Media Sticks by Dina Wakley. My card base wasn’t heavy enough to dry without warping, so I ended up die cutting a layer to mount onto another card. I can’t tell you how many times my card design changes as I work on it, but it’s almost always for the better 🙂
I chose Metallic Copper WOW Embossing Powder to make the bold sentiment design pop and added some sequins by Picket Fence Studio- this mix is called Moscow Mule and it includes some lovely copper tones!
I decided to add just one more finishing touch, a word from Tim Holtz’s Metallic Sticker Book. It’s got so many great little pieces in it, I think I’ll be using it a lot! My only wish is that it came in copper too 😉
Chala here today and I am sharing my creations for the Random Acts of Cardness Challenge word “Spotlight”. I absolutely love making spotlight cards as they are a simple, yet elegant way to create a lot of cards quickly.
This technique is very easy and can be interpreted in many ways. you can layer a spotlight image or do portion cut outs of images that are coloured, today I am keeping it simple with a one layer spotlight.
For my first card I am using the adorable Scribbly Small Birdies from Dina Wakley. When I first saw these I thought they were just begging to be watercoloured! It has been awhile since I have pulled my watercolours out and sometimes I feel intimidated about getting started again. So, I said to myself “Self, why don’t you use your Zig Clear Colour Clear Brush markers? ” And then I said, “Girl! You are SO smart! What a great idea!” and then I was lall like “I know! Right!?” and then I realized I was having a full blown conversation with myself and my buddy Bob (our bearded dragon) was looking at me like I had completely lost it!
If you are like me (maybe not the talking to yourself crazy part) and doubt your skills, the Zig markers make it super easy as you really just colour with the marker and then add water to help bloom the colour out into the areas that you want.
I used the Canson XL watercolour paper cut down to standard A2 size. I stamped the sweet scribbly bird images with Versafine Onyx Black Ink. This ink is really great for watercoloring as it does not bleed due to it’s natural oil-based pigment. I also love that it dries quickly too! I like to use a stamp platform to do this as the texture of the watercolour paper will definitely make it so you need to stamp a couple of times to get a good image.
I have the set of 48 Zig markers, but you really don’t need that many. The Zig 6 marker set is a great way to try them out if you are first getting started and you can always mix colours on an acrylic block or your work surface. I use my Tim Holtz Glass Media Mat. Also, if you are a lefty….Tim Holtz even has a left handed media mat just for you!!
I decided I wanted my spotlight to be focussed on one image in particular and decided that it would be the centre one. You don’t have to make it in the centre, in fact it is fun to choose an image that is off centred as it draws your eye to a different area of the card.
I stamped all the birds out and then began to colour the image with the markers and added the water. I took my time to make sure I didn’t get two areas next to each other wet at the same time to avoid getting a “muddy” look. I used my heat gun to speed up the drying process. I also really gave myself permission to go slow and enjoy the process and built up the layers of the watercolour. The more I walked away and came back to it, the more I like it. That is probably the best advice I can give someone is if you don’t like what you have done – walk away! Take some time and come back as it looks so much better than you think! I used grey colours to create shadows on the other birds and then used a “dirty wash” on the background so it wasn’t stark white.
Here is a list of the Zig markers I used: Carmine Red (22), Wine Red (24), Bright Yellow (52), Orange (70), Violet (80), Purple (82), Gray (90), Light Gray (91), Dark Gray (95), and Mid Gray (96).
If you follow my creations you know that my absolute favourite border die is the MFT Wonky Stitched Rectangle Die so of course I have used it for both of my cards today.
For my second card I decided to use Copic markers and the Picket Fence Peony Bouquet with a bit of masking. I began by stamping the “non spotlight” images with Versafine Clair Morning Mist. It was a perfect tone to create a subtle image. I then coloured those images with the C9, C6, C3, C2, C0. I then moved onto the flower that I wanted to be the spotlight image. I stamped that image in Memento Tuxedo Black Ink. Using a darker ink for your focal image really helps it to stand out. I used a TON of “RV” family markers. I honestly can’t remember all of the ones used (I think I used 8 different ones!) – but I spent a lot of time with the shading and trying to add different layers of colours to help give the feel of more dimension. I layered the panel onto Lawn Fawn Black Licorice Cardstock and I really think that also helps make the coloured image stand out.
I hope that you enjoyed today’s cards and I look forward to seeing what you create! Remember to post your cards on the Scrap’N Stamp Facebook Challenge Page and tag it with #SNSchallenge for your chance to win a $50 Gift Certificate!
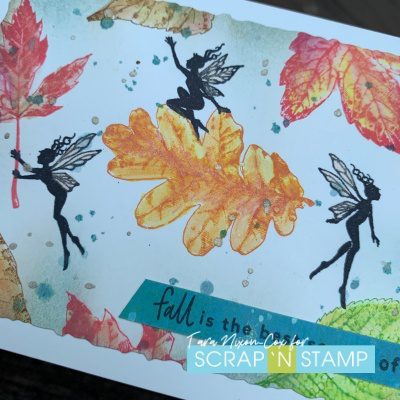
Happy Tuesday! I hope you had a fabulous long weekend celebrating the unofficial end of summer and beginning of fall- and hopefully you got to take in our Live, Love, Lavinia Blog Hop! (If you haven’t hopped yet, there’s still plenty of time to hop & comment for a chance to win!).
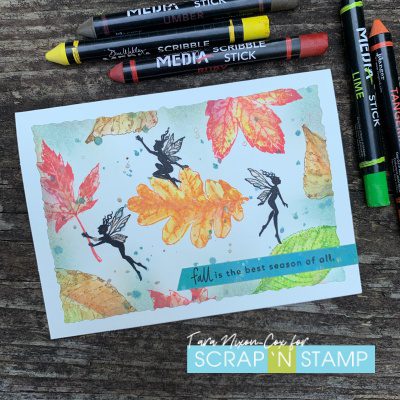
I had a lot of fun with the three dancing fairies in my blog hop project, but I also pictured them dancing on some falling leaves so I decided to pair them with these realistic leaves from the Tim Holtz Natures Wonders stamp set. I stamped them on ivory card stock in a variety of Distress Oxide colors, positioning the fairies around them. I’d never tried combining them before, but I added some shading to the leaves with Dina Wakley Media Scribble Sticks. With the addition of a water brush it ended up to be a really fun combo that I will use again!
Once I finished coloring the leaves I die cut the panel with a deckle edge die and inked the edges with Speckled Egg Distress Ink. I then splattered some Distress Spray Stain the same color over the panel, followed by a bit of metallic spray for extra shimmer.
I finished off the image with a bit of Nuvo shimmer pen on the fairy wings and a bit on the leaves. I stamped a sentiment (from a fab new set by MFT) on a scrap of inked paper leftover from my poinsettia card- I love how it contrasts with the leaves and pulls out the blues in the background. Lastly I layered it all onto an ivory card base.
The finished card is a fun design that is simple enough and lays flat for easy mailing! There are hints of shimmer all over.
I’m looking forward to some more autumn creations and can’t wait to see yours! Be sure to join us in the SNS Challenge group on Facebook and share your creations! Today’s challenge word is Wings!

 I decided to add just one more finishing touch, a word from Tim Holtz’s Metallic Sticker Book. It’s got so many great little pieces in it, I think I’ll be using it a lot! My only wish is that it came in copper too 😉


 I finished off the image with a bit of Nuvo shimmer pen on the fairy wings and a bit on the leaves. I stamped a sentiment (from a