Scratch-N-Stamp
Search

Checkout

Keep up with Sales, New Products and other events at Scrap `n Stamp. Sign up for our newsletter now!

What's New

Hot Deals


Nestabilities

Designer Showcase: Quick & Easy Christmas Cards Using 3D Precut Prints

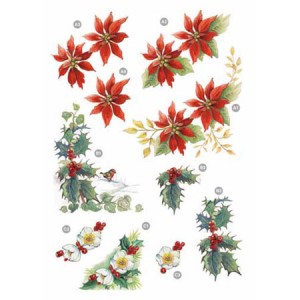
Hi everyone! Today I would like to share with you some quick and easy Christmas cards that were made using the Poinsettia, Holly & Christmas Rose 3D Die Cut sheet. These Die Cut sheets are so easy to use! All you do is pop out the pieces and layer them with foam dots to create gorgeous elements for your cards, gift tags or scrapbook pages. You can use them as they are or add a little glitter, some rhinestones or pearls for a little extra pizzaz.

This sheet will make three separate elements and each element has several layers so you add a lot of dimension to your project when you use them. It is so easy to put them together because each of the pieces is numbered so you know what order to layer them in. Absolutely foolproof!

Here are six different cards all made with this terrific precut sheet and a few extra supplies.

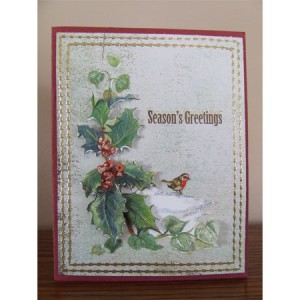
This Holly die cut works beautifully on an A2 card front. Subtle touches of glitter were added to the snow and berries just to highlight them and Decorative Lines Outline stickers were used to frame the card front. Simple & pretty.

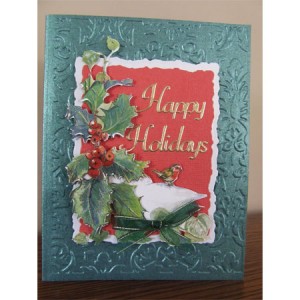
For this next card I used the same image but glammed it up a bit. First I embossed the card front with the Cuttlebug Kassie’s Brocade embossing folder and then I layered the Holly & Bird onto cardstock that had been cut out with Spellbinders Nestabilities Deckled Rectangles. A little bow and an Outline sticker sentiment and it was done.

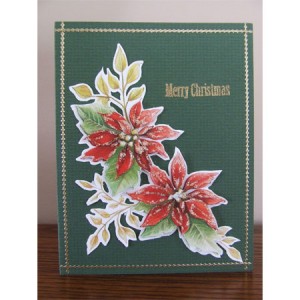
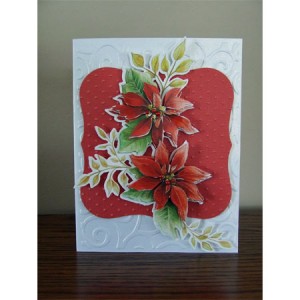
Nothing says Christmas like Poinsettias and these were so easy to use. A simple Outline sticker border and a little bit of Crystal Rainbow glitter was all that was added to this classic card.

Two embossed elements give this card a completely different look. Cuttlebug D’vine Swirl was used to emboss the card front and then the red cardstock was cut out with Spellbinders Labels One and embossed with Cuttlebug  Swiss Dot. Just by changing the colors and the angle of the Poinsettia die cut we were able to get a whole new look.

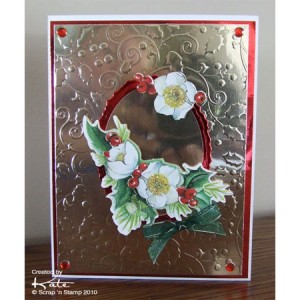
This card was originally featured in our Tuesday Tutorial showing how you can emboss using Dreamweaver Stencils and your Big Shot. The mirrored cardstock  adds an elegant touch.

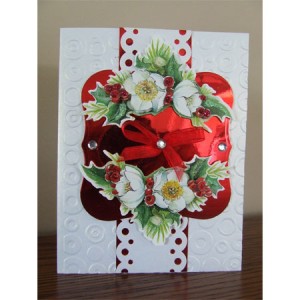
Our last card has it all! Glitter, rhinestones, mirror paper. Everything you need for that wow factor! The card front was embossed with Cuttlebug Spots & Dots and then an EK Success Slim Edger punch with a dotted design was used to create another element that mirrored the circles in the embossing. I love how easy it is to create your own paper ‘lace’ with these border punches. Spellbinders Labels One was used to cut out the large center element from red mirror cardstock and a little Crystal Rainbow glitter was added to the holly and berries for some sparkle. Instead of the little bow you could use an outline sticker sentiment in the center and get a different look.

We have lots of 3D Prints & Precuts in the store so be sure to check them out. They are so easy to work with and as you can see they are very versatile.

Thanks for dropping by today. Have a wonderful week.

© Scrap ‘n Stamp Canada

Designer Showcase: Quick & Easy Christmas Cards Using 3D Precut Prints Read More »

Watercolouring with Markers for Tuesday Tutorial

Hello crafters! It’s Spike here today to show you water colouring with markers for today’s Tuesday Tutorial. This is another basic and easy technique where you can stretch your supplies to go farther! Memento markers are just perfect for this as they are a dye (water) based marker.

Watercolour_Spike1
For today’s card you’ll need:
-140# water colour paper
-Core’dinations Cardstock
-Stardream Paper
-VersaFine Onyx Black
-Inkadinkado Angels Stamp
-Large Scalloped Octagons Nestabilities
-Studio K Embossing Powder
-Watercolour brush
-Memento Markers: Bahama Blue, Grape Jelly, Cantaloupe, Dandelion, Rosebud.
-Rhinestones
-Studio K Spritzes
-EK Slim Line Edger Punch: Fleur de Lis, Dotted Wave
-Craft Heater

1. Stamp the image onto the 140# water colour paper with the Onyx Black VersaFine Ink. This is such a beautiful image! I knew the moment Kate pulled it out that I wanted to work with it! 😀

Watercolour_Spike2

2. Add fine detail embossing powder.

Watercolour_Spike3

3. Then heat with your craft heater. Embossing will protect the image from bleeding when you use water.

Watercolour_Spike4

4. Draw lines with Grape Jelly Memento Marker or if the area is larger you can shade it a little where you’d like the darker areas to be. In this case I wanted to accent where the creases are in her dress.

Watercolour_Spike5

5. Now take your water pen filled with water and “pull” the colour from the coloured line into the blank space.

Watercolour_Spike7

You may have to work it a little bit to get it to the desired shade. If you need more colour you can add a little with your marker and work it in. You’ll also notice the areas where you applied the marker will soften too.

Watercolour_Spike8

Here’s what she looks like after water colouring her wings and halo:
Watercolour_Spike9

And drum roll please…..the finished card…

Watercolour_Spike10

I just had to show you what the card looks like with the flash on, it’s all glitzy and blingy!

Watercolour_Spike11

Stay tuned there’s a lot of exciting things coming to Scrap ‘n Stamp! I can’t say a word but I had a little “taste” yesterday and I know you’ll love it!! 😀

Thanks for dropping in for today’s Tuesday Tutorial as always we’d love to see what you come up with!

Love,

Watercolouring with Markers for Tuesday Tutorial Read More »

Tuesday Tutorial – Creating Vintage with Distress Inks

Welcome everyone it’s Spike here today with this week’s Tuesday Tutorial using Tim Holtz Distress Inks to create a vintage look on embossed paper. I will be using a cream embossed cardstock that has been embossed with the Damask folder Textured Impressions Embossing Folder by Sizzix.

AntiquingTut_Spike9

What many folks don’t know is that Sizzix have their own line of plastic embossing folders. This Damask folder comes in a set with 3 other smaller and elegant folders, it’s a great deal.

AntiquingTut_Spike3

What you will need for this card is:

AntiquingTut_Spike1

-Bouquets of Joy Stamp (Crafty Secrets)
-Small Deckled Rectangles Nestabilities (Spellbinders)
-Ultra Thick Embossing Powder
-Copper Pearls (Kaiser)
-Fleur de Lis Slim Edger Punch (EK Success)
-Dotted Wave Slim Edger Punch (EK Success)
-Textured Impressions Damask Folder (Sizzix)
-Antique Linen Distress Ink
-Tea Dye Distress Ink
-Vintage Photo Distress Ink
-Ranger Inkssentials Ink Blending Tool
-Ranger Inkssentials Blending Foam
-Ranger Inkssentials Non-Stick Craft Sheet
-Paper Flowers
-Cream Cardstock
-Brown Cardstock

Let’s get started:

1. Emboss a 5 1/4″ x 4″ piece of cream cardstock using the Damask folder.

2. Place the cardstock on top of the Ranger Inkssentials Non-Stick Craft sheet. Using the Blending Tool with a blending foam pad, pick up some Antique Linen Distress Ink.

3. Start with the Blending Tool on the craft mat and then with a circular motion apply the ink onto the cardstock about 1 to 1 1/4″ all around. You may have to reapply the ink on the blending foam pad.

AntiquingTut_Spike8

By using the non-stick mat, it keeps ink coverage nice and even.

AntiquingTut_Spike7

4. Change the blending foam pad on the Blending Tool and as in steps 2 and 3 apply the Tea Dye Distress Ink but go in about 3/4 – 1″, depending what you did in step 3. Again, all around the piece.

AntiquingTut_Spike6

5. Change the blending foam pad on the Blending Tool again and as in steps 2 and 3 apply the Vintage Photo Distress Ink but this time just apply ink to the edge.

AntiquingTut_Spike5

6. Here’s the final result. I can’t believe how easy it is to do and the results hit a home run every time!

AntiquingTut_Spike4

What works great with these backgrounds is the Clear Art Stamps line. (click the image to enlarge)
AntiquingTut_Spike2

Thank you for joining me today on today’s Tuesday Tutorial! Happy Stamping!

Love,

Tuesday Tutorial – Creating Vintage with Distress Inks Read More »

Free Shipping Anywhere In Canada